Set up WhatsApp webhooks and integrations
Set up the 3 WhatsApp connections that link Ohanvi to other systems: the Meta webhook, the Developer API and BUSY. At the end, delivery and message events flow into Ohanvi, your own software can send WhatsApp messages, and BUSY invoices go out on WhatsApp.
Before you start
- Your WhatsApp number is connected to Ohanvi. See Connect your WhatsApp number.
- You are an admin, or your role has access to these screens. See Roles and permissions.
- For BUSY: you have an approved template whose body has exactly 1 variable,
{{1}}. See Create a WhatsApp message template.
Where to find these screens
Click your initials bottom-left, then Settings. Under WhatsApp, choose Webhooks or BUSY. The Developer API is under Settings → your name → Developer → Developer APIs.
You can also open any WhatsApp setup screen and use the tabs across the top: Configuration, Webhooks, Business Profile, Website Button, BUSY and Migrate to Ohanvi. BUSY is also listed as BUSY (Accounting) under Connect in the left rail.
| Screen | What it is for |
|---|---|
| Webhooks | Meta sends message and delivery events to Ohanvi in real time. Without it, campaigns never show Delivered or Read, and replies do not reach the Inbox. |
| Developer API | Lets your website, store or backend send WhatsApp messages through Ohanvi with an API key. |
| BUSY | Sends invoice and payment messages from BUSY accounting on WhatsApp. |
Steps
Connect the Meta webhook
-
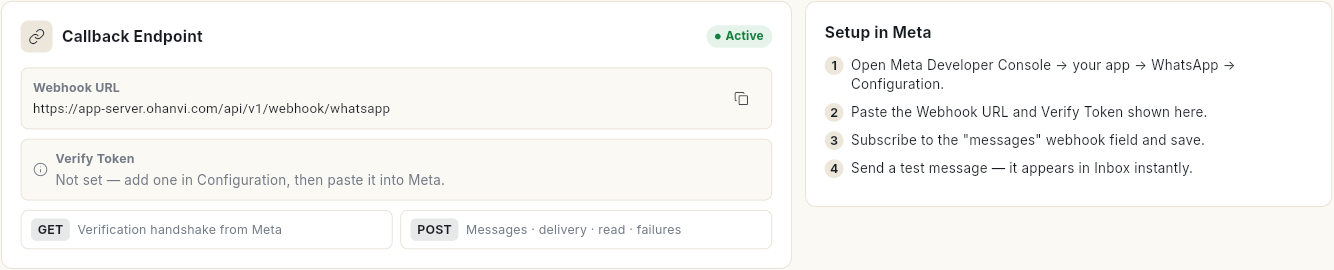
Click your initials in the bottom-left corner, click Settings, select WhatsApp, then Webhooks. The Callback Endpoint card shows your Webhook URL and Verify Token. The Setup in Meta card beside it lists the same steps.
-
If Verify Token shows Not set — add one in Configuration, then paste it into Meta., add a verify token in Configuration first.
- In a new tab, open Meta Developer Console → your app → WhatsApp → Configuration.
- Click Copy next to Webhook URL in Ohanvi and paste it into Meta.
- Click Copy next to Verify Token and paste it into Meta. Save.
- In Meta, subscribe to the messages webhook field and save.
- Send a test message to your number. It appears in the Inbox at once.
- Back in Ohanvi, click the refresh icon next to Webhook Events. The event shows in the list. Until the first one arrives, it says No events yet.
Send messages from your own software (Developer API)
-
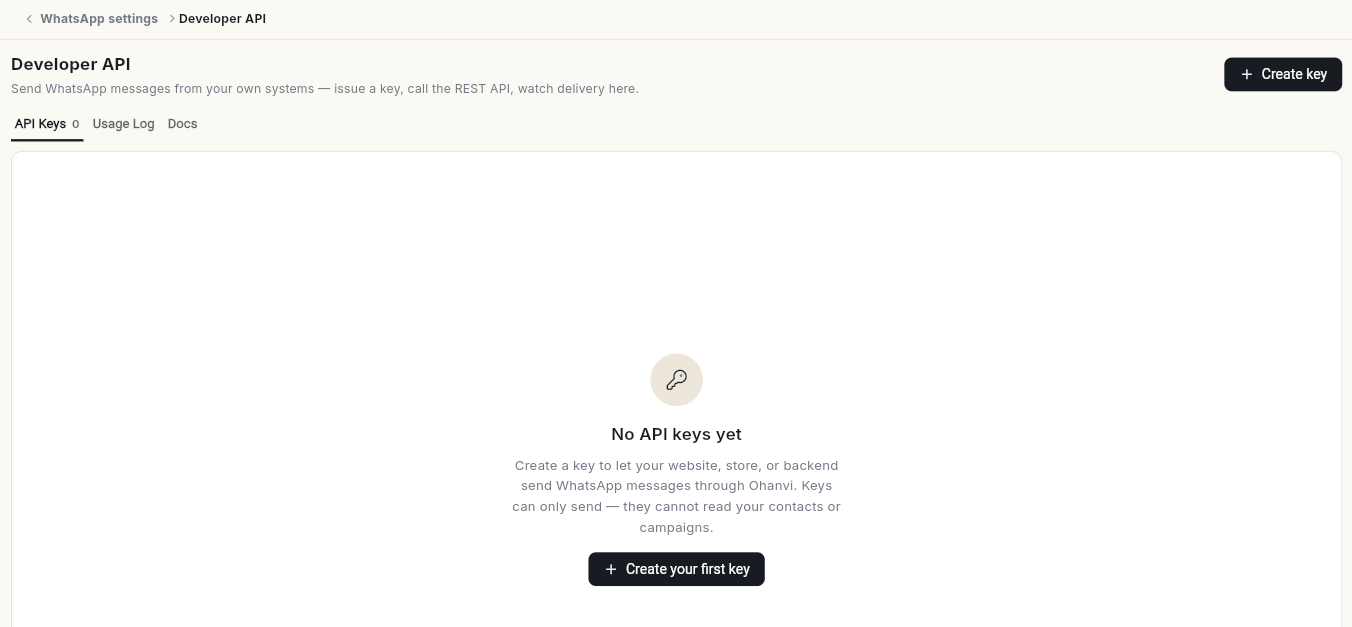
In Settings, click your name, then under Developer open Developer APIs. It has 3 tabs: API Keys, Usage Log and Docs. With no keys yet, it shows No API keys yet and Create your first key.
-
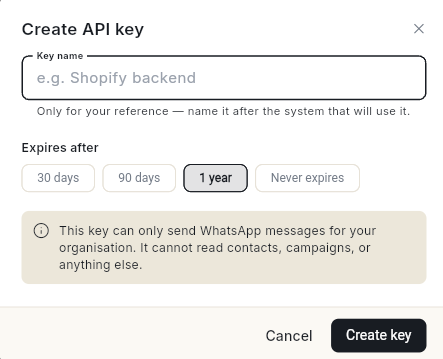
Click Create key. The Create API key window opens.
- Type a Key name, for example
Website checkout. -
Choose Expires after: 30 days, 90 days, 1 year or Never expires. 1 year is picked at first.
-
Click Create key. Your API key — copy it now opens.
- Click Copy key and store it somewhere safe. Tick I have copied the key and stored it somewhere safe. and click Done.
The key is shown only once
Ohanvi stores the key hashed, so it cannot be shown again. If you lose it, revoke it and create a new one.
The key can only send WhatsApp messages for your organisation. It cannot read contacts, campaigns or anything else. Every message sent with it appears in Usage Log as Queued, Sent or Failed, and is charged to your credits like any other message.
For the requests themselves, see the Docs tab and Send WhatsApp messages with the Developer APIs.
To stop a key working, click Revoke on it, then Revoke in Revoke this key?.
Send BUSY invoices on WhatsApp
BUSY → WhatsApp is one way. When BUSY sends an invoice message, Ohanvi delivers it on WhatsApp through your template. It does not sync BUSY data or read your inventory.
-
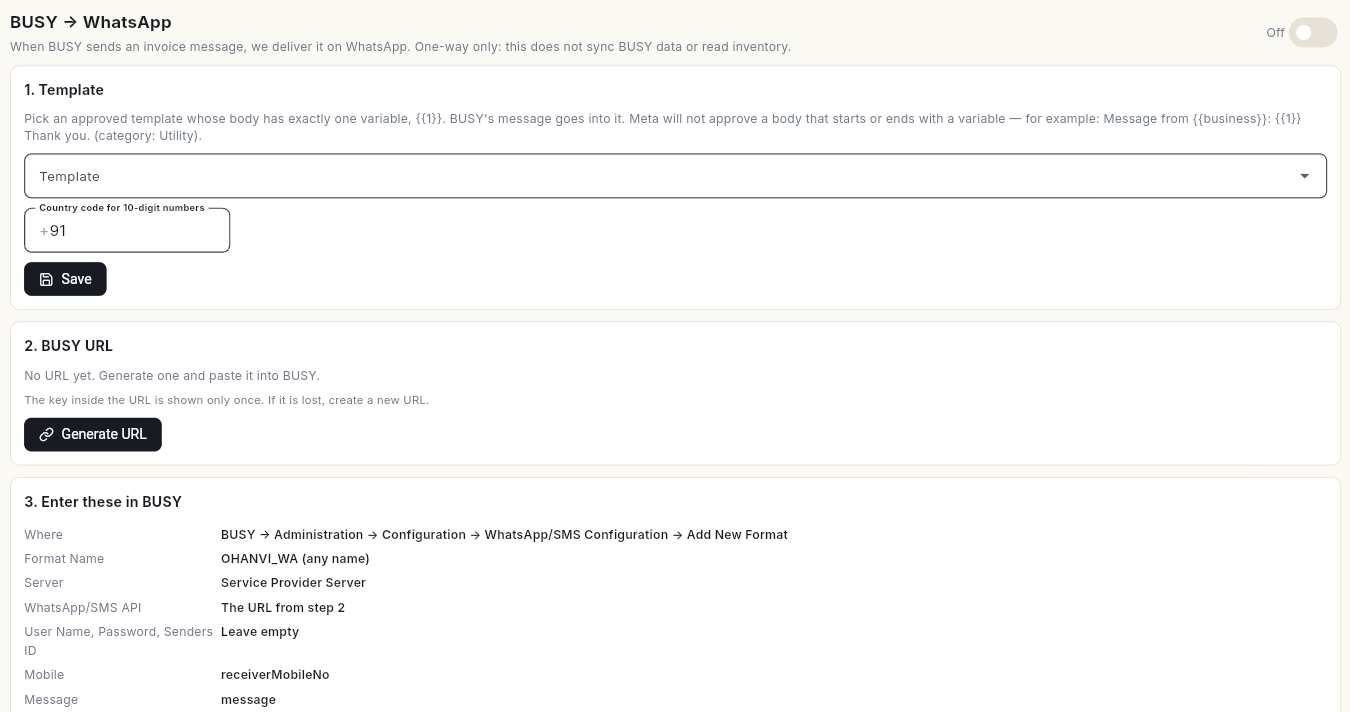
In Settings → WhatsApp, open BUSY. Turn the switch at the top right from Off to On.
-
In 1. Template, choose an approved template whose body has exactly 1 variable,
{{1}}. BUSY's message goes into it. The template cannot have a media header or dynamic buttons. A body likeMessage from {{business}}: {{1}} Thank you.in the Utility category works, with your business name in place of{{business}}. - Set Country code for 10-digit numbers, for example
91, and click Save. - In 2. BUSY URL, click Generate URL. Your BUSY URL — copy it now opens.
- Click Copy URL. Tick I have pasted this URL into BUSY or stored it safely. and click Done.
- In BUSY, open your company, then go to Administration → Configuration → WhatsApp/SMS Configuration → Add New Format. Use the main BUSY window, the one whose title starts with Busy 21, not the BusyAgent window.
-
Enter the values from 3. Enter these in BUSY exactly as shown:
BUSY field Value Format Name OHANVI_WA(any name)Server Service Provider Server. Some BUSY versions do not show this field. Skip it then. WhatsApp/SMS API The URL from step 5, followed by &receiverMobileNo=&message=User Name, Password, Senders ID Leave empty Mobile Under Parameter Name, the name Ohanvi shows, by default receiverMobileNo. Leave Parameter Value empty.Message Under Parameter Name, the name Ohanvi shows, by default message. Leave Parameter Value empty.No. of Other Parameters 0Treatment of Mobile Number Leave as it is Upload PDF or Send PDF link for Invoice Leave off until PDF is set up Separate Internet Call for Each Number During Bulk SMS Ticked Number of Character Allowed per SMS 1000, if BUSY lets you change it. The default160can cut an invoice message short.Parameter names are case-sensitive. BUSY checks that each parameter name is in the URL, which is why the URL ends with
&receiverMobileNo=&message=. Click Save. BUSY clears the form and lists your format by name. -
Tell BUSY to send after each invoice. Go to Administration → Configuration → Voucher Series Configuration. Expand Sales, select your series, for example Main, and click Voucher Configuration.
- Set Send SMS After Saving to Y. In SMS Details, keep Send to Party at Y and click Save. Click Save again on Voucher Series Configuration. For payment confirmations, do the same for Receipt.
- Check that each party who should get the message has a mobile number in its account master. In Mobile No., type the 10-digit number. In WhatsApp No., type it with the country code and no
+, for example919876543210. - In 4. Test, type a number in Send a test to and click Send test. Test message queued. Its status appears under Recent activity. appears.
- Send a real invoice from BUSY to a test party with your own number. Check that it appears under Recent activity. Delete the test invoice and party afterwards so they do not stay in your books.
The test from Ohanvi only checks Ohanvi's side. Only a real send from BUSY proves BUSY is set up.
Anyone with the BUSY URL can send as your business
The URL holds a secret key and is shown only once. If it may have leaked, click Revoke URL. BUSY messages are refused at once.
To replace the URL, click Create new URL, then Create new URL again in the Create a new BUSY URL? window. Use Stop old URL now once BUSY has the new URL. The old URL keeps working for 24 hours, so paste the new one into BUSY within that time.
Optional: invoice PDFs and stock
- Invoice PDF (optional): choose a PDF template (document header) with 1
{{1}}variable. Keep it off, send 1 invoice from BUSY with Upload PDF on, then check Recent activity to see how BUSY sent the file. Pick the matching option and click Save PDF settings. - Stock from BUSY: BUSY cannot be asked for live stock. Export the Stock Status report from BUSY as Excel or CSV and click Upload stock report. The WhatsApp AI agent can then answer "how much of X is left?", as of the last upload. See Set up the AI agent.
Video walkthrough
[VIDEO]
Troubleshooting
| Issue | Cause | Fix |
|---|---|---|
| No events yet on Webhooks | The webhook is not set up in Meta, or not subscribed to messages. | Repeat the webhook steps and subscribe to the messages field. |
| Campaigns stay at Sent and never show Delivered | Delivery events are not reaching Ohanvi. | Check the Webhook URL and Verify Token in Meta match Ohanvi's. |
| Lost the API key | Keys are shown only once. | Revoke the key and create a new one. |
| No approved template qualifies yet. Create one under WhatsApp → Templates. | No approved template has exactly 1 {{1}} variable. |
Create one, for example Message from Sharma Traders: {{1}} Thank you., and wait for Approved. |
| Connect a WhatsApp number first (WhatsApp → Configuration). | No WhatsApp number is connected. | Connect your number, then open BUSY again. |
| BUSY has not called this URL yet. | BUSY is not using the URL yet. | Check the values in BUSY's WhatsApp/SMS Configuration, then send an invoice from BUSY. |
| BUSY says Mobile Parameter name not found in specified API. when you save the format | The URL does not contain the parameter names. | Add &receiverMobileNo=&message= to the end of the URL, with no spaces, then save. |
| Nothing reaches Recent activity after an invoice | The URL was changed while pasting, or Send SMS After Saving is off for the series. | Paste the URL again instead of typing it. It must start with https://app-server.ohanvi.com and contain /send?apiKey=. Then check the series in Voucher Series Configuration. |
| BUSY shows Service Not Running or Error starting SameSeries service when it opens | A BUSY background service for its mobile app is not running. | Click OK. It does not affect WhatsApp messages. |
| BUSY's WhatsApp/SMS Configuration screen says the feature needs an active subscription | Your BUSY License Subscription has ended. | Renew it in BUSY. The date shows in BUSY's title bar as BLS upto. |