Import and sync contacts
Bring your existing contact list into Ohanvi from an Excel or CSV file, and connect the sources that add contacts on their own. At the end, every person is one contact record, and people already in Ohanvi are merged instead of duplicated.
Before you start
- You can see Contacts in the left rail with Import & sync in its panel. If not, ask your admin to give your role access to CRM contacts. See the Settings overview.
- Your list is saved as
.xlsxor.csv. Older.xlsfiles are not accepted. Save them as.xlsxfirst. - The file has at most 100,000 data rows.
- Every person you import has agreed to hear from you. New contacts from a file are marked as opted in to WhatsApp. See Track contact consent.
Steps
See your contact sources
-
Open Contacts in the left rail, then select Import & sync.
-
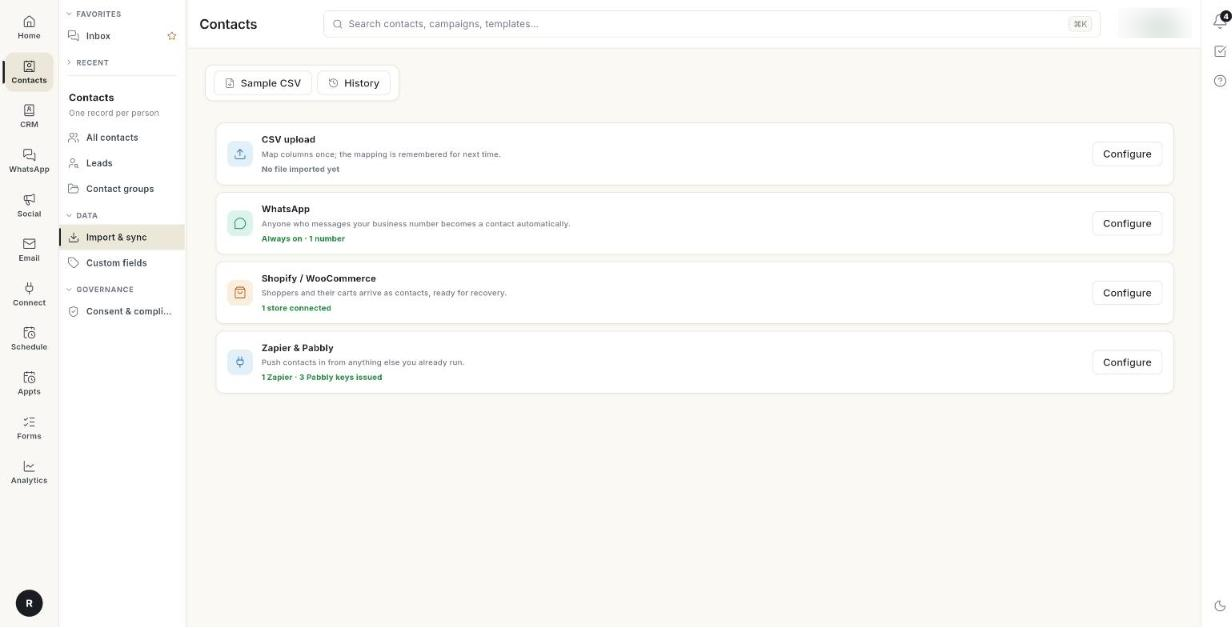
The Import & sync screen lists 4 sources, each with a live status line and a Configure button:
- CSV upload — shows the last run, for example Last run today · 250 rows, 3 rejected, or No file imported yet.
- WhatsApp — anyone who messages your business number becomes a contact. Shows Always on · 1 number or No number connected.
- Shopify / WooCommerce — shoppers and their carts arrive as contacts. Shows 1 store connected or No store connected.
- Zapier & Pabbly — push contacts in from other tools. Shows the keys issued, or No keys issued.
- Click Configure on a source to set it up. WhatsApp opens WhatsApp → Contact. Shopify / WooCommerce opens Connect → Store Connections. Zapier & Pabbly opens Connect → Zapier.
If a line says Status unavailable, Ohanvi could not check that source right now. It does not mean the source is off.
Prepare your file
- Put column names in the first row. Put one contact on each row below it.
- Include a phone number column. It is the only required column. Rows without a phone number are skipped.
- Add any of these optional columns: first name, last name, email, country code and tags.
- Separate several tags in one cell with commas or pipes, for example
Festive|VIP. - Write Indian mobile numbers as 10 digits, with or without
91or+91in front. For other countries, include the country code or put it in a country code column.
Your column names do not have to match Ohanvi's. You map them in the next step. Ohanvi recognises common names on its own, such as Mobile, WhatsApp number, Name, Surname and E-mail.
To start from a template, open the import dialog and click Download Sample CSV. It has 6 columns: Phone Number, First Name, Last Name, Email, Country Code and Tags.
Two sample files
Sample CSV on the Import & sync screen and Download sample CSV in the Import menu download a longer CRM template (contacts-template.csv) with columns such as Designation and Account Name. The importer reads only the 6 columns above plus your custom fields. Other columns are left out of the import [VERIFY: confirm the longer template is intended for this importer].
Upload the file
- On Import & sync, click Configure on CSV upload. You can also click Import → Import from CSV on All contacts. The Import contacts dialog opens.
- Click Choose an Excel or CSV file and pick your file. The footer shows Reading file….
- The mapping step opens with your file name and a count, for example 250 contacts detected. To pick a different file, click Change File.
Map your columns
- Under Header identifiers, each ATTRIBUTE has a dropdown for the COLUMN IN YOUR FILE. Columns Ohanvi recognised are already chosen.
- Check Phone Number (marked *). If it says Select a column, pick your phone column. Import stays disabled until you do.
- For each other attribute, pick its column, or leave — Not in file —.
- If you have custom fields, they appear under YOUR CUSTOM ATTRIBUTES. Map them the same way. See Add custom contact fields.
- Under Options, set Default Country Code. It applies to numbers that have no country code of their own. The default is India (+91).
- Turn on Replace Tags if tags in the file should replace a contact's existing tags. Leave it off to add them alongside.
Import and review the results
- Click Import. The footer shows Validating contacts…, then Importing contacts….
- When it finishes, the Import complete summary opens. It can show:
- N new contacts added
- N already in contacts — details merged
- N repeated in the file — merged
- N rows skipped (no phone number)
- Click Done. The new contacts appear in All contacts.
The CSV upload line on Import & sync now shows this run. To see every past upload with its Total Rows, Processed Rows and Failed Rows, click History. It opens Uploaded Documents, which needs its own access permission.
How duplicates are handled
- Ohanvi matches people by phone number, using the last 10 digits.
9820041122,919820041122and+91 98200 41122are the same person. - A row whose number already exists is merged into that contact. Blank names and email are filled from the file. Existing values are not overwritten.
- Tags from the file are added to the contact's tags, or replace them when Replace Tags is on.
- 2 rows in the same file with the same number become 1 contact.
- A contact you deleted earlier comes back when you import their number again.
Because nothing is added twice, you can safely import the same file again after fixing it.
Imports and follow-ups
An import adds contacts, as described above. It does not start follow-ups for them. An import can be 100,000 people, and follow-ups may send messages, so they never start by surprise.
To start follow-ups for a person, add them one at a time with Add contact. See Manage contacts. To bring in people as leads with a first call, use Import on CRM → Leads. See Import leads and deals.
Import only people who agreed to WhatsApp messages
A contact added by a team member counts as opted in for automatic WhatsApp. Import only people who agreed to hear from you on WhatsApp.
Fix skipped rows
The summary counts skipped rows but does not list them. Find them in your file with the rules below, fix them, and import the file again. Rows that already imported merge with no change.
| Reason a row is skipped | Fix |
|---|---|
| Phone number is required | Add a number, or delete the row. |
| An Indian (+91) mobile number is exactly 10 digits — this one has 9 | Correct the number. Check that no digit is missing and no extra 0 is in front. |
| Phone number is too short — including the country code it must be at least 8 digits | Add the missing digits or the country code. |
| Phone number is too long — including the country code it cannot exceed 15 digits | Remove extra digits, or split 2 numbers in one cell into 2 rows. |
| First name must not exceed 150 characters (also last name) | Shorten the name, or check the column mapping. A long value often means the wrong column was mapped. |
| Email must not exceed 255 characters | Correct the email. |
| Phone number must not exceed 20 characters | Remove text or extra characters from the phone cell. |
Note
The summary always says (no phone number), even when the real reason is a wrong-length number or an over-long field.
Video walkthrough
[VIDEO]
Troubleshooting
| Issue | Cause | Fix |
|---|---|---|
| Could not read the file's column headers — make sure the first row of the file holds the column names. | The first row is empty or not a header row, or the file is damaged. | Put column names in row 1 and save again as .xlsx or .csv. |
| No importable rows found — check the Phone Number column mapping. | Every row failed, usually because Phone Number is mapped to the wrong column. | Map Phone Number to the column that holds the numbers, then click Import again. |
| The file has more than 100000 rows, which is the import limit. | The file is too large. | Split it into files of 100,000 rows or fewer and import each one. |
| These contacts have already been imported — upload the file again to import it once more. | You pressed Import again on a file that already finished. | Close the dialog, open it again and choose the file. |
| Numbers land with the wrong country code | The file has no country code and Default Country Code was wrong. | Add a Country Code column, or pick the right Default Country Code, then import again. |
My .xls file does not appear in the file picker |
Only .xlsx and .csv are accepted. |
Open the file in Excel and save it as .xlsx. |