Connect your WhatsApp number
Link your WhatsApp Business number to Ohanvi so you can message customers from the app. At the end, your number shows as connected, the WhatsApp Dashboard opens, and you can run more than one number from Configuration.
Before you start
- You can see WhatsApp in the left rail. If not, ask your admin to give your role WhatsApp access. See Manage team members, roles and permissions.
- You are the admin of your business in Meta Business Manager, or you can sign in to Facebook as that admin.
- You have a phone number that can receive a text message or a call. For a new number, it must not be linked to any WhatsApp app, personal or business.
- You use the web app. The Facebook popup does not run on mobile. On mobile, use Cloud API credentials instead.
Steps
Choose how to connect
- Open WhatsApp in the left rail, then select Dashboard. Until a number is connected, the Connect WhatsApp screen opens here.
-
Under How do you want to connect?, pick one option:
Option Use it when New number You want to create and verify a new number through the Meta popup. Verified number Your number is already verified on Meta. The access token is fetched for you. WhatsApp Business app You want to keep chatting from your phone. Ohanvi uses the same number for campaigns, bots and the shared inbox. Cloud API credentials You already have a permanent access token and IDs from Meta.
To add a second or third number later, click Add number in Configuration. The same page and options open. See Run several WhatsApp numbers.
You can also start from your profile menu: click your initials, then Settings → Connectors, and click Set up WhatsApp on the WhatsApp (Meta) card.
Connect a new number
- Select New number. Step Business details opens.
- In WhatsApp phone number, pick the country and type the number.
- In Business display name, type the name customers will see.
- In Business website (optional), add your official website. Without it, Meta asks for official documents later.
- In Business category, pick the closest match. Click Next step. Step Link Facebook opens.
- Click Continue with Facebook. The Meta popup opens.
- In the popup, sign in as your Meta Business Manager admin and grant the permissions.
- Select your business portfolio, then create a new WhatsApp Business account and profile.
- Choose Add a new number. Pick Text message or Phone call, then enter the code Meta sends.
- Finish the popup. Ohanvi saves the connection and opens your Dashboard.
Tip
Meta's Get a free WhatsApp number option cannot be used for Click-to-WhatsApp ads, and needs official documents after you connect. Choose Add a new number instead.
Connect a number already verified on Meta
- Select Verified number.
- Fill in WhatsApp phone number, Business display name and Business category.
- Click Continue with Facebook.
- In the popup, select your existing business portfolio, WhatsApp Business account and phone number. No code is needed.
To enter the details by hand instead, click Enter API credentials manually. Fill in Phone Number ID, WABA ID, Meta Business Manager ID and Access Token, then click Save & Connect.
Connect with Cloud API credentials
- Select Cloud API credentials.
- Paste your Permanent access token.
- Fill in WhatsApp Business Account ID (WABA ID), Phone Number ID and Meta Business Manager ID.
- Keep or change the Configuration name. The default is Cloud API.
- Copy the Webhook verify token. Paste the same token in Meta → App Dashboard → WhatsApp → Configuration → Webhooks.
- Click Verify & Connect WhatsApp. When Meta accepts the token, Opening your dashboard… appears.
Use a permanent token
Tokens copied from Meta Developer Console → API Setup expire in 24 hours, and messaging stops. Use a permanent System User token from Meta Business Settings.
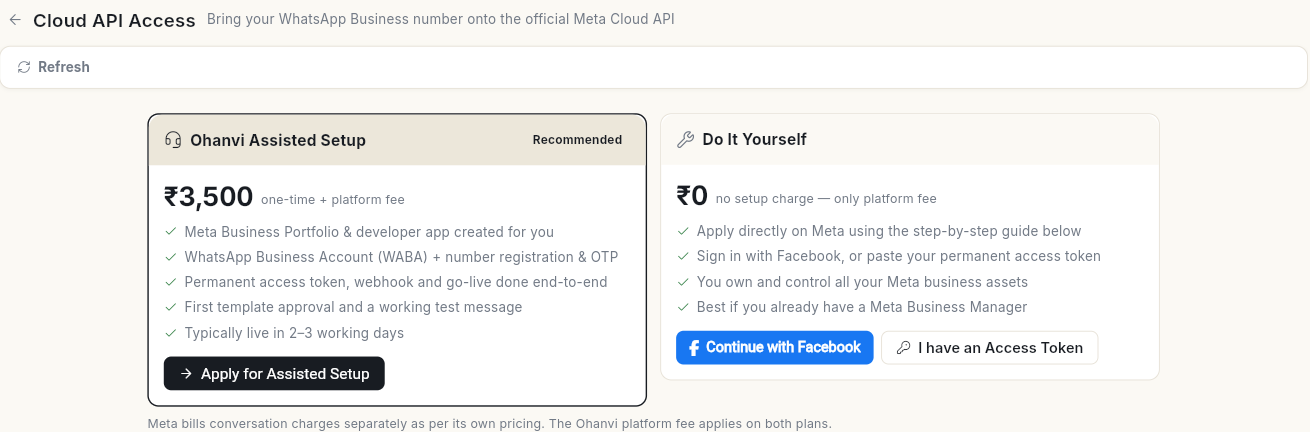
No Meta account yet? Click No credentials? Get Cloud API access →. The Cloud API Access page opens. Choose Apply for Assisted Setup to have the Ohanvi team set Meta up for you, or follow How to apply on Meta yourself.
Activate the number
If Meta has not activated the number yet, the Dashboard shows Connect Account with 4 steps instead.
- Under Connect WhatsApp, connect your WhatsApp Business account.
- Under Request verification code from Meta, pick Text message or Voice Call, then click Send Verification Code.
- Under Enter the verification code, type the 6-digit code and click Verify. The code expires in 10 minutes. Click Resend code if it does not arrive.
- Under Register & activate your number, set a 6-digit PIN for Meta two-step verification. Click Register & Activate.
Keep the PIN safe. You need it if you ever register the number again.
Get help with the Cloud API
Open WhatsApp → Manage → API Key. Cloud API Access offers 2 ways to bring your number onto the official Meta Cloud API:
- Ohanvi Assisted Setup (recommended): Ohanvi creates your Meta Business Portfolio and developer app, registers your number, sets up the access token and webhook, and gets your first template approved. It is usually live in 2–3 working days, for the one-time fee shown on the card. Click Apply for Assisted Setup.
- Do It Yourself: no setup charge. Click Continue with Facebook, or I have an Access Token if you already have a permanent token. Follow How to apply on Meta yourself below the cards: 7 steps, about 30–45 minutes if your business documents are ready.
Meta bills conversation charges separately. The Ohanvi platform fee applies to both.
Manage your numbers
- Click your initials in the bottom-left corner, then click Settings.
-
Select WhatsApp, then Configuration. The page title reads WhatsApp numbers. Each number is a row with a badge, its label, a Default tag on one number, the phone number and its quality rating.
-
Click a number to see its details on the right. Use the buttons at the top of the pane:
- Make default — send campaigns, broadcasts and first messages from this number. The default number shows Default.
- Edit — change the label, the badge colour, the name, the IDs or the token. Click Save.
- Disconnect — stop using this number in Ohanvi. Its chats stay in the inbox.
- To add another number, click Add number at the top right. The Connect WhatsApp page opens with the options above.
- If a number is in your WhatsApp Business Account and customers are writing to it but it is not connected, it shows under In your WhatsApp account, not connected. Click Connect, type a Label and click Connect. No codes or tokens are needed.
The Call settings section of a number lets customers call it. It needs Calling API access approved by Meta first. See Use WhatsApp Calling.
To run more than one number, see Run several WhatsApp numbers.
Video walkthrough
[VIDEO]
Troubleshooting
| Issue | Cause | Fix |
|---|---|---|
| Facebook sign-up did not complete. Please try again. | The Meta popup closed early or permissions were not granted. | Click Continue with Facebook again and finish every step in the popup. Allow popups for app.ohanvi.com. |
| Access token is required. Connect with Facebook or paste your Meta token. | No token came back from Facebook, and none was pasted. | Finish the Facebook popup, or paste a permanent token. |
| Access token expired or revoked on a number | The token was temporary or was removed in Meta. Messages and calls fail. | Click Fix now, then paste a fresh permanent token or reconnect with Facebook. |
| Meta keeps rejecting this request | The saved phone number is not in that WhatsApp Business account, or the wrong ID was saved. | Click Edit phone number and check the number and IDs. |
| WhatsApp broadcasting is restricted | Meta has restricted the number. | Resolve it in Meta WhatsApp Manager, then click Check status again. |
| Connecting via Facebook is available on the web app. | You are on mobile. | Use the web app, or enter your API credentials manually. |