Run Click-to-WhatsApp ads
Run ads on Facebook and Instagram that open a WhatsApp chat with your business. At the end, your Facebook account, Page, ad account and WhatsApp number are connected in Ads Manager, your first ad is created, and every lead it brings shows up in Ohanvi.
Before you start
- Your WhatsApp number is connected to Ohanvi. See Connect your WhatsApp number.
- You manage a Facebook Page and a Meta ad account. No ad account yet? Create one in Meta Business Settings → Ad Accounts.
- You can see Ads Manager in the WhatsApp panel. If not, ask your admin. See Roles and permissions.
What Ads Manager does
Ads Manager runs Meta ads from inside Ohanvi. When someone taps the ad, a WhatsApp chat with you opens, and their message lands in your Inbox. The left column of Ads Manager has these sections:
| Section | What it holds |
|---|---|
| Ads Manager | Your ads, their status, spend, leads and results. |
| Leads | Everyone who messaged you from an ad. Leads land here automatically. |
| Forms | Lead forms used by your lead form ads. |
| Audiences | Custom, website and lookalike audiences to target. |
| Events | Datasets (pixels) that send website events to Meta. |
| Setup | The connection to Facebook, your Page, ad account and WhatsApp number. |
| Performance report | The older performance report, under Reports. |
Steps
Step 1: Connect your Facebook account
- Open WhatsApp in the left rail, then select Ads Manager.
-
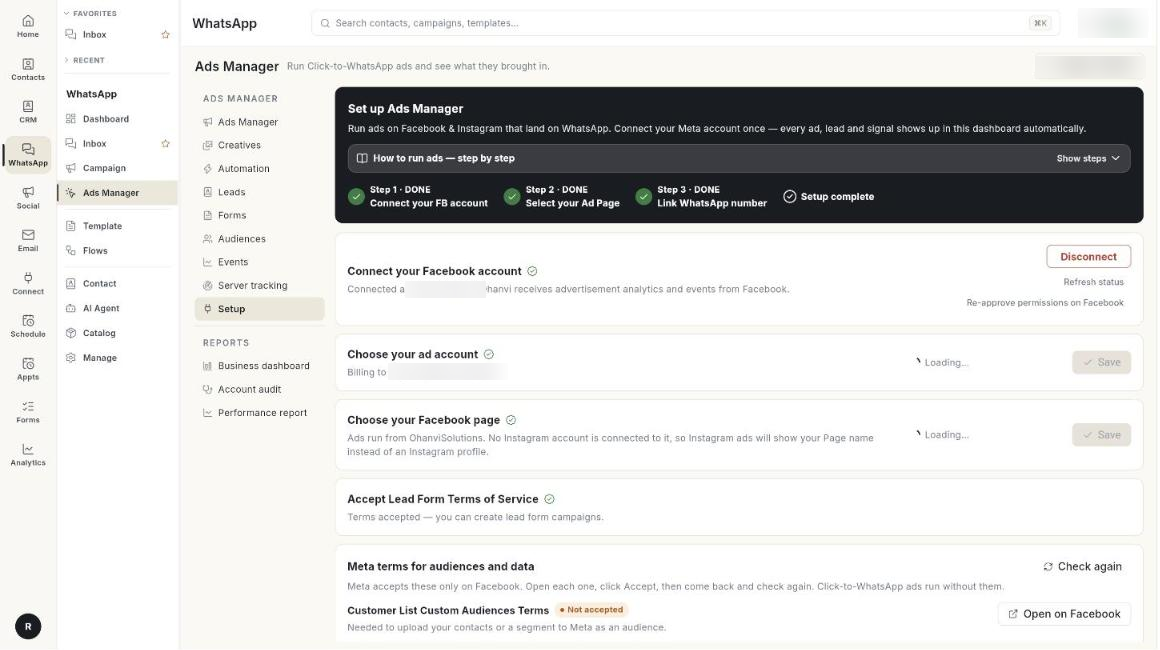
Click Setup. It shows Setup · pending until you finish. The Set up Ads Manager page opens.
-
Click Continue with Facebook.
- Log in with the Facebook account that manages your business.
- On Meta's screen, choose Opt in to all current and future for both Businesses and Pages. The message Facebook connected! appears.
Step 2: Pick your Page and ad account
- Under Choose your Facebook page, pick the Page your ads will run from. If an Instagram account is linked to it, Instagram ads run as that account.
- Under Choose your business portfolio, pick the Meta business that owns your ad account.
- Under Choose your ad account, pick the account your campaigns are billed to.
- Click Save.
- To run lead form ads, tick I accept the Terms of Service for Lead Form Ads and click Accept Terms.
Step 3: Link your WhatsApp number
- Under Link your WhatsApp number, pick the number where leads should land. Only numbers already connected in WhatsApp setup appear.
- Click Send code. Meta sends a code to that number on WhatsApp.
- Type it in Code from WhatsApp and click Verify. The message WhatsApp number linked to your page. appears.
Linking the number to your Page is what makes an ad open a chat with you.
Step 4: Pay for the ads
Choose how Meta is paid for your ad spend:
- Add Meta payment method: add a card on the ad account at Meta. Meta bills the card directly.
- Pay with Ohanvi: Meta bills Ohanvi, and the spend comes off your Ohanvi credits. Set a Spend cap. Meta stops delivering the ads when the cap is reached. Your cap is limited by your credits balance. On the free trial, Pay with Ohanvi is refused, so add a Meta payment method instead [VERIFY: refusal message on trial].
To add credits, click Buy Credits. The Add money to Ads Credits window opens. Type an Amount (₹) and click Pay with Razorpay.
Step 5: Create an ad
-
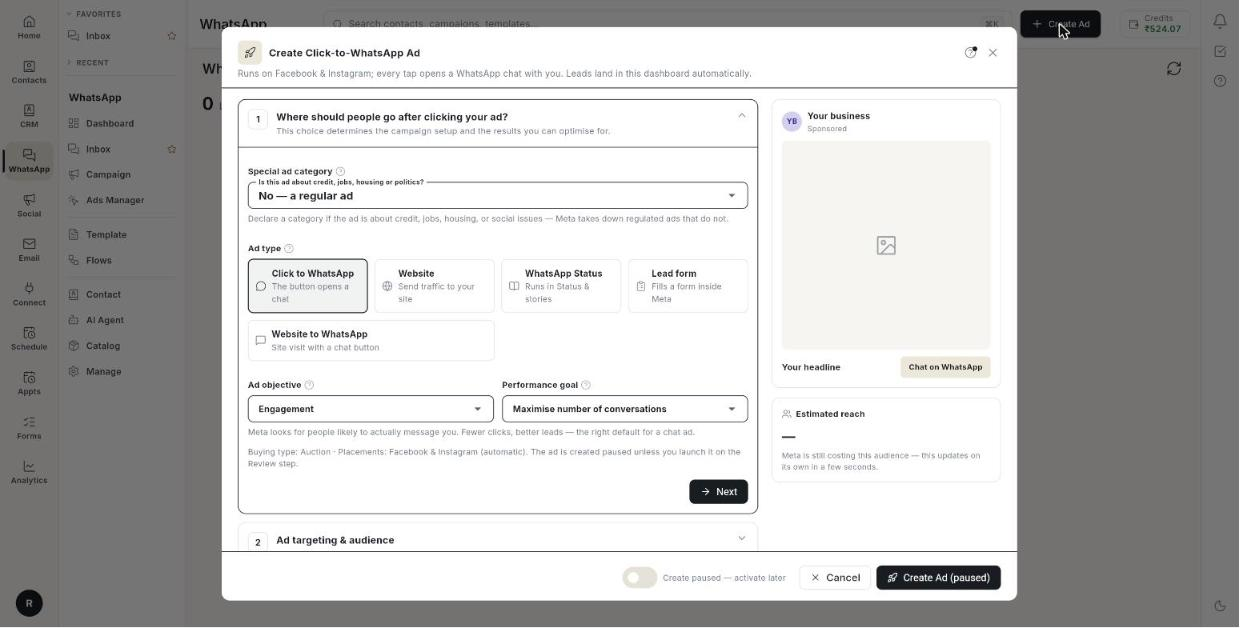
Click Create Ad. The Create Click-to-WhatsApp Ad form opens, with a preview beside it.
-
Under Ad type, choose Click to WhatsApp. Other types are Website, WhatsApp Status, Lead form and Website to WhatsApp.
- Under Ad objective, pick what Meta should optimise for, for example Maximise number of conversations.
- Under Ad targeting & audience, pick locations in Select locations, then gender, age and optional interests. Estimated reach updates as you choose.
- Under Special ad category, choose No — a regular ad, or the category if the ad is about credit, jobs, housing or politics.
- Under Ad budget, choose Daily budget or Lifetime budget, type the amount, and set a Start date and an optional End date. The form shows Meta's minimum: per day for a daily budget, and per day times the number of days for a lifetime budget. A later Start date is kept for both.
- Under Ad creative, write the ad text and headline, and add an image, video or carousel.
- Optional: under Greeting & icebreakers (optional), write the first message of the chat and the tappable questions under it.
- Choose Goes live after Meta approves, or Create paused — activate later.
- Click Launch Ad or Create Ad (paused).
One of these messages appears:
- Ad launched — it is now live on Meta (Ad ID …).
- Ad created in paused state (Ad ID …). Activate it when you are ready to spend.
Meta reviews the ad, usually within 24 hours. Until then it shows In review.
Track your ads and leads
-
Open Ads Manager to see each ad's status, Total Spend, Number of Leads, Cost Per Lead and Click-Through Rate. Filter the ads by All, Active, Completed, In review, Paused or Not approved, and pick the date range at the top.

-
Open Leads to see who messaged you from an ad. Search by name, phone or ad, or click Download Report.
- Reply to them from the Inbox, like any other chat.
Video walkthrough
[VIDEO]
Troubleshooting
| Issue | Cause | Fix |
|---|---|---|
| Please select OPT-IN to all for Business and Page to proceed. | On Meta's screen, not every Business and Page was opted in. | Click Continue with Facebook again and choose Opt in to all current and future for both. |
| Facebook is connected, but ads access is still pending | The login did not include permission to manage ads. | Your Page and WhatsApp number steps still work. Ad creation turns on once Meta approves the permission. |
| Connect your Facebook account in Setup before creating an ad. | Step 1 is not done. | Finish Setup, then click Create Ad. |
| Choose the ad account your campaigns are billed to in Setup. | No ad account is selected. | Pick one under Choose your ad account and click Save. |
| Add your privacy policy URL — Meta requires one on every lead form. | A lead form ad has no privacy policy link. | Fill Privacy policy URL. |
| Ad shows Not approved | Meta rejected the ad. | Change the text or image to follow Meta's ad rules, then create it again. |