Connect an app and use it in a flow
Connect an outside app, such as a store or a CRM, through the connector catalog and use it in your flows. At the end, you have a tested connection and a flow step that calls one of the app's operations as that connection.
Before you start
- You can see Connectors in the Connect panel. This screen is for admins by default. If you do not see it, ask your admin.
- You have the app's credentials, for example an API key, or you can sign in to the app to approve access.
- The app is listed in the catalog. Apps built into Ohanvi, such as your store, WhatsApp and Google Workspace, are connected on their own screens and do not need the catalog. For Google apps, see "Connect a Google app" below.
How connectors work
- A connector (an app in the catalog) describes an outside app and its operations, such as "find a customer" or "create an order".
- A connection holds your account's credentials for that app. Credentials are stored encrypted.
- A flow step picks an operation and the connection it signs in with. Published flows stay on the operation version they were built with, so a catalog change does not alter them.
Steps
Connect a Google app
Google Sheets, Google Calendar, Google Meet, Google Forms and Google Contacts are built into Ohanvi, so they do not go through the connector catalog.
- Open Connect in the left rail, then select Google Workspace under Connectors.
-
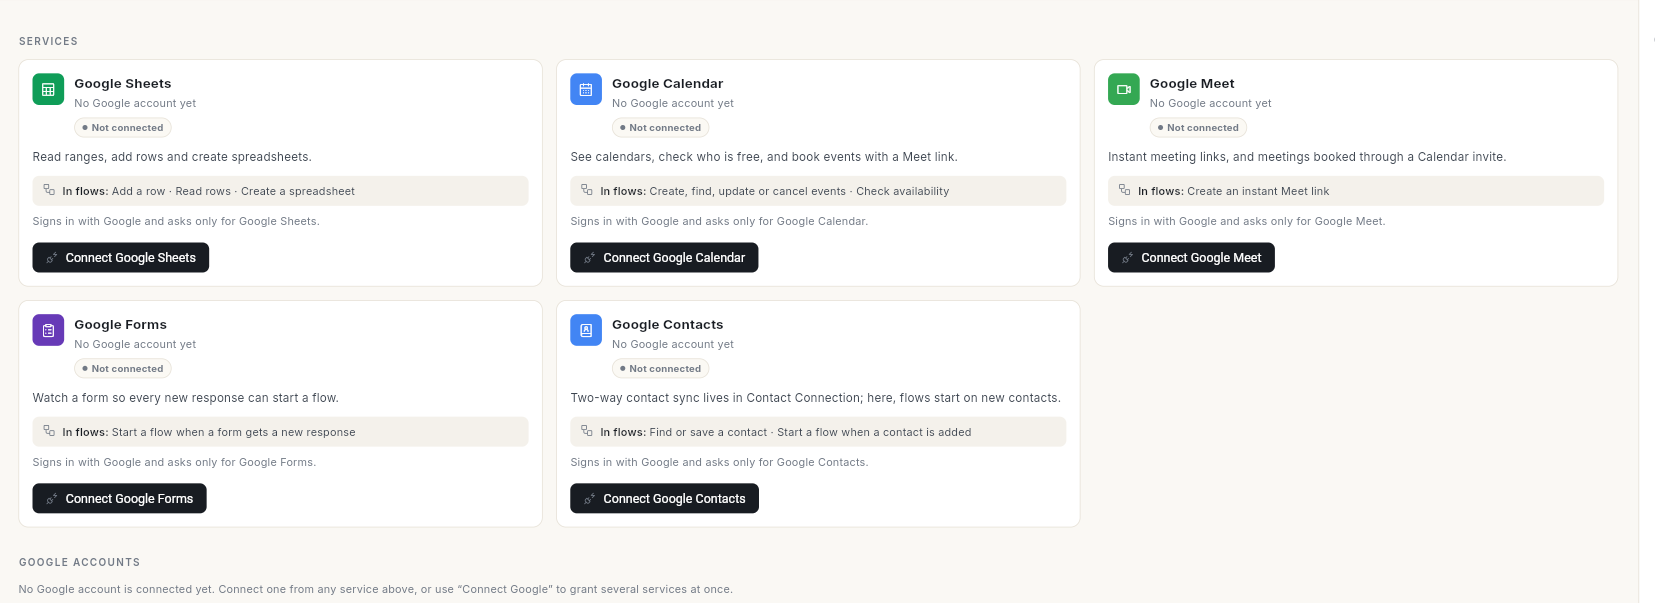
Read each card. In flows says what the app can do in a flow, for example Add a row · Read rows · Create a spreadsheet for Google Sheets. A card shows Not connected until you sign in.
-
Click the button on the card you need, for example Connect Google Sheets. The Sign in with Google window opens.
-
Choose your Google account and allow access. Each app asks only for its own access.
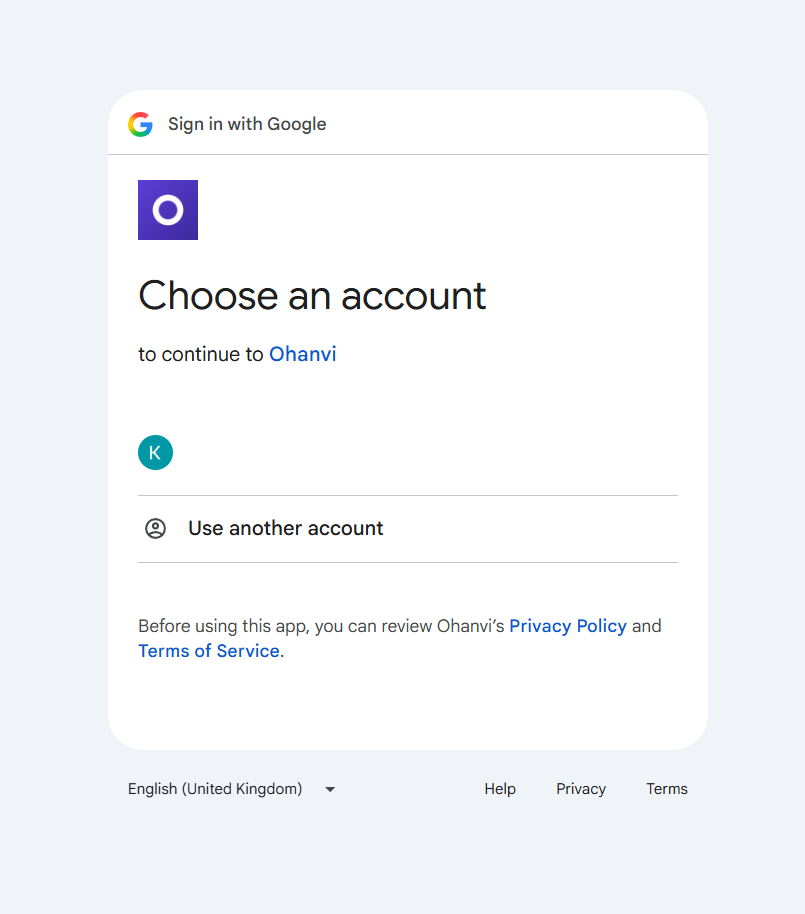
The connected account then shows under Google accounts. To grant several apps at once, use Connect Google.
Ohanvi opens only the spreadsheets and forms you choose for it with Choose from Google Drive, and the spreadsheets it creates. For every option, including disconnecting, see Connect Google Workspace.
Open the connector catalog
- Open Connect in the left rail, then select Connectors under Connectors. The Connectors screen opens.
- Type in Search connectors, or filter by lifecycle (Published, Draft, Deprecated) and scope (Shared catalog, Private connector).
- On the app's card, click Manage. The app opens with the tabs Overview, Operations, Connections and, when the app has them, Webhooks.
Add a connection
- Open the Connections tab.
- Click Add connection. The Connect window opens with the app's name.
- In Label, type a name that tells this account apart, for example
Main store. The label must be unique for the app. - Fill in any fields the app asks for, such as a shop address. Required fields are marked.
- In Credentials (JSON), paste the key in the format shown, for example
{"apiKey": "…"}. For apps that sign in with OAuth, leave it blank. - In Who can build on this, choose Only me, Everyone in this organisation or A specific role. For a role, type it in Role.
- Click Connect. The message Connection saved. appears and the connection is listed.
Sign in to an OAuth app
- On the connection's row, click Connect account. The app's consent screen opens in a new window.
- Sign in to the app and approve access there.
- Return to Ohanvi. In the Approve in the other window message, click Done.
- Check the message. Connected. means the app sent its token.
The consent link expires after 15 minutes. If it expires, click Connect account again.
Test the connection
- On the connection's row, click Test connection.
- Read the message. Looks good. means the app accepted the credentials. The row shows Last tested with the time.
To try one operation for real, open the Operations tab and click the play icon, tooltip Test run, on the operation. Choose a Connection, type the Input (JSON), and click Run. The Test result window shows the HTTP status and the response.
A test run is a real call
Test runs call the app for real. An operation marked Not retry-safe — a retry would duplicate its effect creates a real record each time you run it.
Use an operation in a flow step
- Open the flow in the builder. See Build an automation flow.
- Click + after a step, click All steps, and under Advanced click Action.
- In the Step panel, open This step will and choose the operation. Connector operations appear as the app's name, a dot and the operation, for example
Acme CRM · Find customer. - Under Connection, choose the account in Signs in as.
- Click Advanced and fill in Input mapping (JSON) with the values to send, for example
{ "email": "{{trigger.email}}" }. - Click Save, then Publish.
Values in the mapping can use the trigger and earlier steps. See "Use data from the trigger or an earlier step" in Build an automation flow.
Start a flow from an app
- New records — in the flow's When this runs panel, choose When a record appears. Pick the Trigger operation and the Connection. The first check only marks where to start, so existing records do not start runs.
- Webhooks — on the connector's Webhooks tab, choose the Connection and click Subscribe beside an event. In the flow, choose When a webhook arrives and enter the connection in Connection. If the row reads Registered locally, paste its callback URL into the app. Click the copy icon (tooltip Copy callback URL) to copy it.
Fix or remove a connection
- If a row shows needs re-auth or error, read the note under it.
- Click Reconnect to refresh the token, or Connect account to approve access again.
- To change the label or credentials, open the row's More menu and click Edit.
- To stop using it, click Revoke (clears the credentials) or Delete (removes the connection).
Flows using the connection stop working
After Revoke or Delete, steps that sign in with this connection fail, and webhooks registered on it stop. Past run history is kept.
Video walkthrough
[VIDEO]
Troubleshooting
| Issue | Cause | Fix |
|---|---|---|
| Step panel says No connections yet. Connect the app under Integrations → Connectors before this step can authenticate. | The app has no connection you can use. | Add a connection, then reopen the flow. |
| This step will lists only Ohanvi's own actions | No connector apps are set up, or the catalog did not load. | Set up the app under Connect → Connectors, then reopen the flow. |
| No token arrived yet. If you approved, press Connect account again… | You did not finish approving, or the link expired. | Click Connect account again and approve within 15 minutes. |
| The provider rejected the stored credential. Use Connect account to consent again. | The key or token expired or was revoked in the app. | Click Connect account, or Edit and paste a new key. |
| You cannot publish a flow that uses a connection you do not have access to. | The step signs in with a connection shared only with someone else. | Pick your own connection in Signs in as, or ask the owner to share it. |
| The connection this step uses no longer exists. | The connection was deleted. | Choose another connection in Signs in as, then publish. |