Build ad audiences
Open the Audiences tab to choose who your ads reach and who they skip. At the end, you have an audience on Meta, ready to pick in Create Ad. You can also copy ready-made audiences from the Library and rank audiences by cost per result. Takes 5 to 10 minutes for the first audience.
Before you start
- Your Facebook account, Page and ad account are connected in Setup. See Run Click-to-WhatsApp ads.
- For a Custom audience, you have contacts with a phone number or email. See Manage WhatsApp contacts.
- For a Website audience, you have a dataset (pixel) that records visits. See Track website events.
- For a Lookalike audience, you have at least 1 custom or website audience to copy from.
- Meta's Custom Audience terms are accepted for this ad account. If they are not, the error shows a Meta link. Open it while logged in to this ad account and accept the terms.
Audience types and views
| Type | Who is in it |
|---|---|
| Custom | People from your own list of contacts, phone numbers or emails. |
| Website | People who visited your website and were recorded by a pixel. |
| Lookalike | People who are similar to a custom or website audience. |
The Audiences tab has five views. Pick one from the strip at the top.
| View | What it holds |
|---|---|
| Ohanvi Audiences | Audiences you created in Ohanvi. |
| Fetched Audiences | Audiences that already exist in your Meta ad account. Click Sync to pull them in. |
| Library | Ready-made audiences grouped by funnel stage, and groups kept in sync with your own data. |
| Studio | A builder for interests, behaviours and audience rules, plus interest insights. |
| Top audiences | A ranking of the audiences you have used, by cost per result. |
The first two views show a table.
| Column | What it shows |
|---|---|
| NAME | The audience name. |
| TYPE | Custom, Website or Lookalike. |
| SIZE | The approximate number of people. Shows — until Meta has counted. |
| STATUS | The audience status, for example READY. |
| CREATED | The date it was created. |
Steps
Find an audience
- Open WhatsApp in the left rail, then select Ads Manager.
-
Click Audiences.
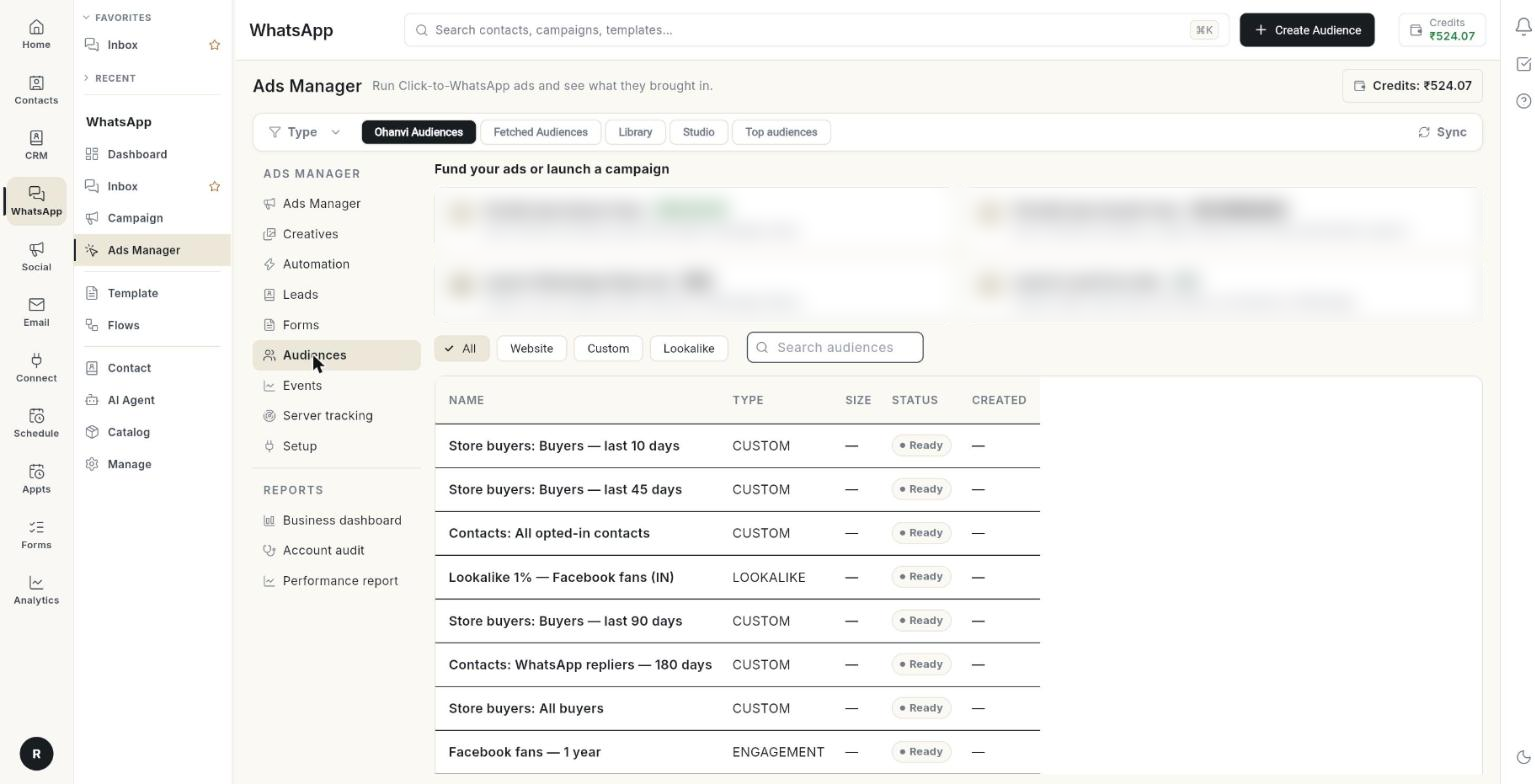
-
Click a type chip to narrow the list: All, Website, Custom or Lookalike.
- Or type in the Search audiences box.
- For audiences that already exist at Meta, open Fetched Audiences and click Sync. If the list was never synced, the tab shows No audiences fetched from the Meta ad account yet — tap Sync to pull the ones that already exist there.
Create a custom audience
- Click Audiences, then click Create Audience. The Create Audience window opens.
- Type an Audience name *. Use a name that says who is in it, for example
Buyers last 90 days. - Choose Custom under Type.
- Under Who goes in this list, choose My contacts to add every contact that has a phone number or email. Or choose Paste a list.
- For Paste a list, type or paste into Phone numbers or emails. Use one phone number or email per line.
- Optional: type a Description (optional).
- Click Create. The window shows progress such as Collecting your customers… and Sending 120 people to Meta…. It closes when the audience is created.
Rules for the pasted list:
- Commas and spaces are ignored.
- Duplicates are removed.
- Numbers and emails are scrambled before they leave Ohanvi. Meta sees a match, never the number or email itself.
Meta needs a few hours to build the audience. A very small list may never match enough people to be usable.
Create a website audience
- Click Audiences, then click Create Audience.
- Type an Audience name *.
- Choose Website under Type.
- Under Meta Pixel *, choose the pixel (dataset) whose visitors you want to reach again. If the list is empty, create a dataset in Events first.
- Under Include visitors who *, choose Viewed any page, Viewed a product or service, Added to cart or Purchased.
- Under Keep visitors for, choose 7, 14, 30, 60, 90 or 180 days. Meta removes a person after this period.
- Optional: type a Description (optional).
- Click Create.
Create a lookalike audience
- Click Audiences, then click Create Audience.
- Type an Audience name *.
- Choose Lookalike under Type.
- Under Modelled on *, choose the audience Meta should copy. Only custom and website audiences appear.
- Move the Audience size slider from 1% to 20%.
- Under Country to find similar people in, type a 2-letter country code. The default is IN.
- Optional: type a Description (optional).
- Click Create.
The slider sets how close the match is:
- 1% is the smallest and most similar audience.
- 2% to 3% is balanced.
- 10% or more is a wide, looser match.
Use a ready-made audience from the Library
The Library holds audiences you can create in 1 click. They are grouped by funnel stage.
- Click Audiences, then click Library.
- Pick a stage tab:
- Prospecting: new people who look like your best customers.
- Re-engagement: people who know you but have not visited or bought.
- Retargeting: people who showed intent and did not buy.
- Retention: your customers, to bring them back and grow their spend.
- Click Popular to see the most used audiences from every stage.
- Type in Search audiences to search all stages.
- On a card, click Create. Some cards ask for one value first:
- Number of days (1–365), for example 45. Website cards allow 1 to 180 days.
- Part of the page URL, for example
/collections/shoes. - Pixel event name, for example
Subscribe.
- Wait for the message "Name" created on Meta, with its exclusions. The card now shows a Created tag.
- Click Use in ad to open Create Ad with this audience filled in.
A card can show these details:
- Leaves out: the groups the audience excludes, such as past buyers.
- Modelled on 5,000 people or 5,000 people in the group: the size of the source group.
- Add another: a card with a value can hold more than one version, for example 30 days and 90 days.
- A yellow note: the reason a card cannot be created yet, for example no source data.
Remove an audience from the Library
- Find the card.
- Click the bin icon (Remove from library).
- Read the message Removed from the library. The audience stays on Meta for running ads.
Launch several audiences at once
- Tick the box on each card you want, or click Select all in this view.
- Click Launch selected (3). The Launch 3 audiences window opens.
- Choose One ad set per audience to copy an ad set you already run. Only the audience changes. Ad sets are created paused.
- Under Ad set to copy, choose the ad set.
- Or choose All together in one new ad to open Create Ad with all audiences and their exclusions filled in.
- Click Create paused ad sets or Open Create Ad.
- Turn the ad sets on in Ads Manager when you are ready.
You can launch up to 10 audiences at a time.
Keep a group of contacts in sync
Synced from your data sits at the top of the Library. It keeps a Meta audience up to date with your own groups.
- Click Sync a group. The Sync a group to Meta window opens.
- Under Where the people come from, choose the source.
- Under Group, choose the group. Groups already synced show (synced).
- Click Create and sync.
The audience is created and filled. It re-syncs every night. Only people who have not opted out are sent. Phone and email are hashed before they reach Meta.
To manage a synced group, use the icons beside it:
- Click Sync now to sync at once.
- Click Pause nightly sync to stop the nightly sync. Click Resume nightly sync to start it again.
- Click Stop syncing (the Meta audience stays) to end syncing and keep the audience on Meta.
Each synced group shows one status:
| Status | Meaning |
|---|---|
| Synced | The last sync worked. |
| No one yet | The group has no one to send. |
| Failed | The last sync failed. The error shows under the name. |
| Pending | The first sync has not run yet. |
Design targeting in the Studio
Use the Studio to build targeting that is not tied to one ad.
- Click Audiences, then click Studio. The Builder view opens.
- Optional: pick Start from a saved audience to load an earlier setup.
- Type Countries, for example
IN, AE. - Under Include — people matching any of, search interests, behaviours and demographics, and add them. The audience matches a person with at least 1 of them.
- Optional: click Narrow further ("and must also match"). A person must also match this extra box.
- Under Your audiences, choose audiences in Reach. Reach includes everyone in the list.
- Under Your audiences, choose audiences in Exclude. Exclude removes them.
- Read Monthly reach. It shows an estimate such as 1.2M – 1.8M people.
- Type an Audience name, then click Save audience. The message Saved. Pick "Name" in Create Ad → Audience. appears.
- Or click Use in ad to open Create Ad with this targeting.
Meta no longer allows excluding by interest
To leave people out, exclude one of your audiences under Your audiences.
Find the interests that cost least
- In the Studio, click Interest insights.
- Read the columns: INTEREST, AD SETS, SPEND, RESULTS, COST / RESULT and VS AVERAGE.
- Click the add icon (Add to builder) on a row to use that interest.
Interest figures are an estimate. Meta does not report results per interest.
See which audiences perform best
- Click Audiences, then click Top audiences.
- Pick the date range and filters at the top.
- Open Audiences to see each audience with AD SETS, SPEND, RESULTS, COST / RESULT, TREND, VS AVERAGE and EXCLUDED IN.
- Read the verdict in VS AVERAGE: Better than average, About average, Worse than average or No results. Excluded only means the audience was only used to skip people.
- Open Funnel to see spend by stage in % OF SPEND, and LIVE / CREATED ad sets.
- Open Breakdowns to see who responds by age, region and placement, and the top landing pages.
- Click Use in ad on a row to reuse an audience.
An ad set counts in full for every audience it included. A star (*) marks audiences that shared ad sets.
Troubleshooting
| Issue | Cause | Fix |
|---|---|---|
| Audience name is required. | The name box is empty. | Type a name and click Create again. |
| Pick the audience this lookalike should be modelled on. | Modelled on * is empty. | Choose a source audience. |
| No Custom Audience is available yet. Create a customer-list audience first, then refresh. | No source audience exists for a lookalike. | Create a Custom audience, then click Refresh source audiences. |
| Choose the Pixel whose visitors you want to retarget. | No pixel was chosen for a Website audience. | Choose a pixel. If the list is empty, create a dataset in Events. |
| Paste at least one phone number or email, one per line. | Paste a list is empty. | Paste your list. |
| No contacts with a phone number or email were found. | My contacts has no usable contact. | Add contacts, or use Paste a list. |
| Custom Audience terms are still not active for this exact Meta ad account. | Meta's terms are not accepted for this ad account. | Open the link Meta gives you while logged in to this ad account, accept the terms, wait a few minutes, reconnect Meta Ads and try again. |
| No audiences fetched from the Meta ad account yet — tap Sync to pull the ones that already exist there. | Fetched Audiences has not been synced. | Click Sync. |
| Could not load audiences | The list did not load. | Click Retry. |