title: Create an ad description: Fill in the Create Ad form step by step: ad type, objective, audience, budget, creative and first chat message, then launch the ad or save it paused.
Create an ad
Fill in the Create Click-to-WhatsApp Ad form, check the preview, and launch the ad or save it paused. At the end, your ad is In review at Meta, or saved paused. The form has 5 sections and takes about 15 minutes. Meta reviews the ad, usually within 24 hours.
Before you start
- Setup is complete. The Ads Manager page shows Setup complete. See Set up Ads Manager.
- You have ad credits, or a payment method on the Meta ad account. See Set up Ads Manager.
- You have the image or video for the ad. Use a square image, or a 1080×1920 image for Stories and Reels.
- For a Sales ad, you have a pixel or a product catalogue. See Track website events.
- For a lead form ad, you have a privacy policy page that starts with https://.
How the form works
- Click Create Ad in Ads Manager. The form opens with a live preview beside it. The preview looks like an Instagram feed post. It shows your whole picture, the headline and button in a bar under it, and the text folds after about 125 characters.
- Click Save draft at any time to keep the form and come back later. See Save a draft.
- The form has 5 numbered sections. Click a section to open it. Click Next to finish it and open the next one. A finished section shows a tick.
- A small (i) icon beside a field opens a short hint.
- Section 5 changes with the ad type. It is Greeting & icebreakers (optional), Landing page or Lead form.
What you choose first
The Ad type decides what happens when someone taps the ad. It also decides which objectives and goals you can pick. Choose it first.
Choose an ad type
| Ad type | What happens on tap | Objectives you can pick |
|---|---|---|
| Click to WhatsApp | The button opens a chat with you. | Awareness, Traffic, Engagement, Sales |
| Website | Sends traffic to your site. | Awareness, Traffic, Sales |
| WhatsApp Status | Runs in Status and stories. | Awareness, Traffic, Engagement, Sales |
| Lead form | Fills a form inside Meta. | Leads only |
| Website to WhatsApp | Site visit with a chat button. | Awareness, Traffic, Sales |
Choose an objective and goal
The Ad objective is what you buy from Meta. The Performance goal is the exact action Meta optimises for. The goal list is rebuilt when you change the objective.
| Objective | Performance goal options | What Meta does |
|---|---|---|
| Awareness | Maximise reach, Maximise impressions | Maximise reach shows the ad to as many people as possible in your audience. Maximise impressions optimises for visibility and repeated delivery, not clicks or leads. |
| Traffic on a chat ad | Maximise number of link clicks | Buys the cheapest clicks. Expect more taps and fewer real chats. |
| Engagement on a chat ad | Maximise number of conversations, Maximise number of link clicks | Maximise number of conversations looks for people likely to message you. |
| Traffic on a website ad | Maximise landing page views, Maximise number of link clicks | Maximise landing page views needs a pixel on the site. |
| Sales | Maximise number of conversions | Looks for people likely to buy. Needs a pixel or a product catalogue. |
| Leads | Maximise number of leads | The result is the submitted form. |
For an impression ad
Choose Awareness, then Maximise impressions. Do not click Apply this setup in the Suggested first ad box. That setup uses a conversation goal and a ₹100/day test.
Steps
Choose where the click goes
- Open WhatsApp in the left rail, then select Ads Manager.
-
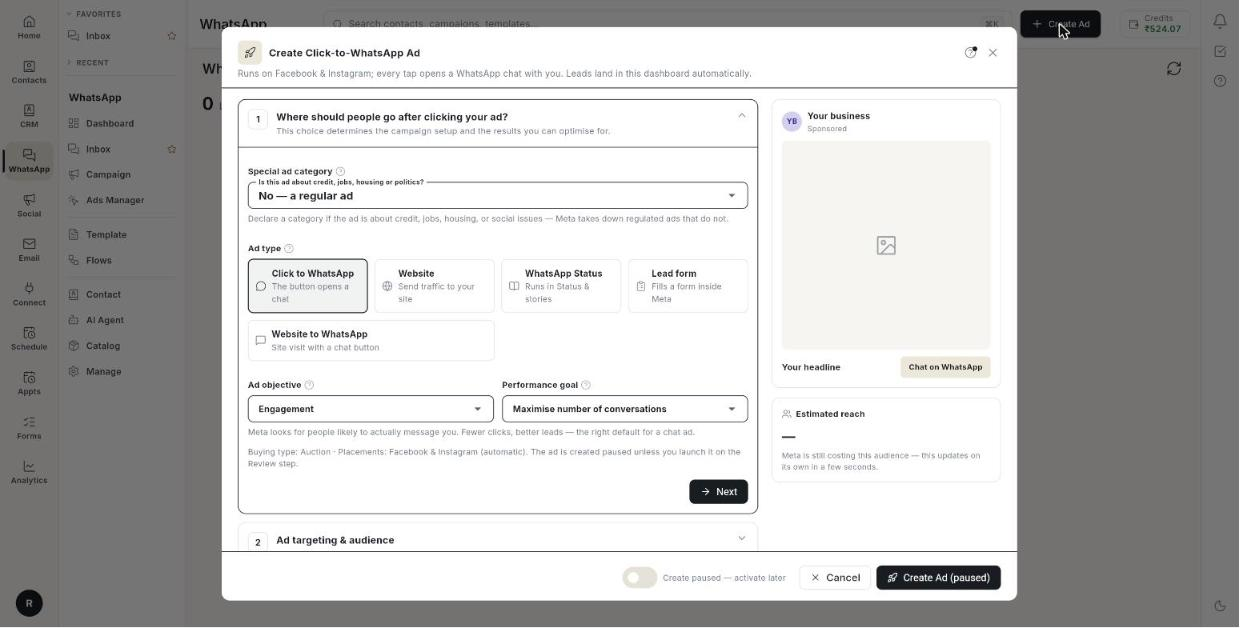
Click Create Ad. The Create Click-to-WhatsApp Ad form opens, with a preview beside it.
-
Open section 1, Where should people go after clicking your ad?.
- Under Special ad category, answer Is this ad about credit, jobs, housing or politics?. Choose No — a regular ad for most ads.
- If the ad is regulated, choose Credit (loans, cards, finance), Employment (jobs, hiring), Housing (property, rentals) or Social issues, elections or politics. The form clears age, gender, detailed and audience targeting.
- Under Ad type, click one card: Click to WhatsApp, Website, WhatsApp Status, Lead form or Website to WhatsApp. The objective and goal lists change.
Special category limits:
- For credit, jobs and housing, locations must cover at least 24 km.
- For Social issues, elections or politics, the Page needs Meta ad authorisation before the ad can run.
- Pick the right category. Meta takes down regulated ads that do not declare one.
Website ads
For the Website type, a Destination block appears below the objective. Type the Website URL (it must start with https://) and pick the Button, for example Learn more or Shop now. The Website to WhatsApp type shows no such field yet, so Next asks for a website URL that you cannot enter.
Pick the objective and goal
- Under Ad objective, choose Awareness, Traffic, Engagement or Sales. A lead form ad has only Leads, so there is nothing to pick.
- Under Performance goal, keep the goal the form picks, unless you need another. See the goal table above.
- Read the line under the two fields. It says what Meta will do with your choice.
- Read the line that starts Buying type: Auction. It is read-only. A Click to WhatsApp ad shows Placements: Facebook & Instagram (automatic). A WhatsApp Status ad shows Placements: WhatsApp Status, plus Facebook and Instagram stories.
- Click Next. Section 2 opens.
Goal notes:
- Traffic buys taps, not customers. It looks cheap in the report and brings the fewest real chats.
- A goal that no longer applies is replaced when you change the objective. Check the goal again after each change.
Set up a Sales ad
Do this when you chose Sales.
- Under Pixel, pick a pixel, or keep Choose a pixel if you use a catalogue only. A Sales ad does not launch without a pixel or a product catalogue.
- Under Conversion event, choose Purchase, Add to cart, Checkout started, Lead or Registration. On a new pixel, pick an event that happens often, such as Add to cart.
- Under Product catalogue, pick a catalogue. Leave it on No catalogue if you do not run catalogue ads. With no catalogue, click Create a catalogue and add products.
- Optional: under Product set (optional), pick one slice of the catalogue.
Sales limits:
- A product set on its own is refused. Fill the catalogue too.
- The form says Pick a pixel for website conversions or a product catalogue for catalogue sales. until you pick one.
Set up a Website ad
Do this when you chose Website.
- Under Website URL *, type the page the tap opens, for example
https://yourshop.com/offer. The form shows The URL must start with https:// if it does not. - Under Button, choose Learn more, Shop now, Sign up, Book now, Get quote, Apply now, Contact us or Download. The default is Learn more.
- Optional: under Pixel (optional), choose No pixel, or pick a pixel. Without a pixel, Meta buys clicks. With one, it buys landing page views.
Set up a WhatsApp Status ad
Do this when you chose WhatsApp Status.
- Open section 2. Find Platforms & placements.
- Check that WhatsApp Status and Instagram Stories are selected. You cannot change them. Meta requires both.
- In section 4, upload a vertical 9:16 image or video. Status and Stories are full screen.
Choose locations
-
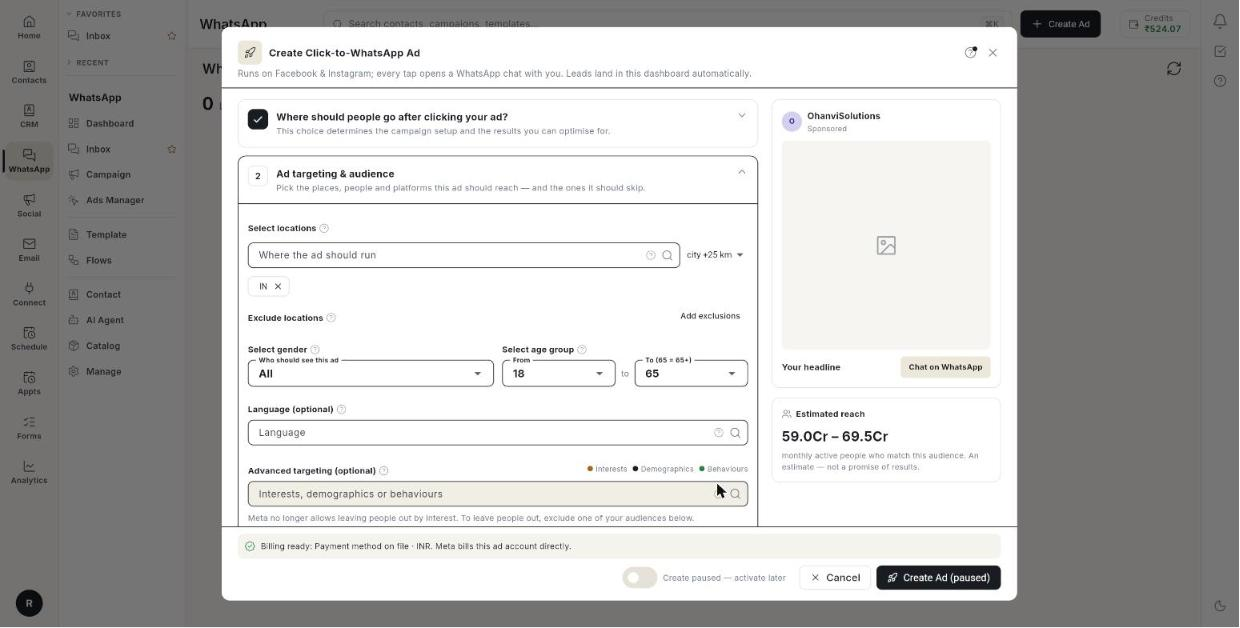
Open section 2, Ad targeting & audience. Estimated reach beside the form updates as you choose.
-
Under Select locations, type in Where the ad should run. Search cities, regions, countries or pin codes, then pick from the list. Add as many as you need.
- Choose the radius in the list beside the box: city +17 km, city +25 km, city +40 km, city +60 km or city +80 km. It applies to the next city you add.
- Optional: click Add exclusions. Under Where the ad must not run, search and pick places to cut out. Click Hide to close it. People in these places do not see the ad.
Location notes:
- Empty means all of India. For a shop, add the pin codes around it.
- The radius applies to cities only. Regions, countries and pin codes use their own boundaries.
Set age, gender and interests
- Under Select gender, in Who should see this ad, choose All, Men or Women. Keep All unless the product is for one group.
- Under Select age group, choose From and To (65 = 65+). The range runs from 13 to 65. For example, from 25 to 55.
- Optional: under Language (optional), search a language, for example Hindi.
- Optional: under Advanced targeting (optional), search Interests, demographics or behaviours, for example online shopping or new parents. Pick two or three. The chips are coloured: Interests, Demographics, Behaviours.
- Optional: under Your audiences (optional), click Reach this audience or Exclude this audience, then pick a list.
- To build a list now, click Create custom or lookalike. The Audiences tab opens.
- Turn on Audience expansion. Meta may go beyond your interests when it expects cheaper results.
Targeting limits:
- A wide age range delivers better than a narrow one.
- Leave Language (optional) empty unless the ad text works in one language only. A language can shrink the audience a lot.
- Many interests make the audience too small. Two or three are enough.
- Meta no longer allows leaving people out by interest. Exclude one of your audiences instead.
- Meta no longer lets you skip people who like your Page. To skip your customers, exclude a customer list under Your audiences.
- Your locations, age and gender still apply when Audience expansion is on.
Special ad categories
For credit, jobs and housing ads, the form clears age, gender, detailed targeting and audiences, and hides Your audiences. The age, gender and detailed targeting fields are hidden.
Choose placements and brand safety
- Under Placements, keep the default. Meta places the ad where it gets results.
- To pick places yourself, click Choose manually. Under Placements (optional), tick Facebook feed, Facebook stories, Facebook reels, Marketplace, Instagram feed, Instagram stories, Instagram reels, Instagram explore or Audience Network.
- Use a shortcut if it fits: Instagram only or Facebook only.
- To undo, click Back to automatic.
- Under Brand safety, choose a level for each of Video & Reels, Audience Network and Feeds: Meta default, Relaxed, Standard or Strict.
- Optional: under Publisher block list IDs (optional), type Meta block list IDs, separated by commas. Leave it empty if you have no list.
Placement notes:
- Choosing manually usually costs more per result.
- Stories and Reels are vertical. A square image shows with bars above and below.
- Stricter brand safety levels cost reach. Meta default keeps whatever the ad account already uses.
Save and reuse the audience
- Under Save this audience as, type a name, for example
Indore home-decor buyers. Name it by who it is. - Click Save. The audience is saved with all choices on this screen.
- Next time, under Saved audiences, use Load a saved audience and pick it.
- Click Next. Section 3 opens.
Set the budget
- Open section 3, Ad budget.
- Under the budget type, choose Daily budget or Lifetime budget. The heading changes to Select per day budget or Select total budget.
- Type the Budget amount in ₹, for example
500for a daily budget. - Read Meta minimum under the box. Raise the amount if it is below.
Budget notes:
- Daily budget spends about the amount each day. The minimum is Meta's minimum per day, for example
Meta minimum: ₹89/day. - Lifetime budget is a fixed total spread over your dates. Its minimum is Meta's daily minimum for every day it runs, so it grows with the number of days. Pick the End date first, then read the box: for example
Meta minimum: ₹623 for 7 days (₹89/day). Before you pick an end date it saysPick an end date to see the total. - Below Meta's minimum, the ad does not deliver, and the form refuses it with the number you need.
Set the dates
- Under Start date, keep Today, or pick a later date. With Today, the ad starts after Meta approves it, usually within a few hours. With a later date, the ad waits and starts that day. This works for a Daily budget and a Lifetime budget.
- Tick Set an end date, then pick the End date.
- Optional: on a Lifetime budget, turn on Run ads on a custom schedule. Tap or drag on the hour grid.
- Choose Viewer's time zone or Ad account's time zone. Use the ad account's clock for your opening hours.
- Read the summary box under the section. It shows the total spend, for example Total estimated budget. Check it before you continue.
- Click Next. Section 4 opens.
Date limits:
- A Lifetime budget needs an end date at least a day after the start. A past date is refused.
- Dates use your own time zone. A start of 5 October means the start of 5 October where you are, not where the ad account is.
- The custom schedule works only on a Lifetime budget. With a daily budget the switch is off and shows Ad scheduling is only available on a lifetime budget.
- Nothing selected on the grid means any hour.
Write the ad text
- Open section 4, Ad creative. The preview beside the form updates as you type.
- Optional: under Write it for me, type a brief, for example
monsoon sale on rain jackets, 30% off. Click Draft. The text and headline fill in. Edit them. Nothing is launched. - Optional: click Load preset to reuse a saved preset. A preset keeps the primary text, headline, description, button and images. Click Save as preset to save your own.
- Type the Ad name. It is required, and only you see it. For example
Monsoon sale — Indore. - Type the Primary text. Put the offer and place in the first line.
- Optional: type the Headline (optional), for example
Chat on WhatsApp. - Optional: type the Description (optional).
- Open Competitor inspiration to see what is working in your own account over the last 30 days: placements, age and gender, regions and your best ads. It does not show other advertisers' data, because Meta does not publish it.
- Pick the Facebook Page *. If the list is empty, type the Facebook Page ID *.
- Optional: type a WhatsApp number (optional) with the country code and digits only, for example
919812345678. -
After you finish, click Save as preset to reuse these fields.
-
Optional: add another version of the text to test. Under Primary text, click Add another primary text (up to 5), or click Add version under Test another version (optional) and type Version 2 text and Version 2 headline (optional). Meta shows the version that works better more often.
- Look at the preview. If you added versions, click Version 1, Version 2 and so on above it to read each one.
Text limits:
- Ad name: up to 255 characters.
- Primary text: up to 2,200 characters. It is required, unless the media is Existing post. Only two lines show before See more.
- Headline (optional): up to 40 characters. Empty means Meta shows your Page name.
- Description (optional): up to 30 characters. It does not always show.
- For chat ads, the Page must have a linked WhatsApp number. Other Pages show no WhatsApp number.
- WhatsApp number (optional): empty uses the number from Setup.
Add the picture or video
- Under Media, choose a tab: Image, Carousel, Video or Existing post. Upload from your media library, paste a URL, or generate with AI. WhatsApp Status ads show only Image and Video.
- For Image, upload one picture, or click Choose from library.
- Optional: under Story & Reels image (optional), upload a 1080×1920 image. Click Remove to delete it.
- For Carousel, click Add card for each card. Add an image to each one. Click Remove this card to delete one.
- For each card, type the Card headline. Type the Card description (optional) and the Card link (optional) if you need them. Card link (optional) shows for website ads only; if left empty it uses the ad's URL.
- For Video, upload the video file. Then add the thumbnail image.
- For Existing post, choose Facebook or Instagram, then pick a recent post from the list. The post keeps its likes and comments, and its own text and picture are used.
- Optional: under Generate the picture with AI, describe the picture. Add a Product photo and a Logo. Pick a tone: General, Festive, Premium, Playful or Minimal. Click Generate image.
- Click History to see earlier images. Pick one to use it.
- Optional: under Test another version (optional), click Add version. Fill Version 2 text and Version 2 headline (optional).
- Optional: for a website ad, type UTM parameters under Tracking (optional), for example
utm_source=meta&utm_campaign=monsoon. - Read the line under the media. It shows the button: Call to action: Send Message (WhatsApp) for chat ads. Other ads show the button from section 1.
- Click Next. Section 5 opens.
Media limits:
- Use a square image. Status and Stories need a vertical 9:16 image.
- Without a Story & Reels image (optional), the square image shows with bars above and below.
- Carousel: 2 to 10 cards, each with an image. Card headline up to 40 characters. Card description (optional) up to 30 characters.
- A video ad without a thumbnail is rejected. Meta does not pick a frame.
- The AI button shows how many images are left today. Nothing is published until you pick an image.
- Each extra version runs as its own ad on the same budget and audience. Meta shifts spend to the better one. Change one thing per version.
- UTM parameters are needed for website ads only.
Write the greeting and icebreakers
Do this for Click to WhatsApp, WhatsApp Status and Website to WhatsApp ads. Section 5 is Greeting & icebreakers (optional).
- Optional: under Use a saved set, pick a saved greeting and icebreakers.
- Type the Greeting message. For example
Hi! Thanks for tapping our ad. What are you looking for?. It is pre-filled in the customer's WhatsApp when they tap the ad. - Under Icebreakers (up to 4), type a tappable question, for example
Show me offers. Add up to 4. - Optional: in the flow list beside an icebreaker, pick a chatbot flow, or No flow.
- Optional: to save the set, type a Set name (to save it for later), for example
Store enquiries. Click Save set.
Greeting limits:
- Greeting message: up to 1,000 characters. Greet, name the offer and ask one question. Empty means Meta sends a default message.
- Icebreakers: up to 80 characters each. People tap instead of typing.
- A flow starts when the icebreaker is tapped. The icebreaker text is added as a keyword on the flow.
- With No flow, an agent answers in the inbox.
Set up a lead form ad
Do this when you chose Lead form. Section 5 is Lead form. A website ad has Landing page instead. It shows Where the click goes with Destination, Button and Measured with, and has no greeting. To open a chat instead, pick Click to WhatsApp or Website to WhatsApp in section 1.
- Under Use an existing form, pick a form from your Page, or choose Create a new form.
- Under What to ask for, tick Name, Phone, Email, City or Company.
- Optional: type a Custom survey question (optional), for example
What product are you interested in?. - Type the Privacy policy URL *, for example
https://your-site.com/privacy.
Lead form limits:
- Reusing a form keeps leads in one place.
- At least one field stays ticked. Every extra field loses people.
- Ask the question that qualifies the lead.
- Meta refuses a lead form without a privacy policy URL.
- Leads land in Ads Manager → Leads when someone submits the form.
Check the ad as Meta shows it
- Under the preview, find See it as Meta shows it. Add the picture first.
- Click a placement chip. With Placements on automatic you see Facebook feed, Instagram feed and Instagram story. With placements chosen, you see those.
- Meta draws the ad with its own crop and layout. If you chose a text version above the preview, Meta shows that version.
- If the frame stays empty, click Open in a new tab.
Each click asks Meta for the preview, so click one placement at a time.
Save a draft
- Click Save draft at the bottom of the form. The message Draft saved. Open Create Ad again to resume it. appears.
- Close the form. Later, click Create Ad again.
- Click Resume draft from … at the bottom to bring back everything you typed, including the targeting, budget, dates, text, versions and greeting. Click Discard to delete the draft.
A draft is kept in this browser only. It does not show on another device. It is removed when you launch the ad.
Launch the ad
- Check the billing strip. Billing ready with the payment method means Meta can bill the account.
- If the strip says No payment method on the Meta ad account, click Open Meta Billing. Add a card or UPI. You can still create the ad paused.
- Use the switch. Create paused — activate later is the default. Goes live after Meta approves sends the ad for review and starts it by itself.
- Click Launch Ad. If the switch is off, the button reads Create Ad (paused).
One of these messages appears:
- Ad launched — it is now live on Meta (Ad ID …).
- Ad created in paused state (Ad ID …). Activate it when you are ready to spend.
Meta reviews the ad, usually within 24 hours. Until then it shows In review.
A live ad spends money
Choose Goes live after Meta approves only when the budget, dates and audience are right. Change them on a running ad and Meta restarts delivery.
Video walkthrough
[VIDEO]
Troubleshooting
| Issue | Cause | Fix |
|---|---|---|
| Select a Facebook Page for the ad. | No Page is picked in section 4. | Pick a Page under Facebook Page *. |
| Pick an end date for a run-once ad. | A Lifetime budget has no end date. | Pick an End date at least a day after the start. |
| Meta's minimum on this account is ₹… | A daily budget is below Meta's minimum per day. | Raise the amount to the minimum shown under the box. |
| Meta's minimum for a … day run on this account is … | A lifetime budget is below the daily minimum times the number of days. | Raise the total, or shorten the run by moving the End date closer. |
| The ad started before the Start date you picked. | You used an older version of the form, which ignored the start date on a daily budget. | Update Ohanvi. A picked start date now holds for both budget types. Pause the ad if it started too early. |
| The URL must start with https:// | The Website URL * uses http://. | Change it to an https:// address. |
| The launch stops on a video ad. | The video has no thumbnail. | Add the thumbnail image under the video. |
| Connections are no longer available when you launch. | An old form skipped Page followers, and Meta no longer accepts that. | Update Ohanvi. The setting is gone. Exclude a customer list under Your audiences instead. |
| Ad shows Not approved. | Meta rejected the ad. | Change the text or image to follow Meta's ad rules. Create the ad again. |
| Connect your Facebook account in Setup before creating an ad. | Setup is not complete. | Finish Setup. See Set up Ads Manager. |