Get started with email marketing
This guide follows one new user from sign-up to their first email in a customer's inbox. Along the way you add a sending address, add a contact, design an email, send it, and set up a welcome email that goes out on its own. It takes about 20 minutes.
Everything on this page was done for real in the app, and every picture is a real screen.
The example we use
We follow a made-up coffee brand, Bloom & Brew. Its first customer is Riya Sharma (riya@bloomandbrew.in). All names and email text below are examples. Use your own.
What you will do
| # | Step | Where | Time |
|---|---|---|---|
| 1 | Confirm your sending address | Email → Campaigns | 3 min |
| 2 | Add your first contact | Email → Contacts | 2 min |
| 3 | Design your email | Email → Email Templates | 5 min |
| 4 | Send your first campaign | Email → Campaigns | 3 min |
| 5 | See who got it | Email → Manage → Send Logs | 1 min |
| 6 | Automate your emails with a flow | Email → Flows | 5 min |
If something on your screen looks different, or a step won't go through, jump to Troubleshooting. Every known problem is listed there with its fix.
1. Confirm your sending address
Before Ohanvi sends anything, it checks that the From address is really yours.
Add the address
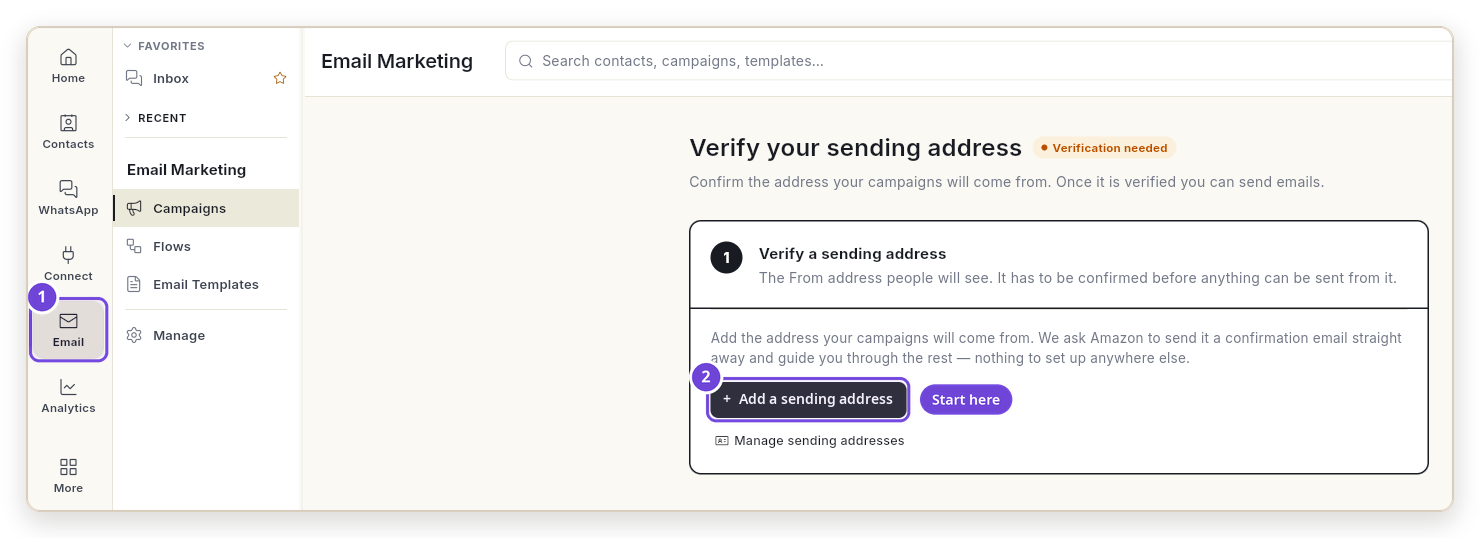
- Click Email in the left rail. The first time, the page says Verify your sending address.
-
Click Add a sending address.
-
Fill in the Add Sender Address window:
# Field What to type Example 1 Email Address The address your emails come from. hello@bloomandbrew.in2 (4 checks) Nothing. Ohanvi checks your domain by itself. All 4 should say In place. — 3 Reply To (Optional) Where replies should go. support@bloomandbrew.in4 From Name (Optional) The name people see in their inbox. Bloom & Brew5 Add Sender Address Click it. — 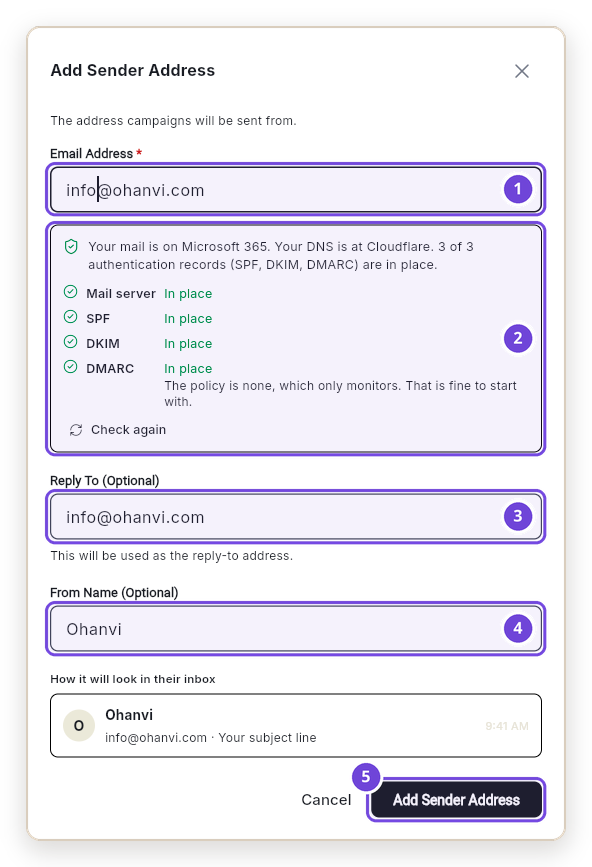
The 4 checks only appear for an address on your own domain. If any of them isn't In place, the button stays grey. See A DNS check isn't "In place".
Type the code
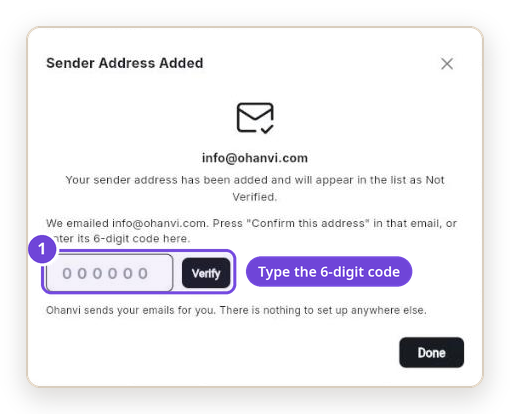
- The window now says Sender Address Added. Ohanvi has emailed a 6-digit code to the address.
- Open that inbox. Find the email from
info@ohanvi.comwith the subject Confirm hello@bloomandbrew.in on Ohanvi. -
Type the code in the box and click Verify. Or press Confirm this address in the email.
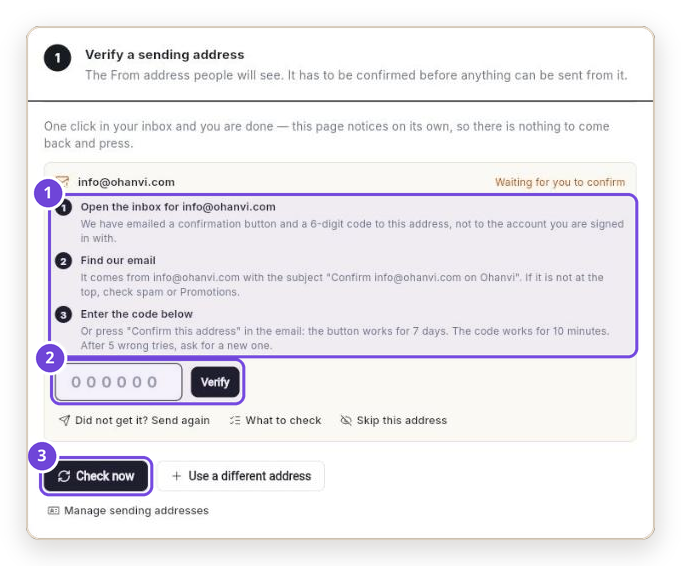
If you close the window first, the page shows the same 3 steps (1). Type the code there (2), or click Check now (3) after pressing the button in the email.
Make it your default sender
- Once confirmed, the address shows Verified (1). Go to Manage → Sender Identities, or open app.ohanvi.com/#/marketing/em-manage.
-
Click the crown icon (2), then Set as Default. You see Sender identity updated, and the address is marked Default sender.
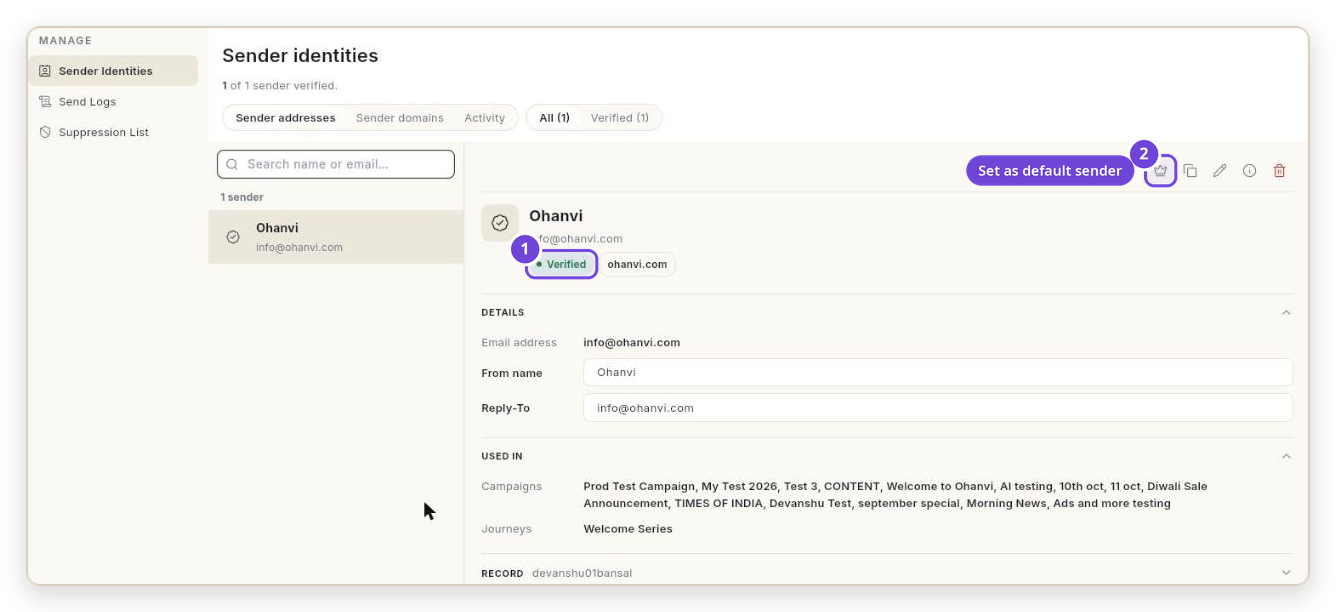
Don't skip the default
Campaigns let you pick a sender each time, but automated flows use the default sender. Without one, every flow email fails.
2. Add your first contact
You can only email people who are saved as contacts.
- Open app.ohanvi.com/#/marketing/em-contact. You can also get there from More → Email Marketing.
- Click Add Contact at the top.
-
Fill in the form and click Submit (5):
# Field Example Why it matters 1 Email riya@bloomandbrew.inRequired. 2 First Name RiyaLets you greet people by name. 3 Subscription Status SUBSCRIBED Only subscribed people get marketing emails. 4 Tags newsletterOptional. Helps you find people later. 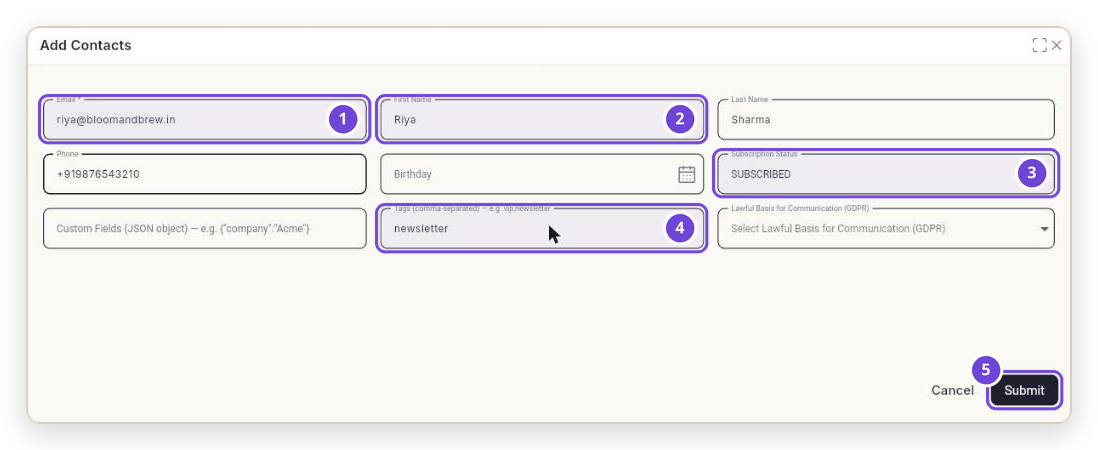
-
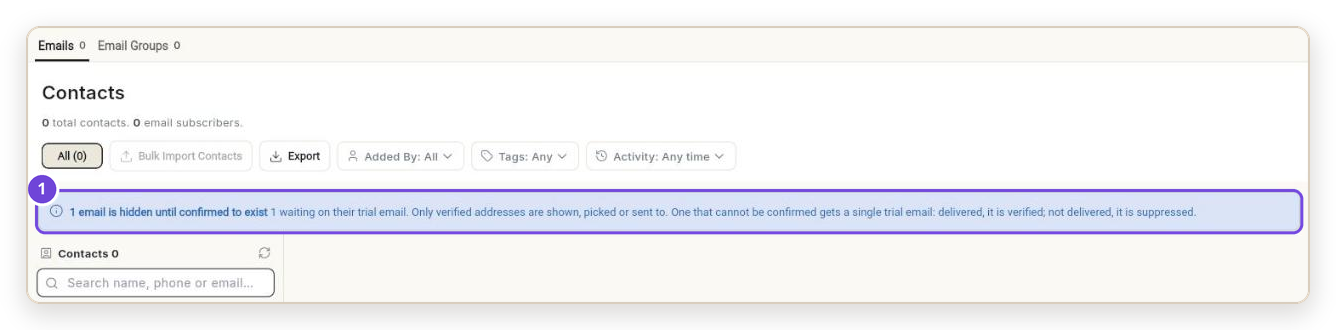
Wait about 1 minute. Ohanvi checks that every new address really exists before you can send to it. Until then, the contact is hidden and the page says 1 email is hidden until confirmed to exist.
Adding many people at once
Use Bulk Import Contacts on the same page to upload a file. To put people on a list, such as Newsletter, open the list and use Add or remove contacts.
3. Design your email
A template is an email you design once and reuse.
- Open Email Templates in the Email panel, and click New template.
-
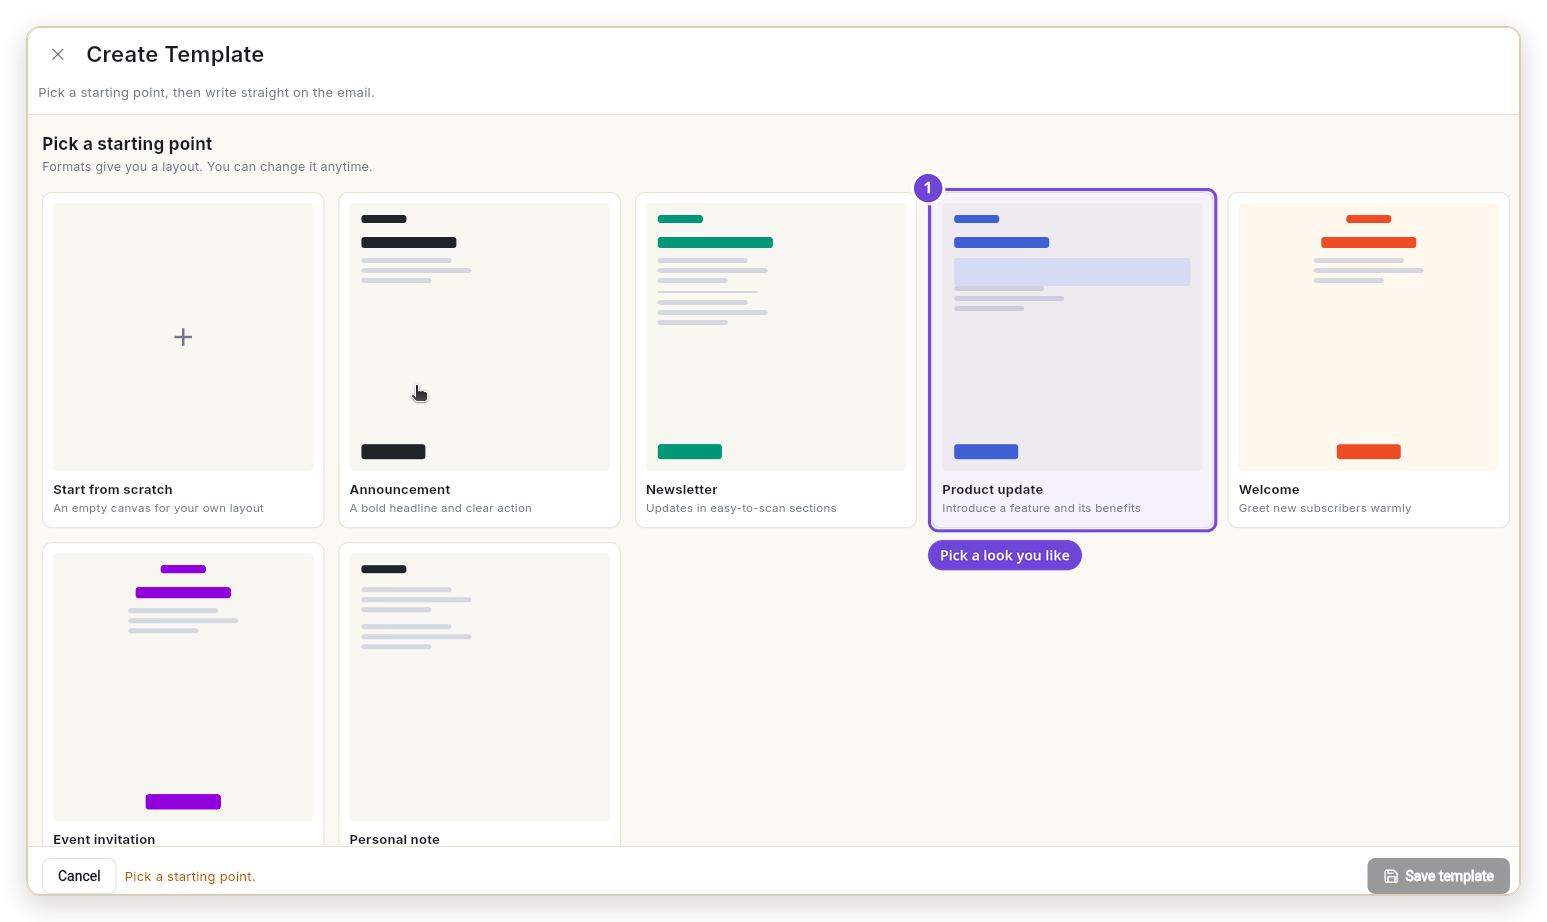
Pick a layout. For a product launch, Product update works well.
-
Fill in the 3 fields at the top (1). Use the Blocks panel (2) to add a heading, text, image, button, divider or spacer.
Field Example Template name Hazelnut cold brew launchSubject line Our new Hazelnut Cold Brew is herePreview text Smooth, low in acid, and ready in your fridge overnight.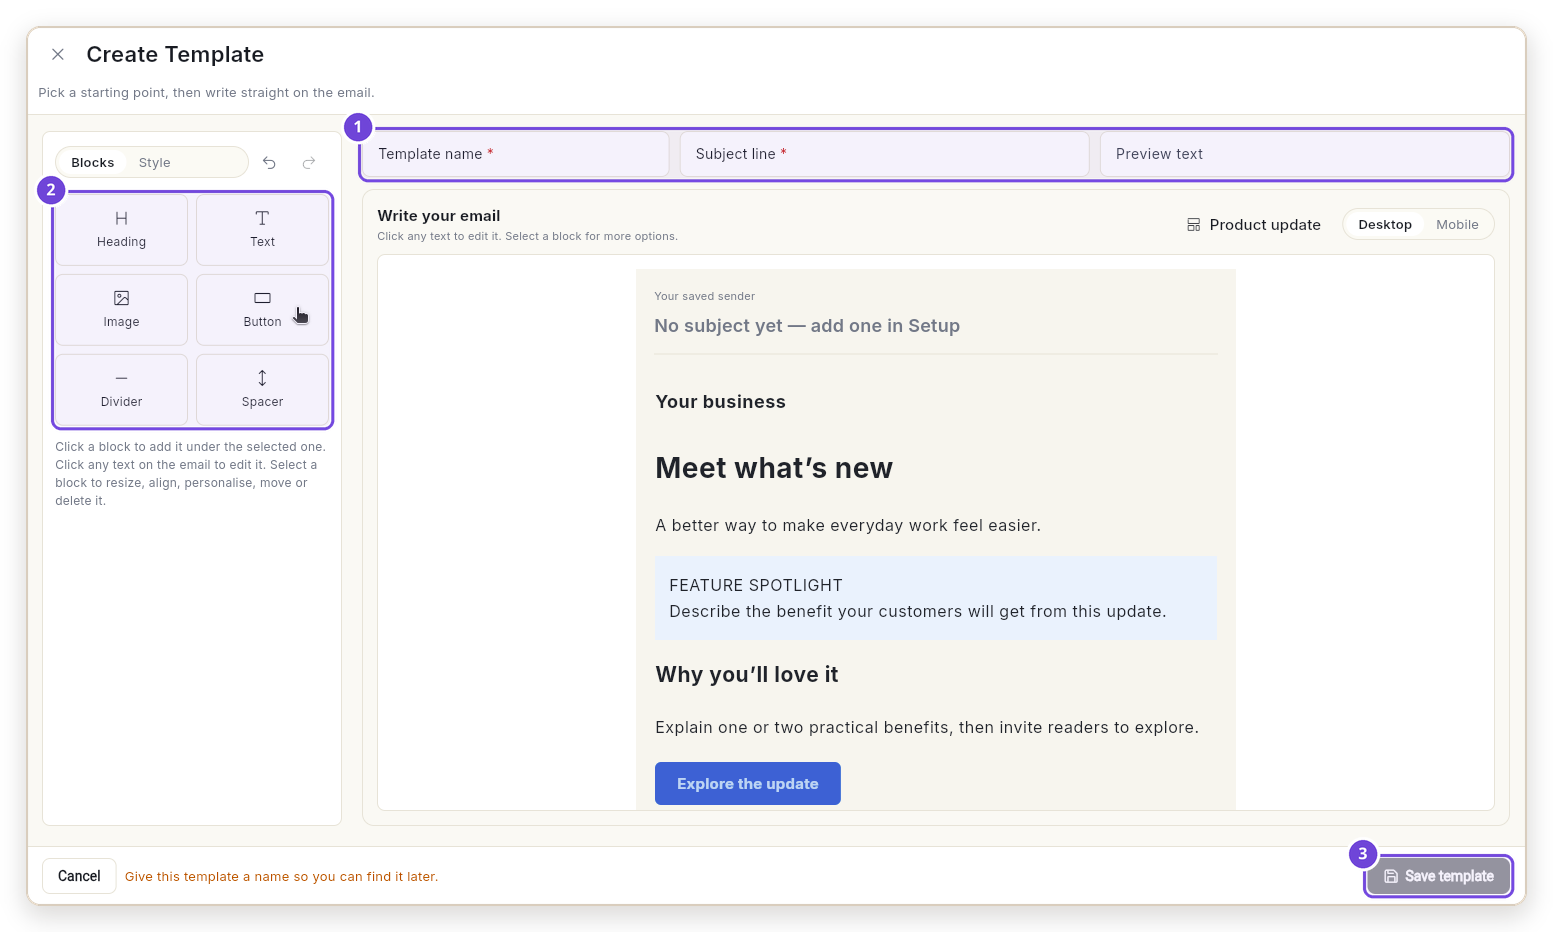
-
Click any text on the email and type over it. To greet people by name, click into a line, open Personalise in the small toolbar, and pick First name. The text shows
{{firstName}}. Each person sees their own name, for example Hi Riya.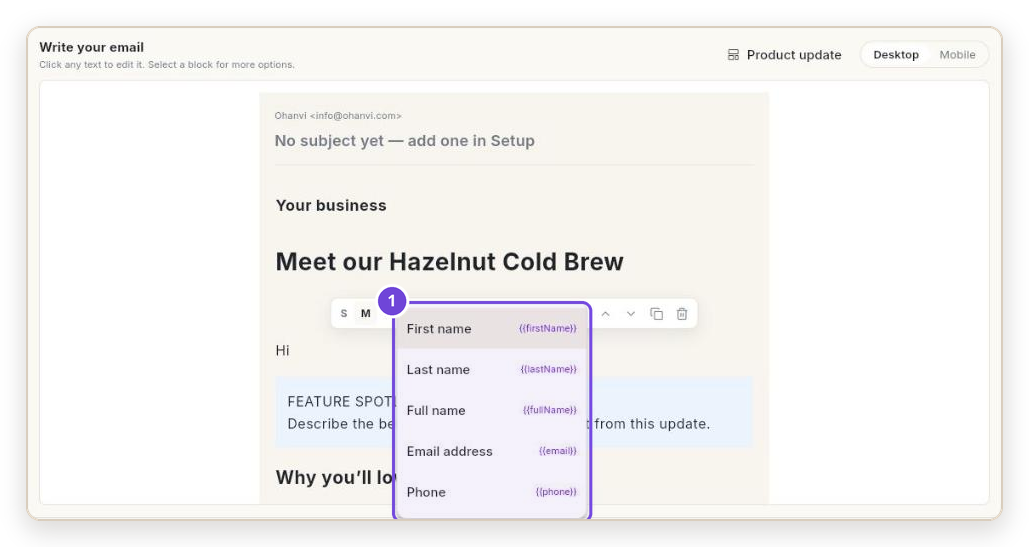
-
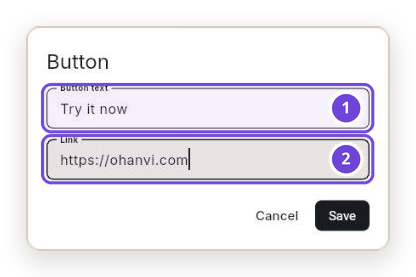
To change the button, click it, then click the link icon in its toolbar. Type the Button text (1) and the Link (2), then click Save.
Here is the full Bloom & Brew email:
Block Text Heading Meet our Hazelnut Cold BrewText Hi {{firstName}}, we steeped our single-origin beans for 18 hours and added a hint of roasted hazelnut. The result is smooth, a little sweet, and never bitter.Highlight box NEW THIS WEEK: Free shipping on your first bottle, until Sunday.Heading Why you'll love itText Half the acidity of hot coffee. No sugar added. Keeps for 10 days in the fridge.Button Try it now→https://bloomandbrew.in/cold-brew -
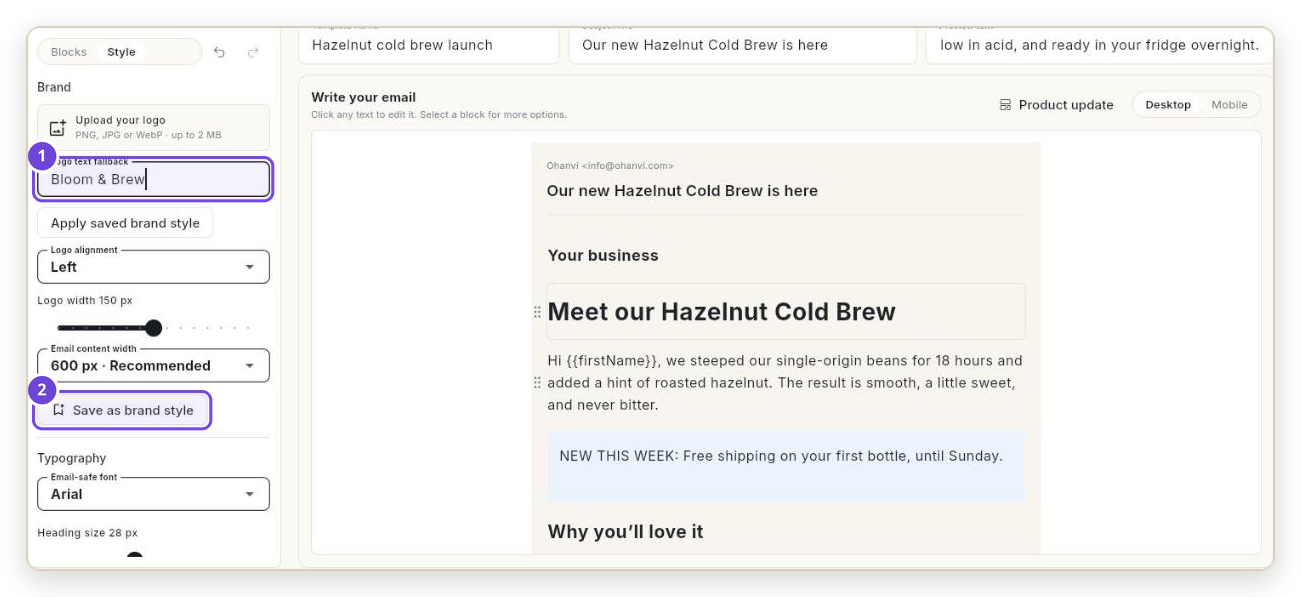
Click Style. Type your brand name in Logo text fallback (1), or upload your logo. Click Save as brand style (2) to reuse the look next time.
-
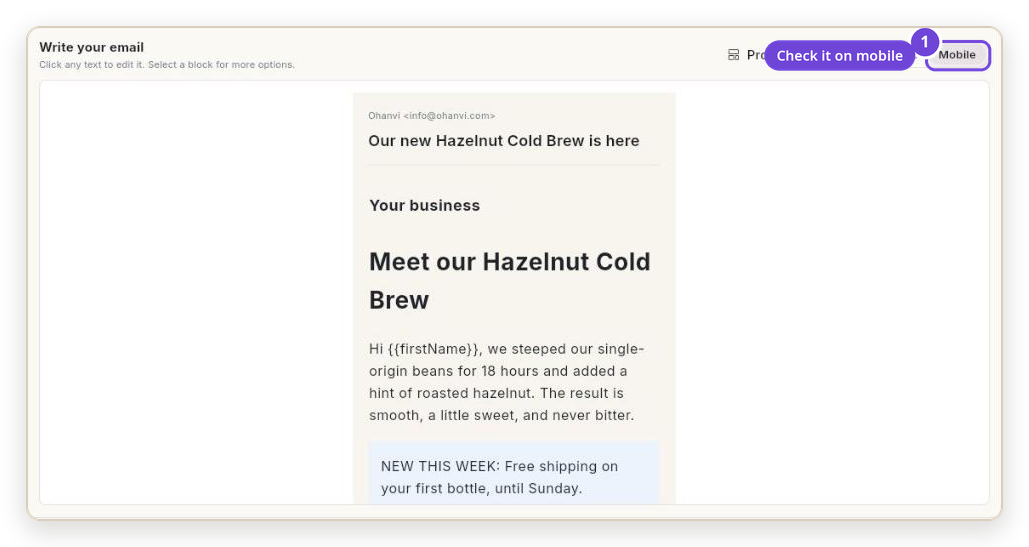
Click Mobile to see the email the way most people will read it.
-
Click Save template. You see Template saved. It is ready to use straight away, with no approval needed.
4. Send your first campaign
A campaign sends one email to a group of people, once.
-
Open Campaigns in the Email panel and click Create email.

-
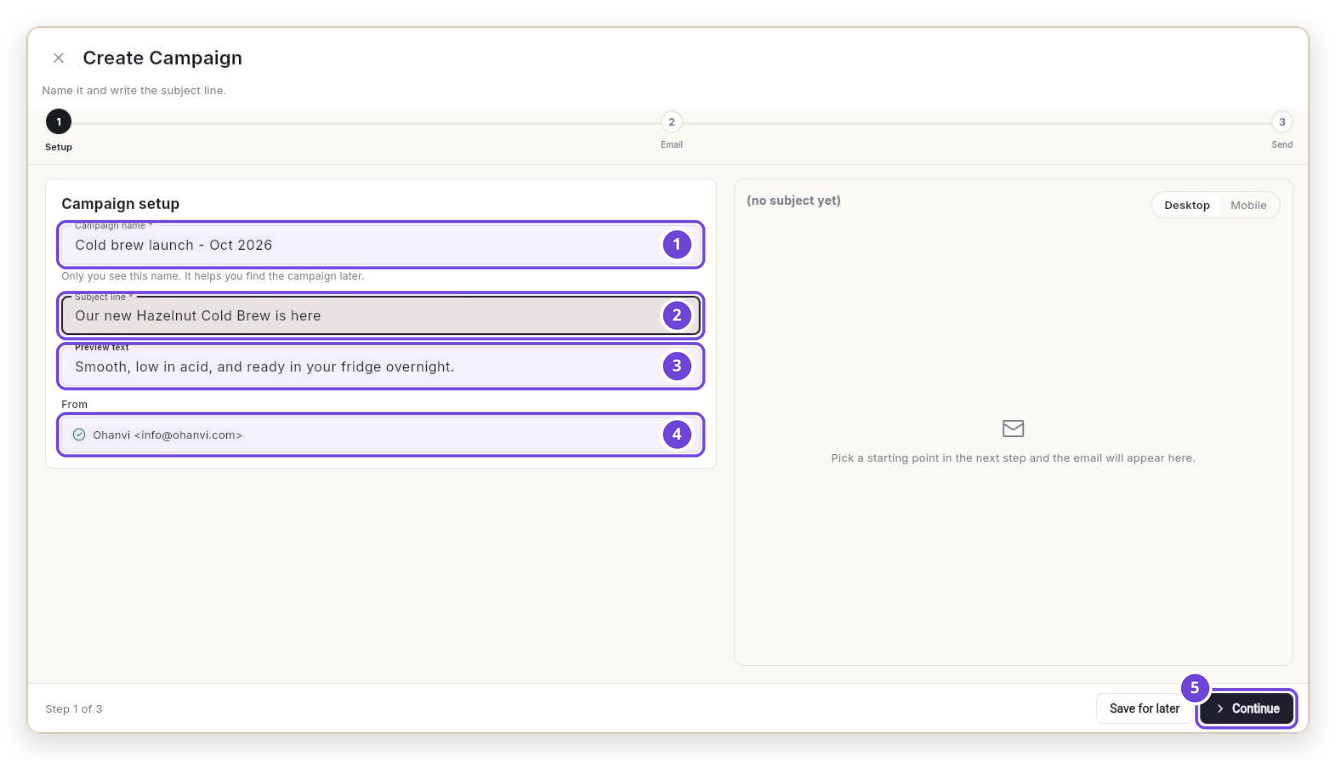
Setup. Fill in Campaign name (1), Subject line (2) and Preview text (3). From (4) already shows your confirmed sender. Click Continue (5).
-
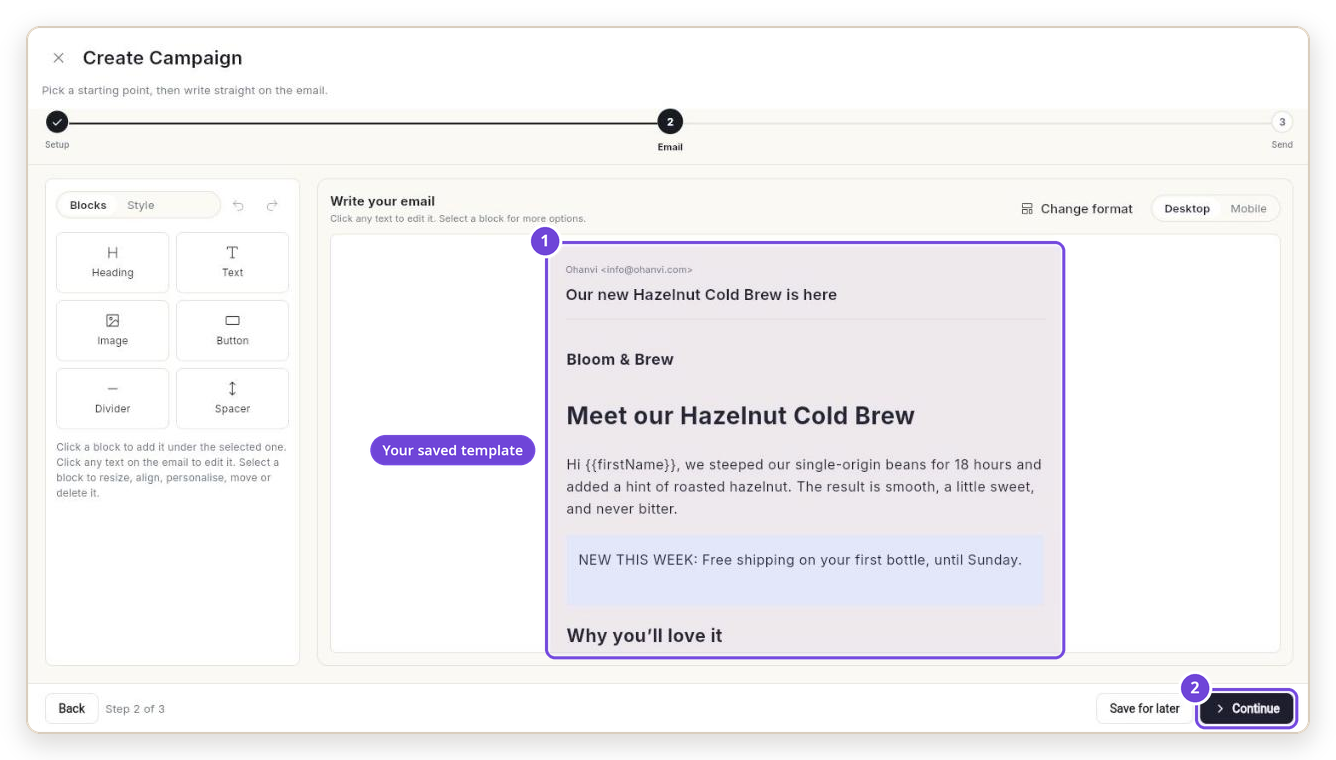
Email. Scroll down to Your templates and click Hazelnut cold brew launch. The email opens (1). You can still change it here for this campaign only. Click Continue (2).
-
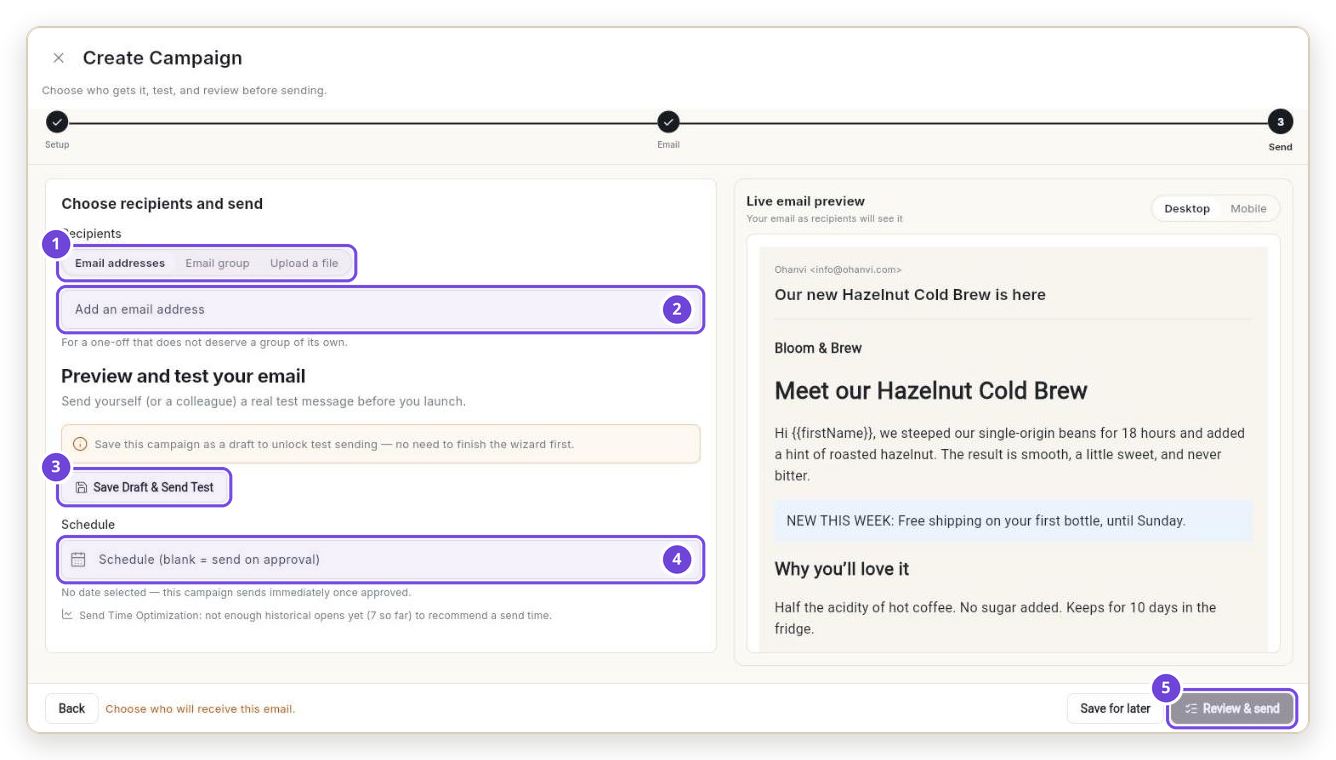
Send. Choose who gets it (1):
- Email addresses: start typing a contact's name or address (2) and click them in the list.
- Email group: pick a saved list or group.
- Upload a file: a
.csvwith one address per row. Ohanvi saves it as a group.
-
Click Save Draft & Send Test (3) and send a test to yourself. It arrives with [TEST] in the subject. Tests are free.
- Leave Schedule (4) empty to send now, or pick a date and time.
-
Click Review & send (5). Check the Launch Readiness list, then click Send email, then Send email again in Send this email?. You see Your email is on its way.
People who unsubscribed, bounced, marked you as spam, or whose address failed the check are skipped automatically.
5. See who got it
- Open Manage → Send Logs.
-
Pick your campaign in Campaign (2). Each row shows when the email was sent and opened (3). Use the filters (1) to see only Opened, Clicked, Bounced and so on.
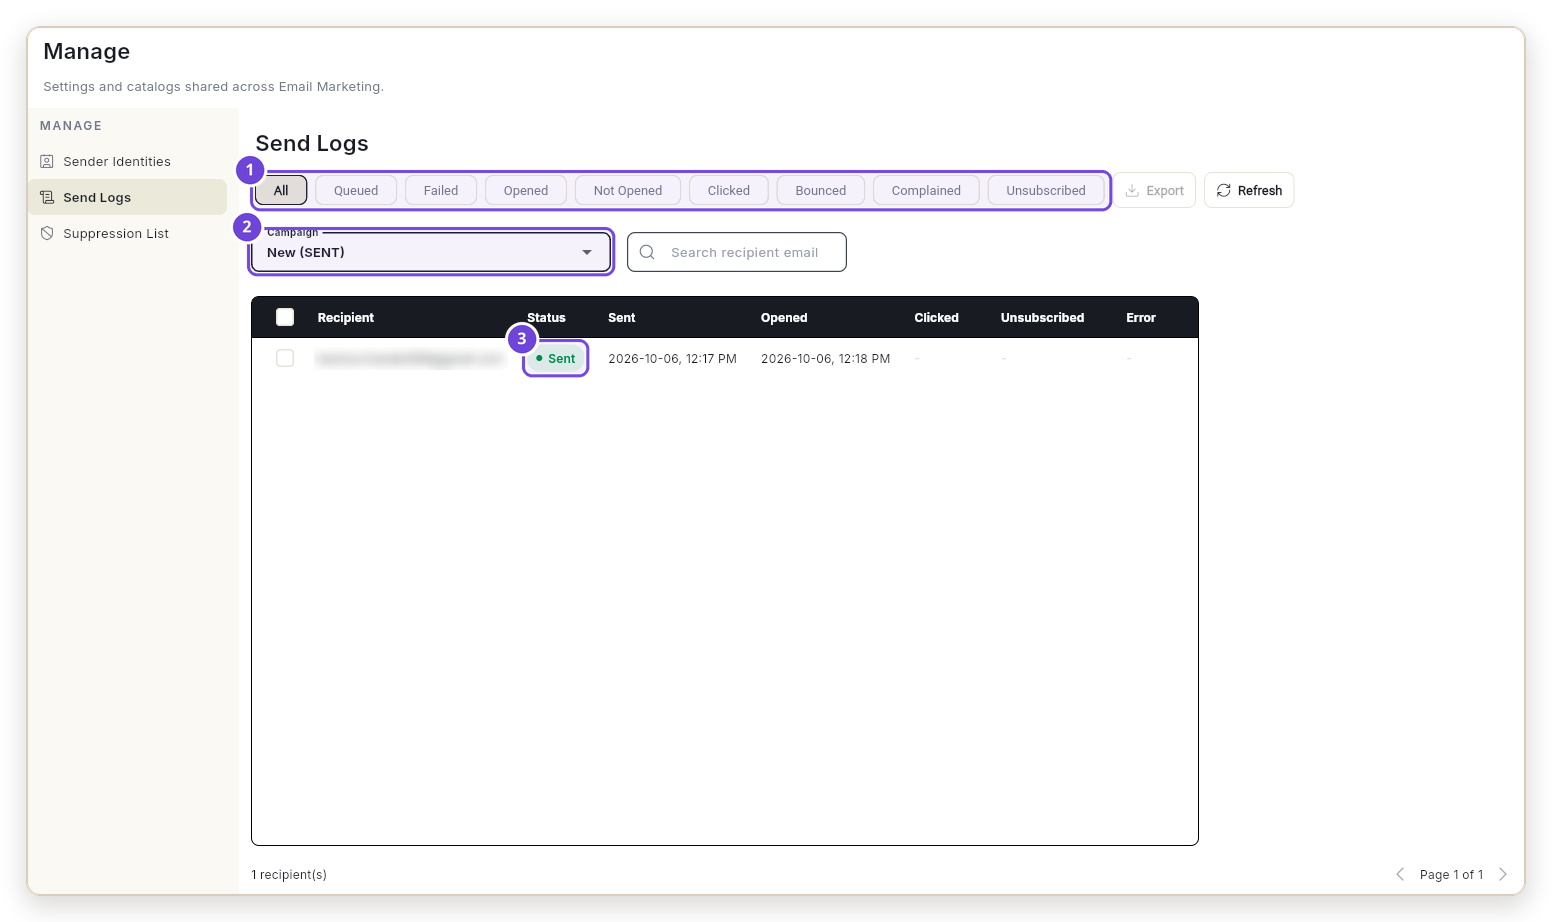
Click Refresh to see new opens and clicks.
6. Automate your emails with a flow
A flow sends emails for you, on its own, whenever something happens. You set it up once, and it keeps working in the background.
Here are some of the things you can automate:
| When this happens | The flow can |
|---|---|
| A contact joins an email list | Send a welcome email |
| Someone fills in your form | Send a thank-you email, and add them to a list |
| Someone opens or clicks your email | Send a follow-up, or tag them as interested |
| A contact gets a tag | Send the emails meant for that group |
| On a schedule, for example every day at 9 AM | Send a reminder or a report |
Between those, you can add steps like Wait, Wait for email open, Tag contact, Add to a list and Unsubscribe. That way one flow can send a whole series of emails.
Below, we build the most common one: a welcome email for everyone who joins the Newsletter list.
The welcome flow
- Open Flows in the Email panel and click New flow.
-
A welcome flow needs just 2 cards: what starts it (1), and the email it sends (2).
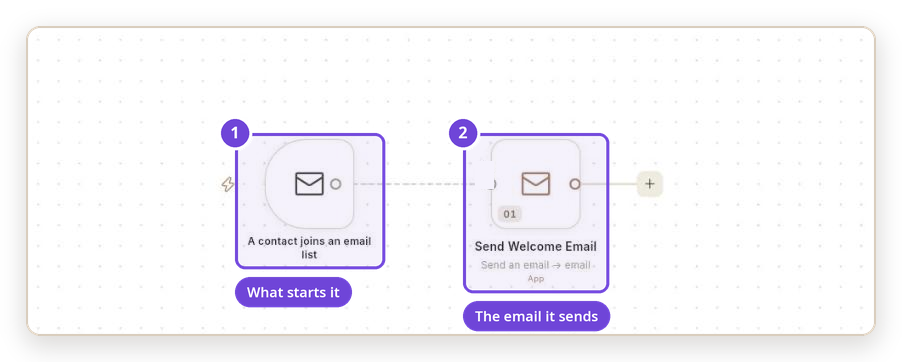
# Card What it does 1 A contact joins an email list Starts the flow the moment someone is added to your list. 2 Send an email Emails that person your welcome message.
Check 2 things
-
The list. Click the first card. Under When this runs, choose your list in Which list (1).
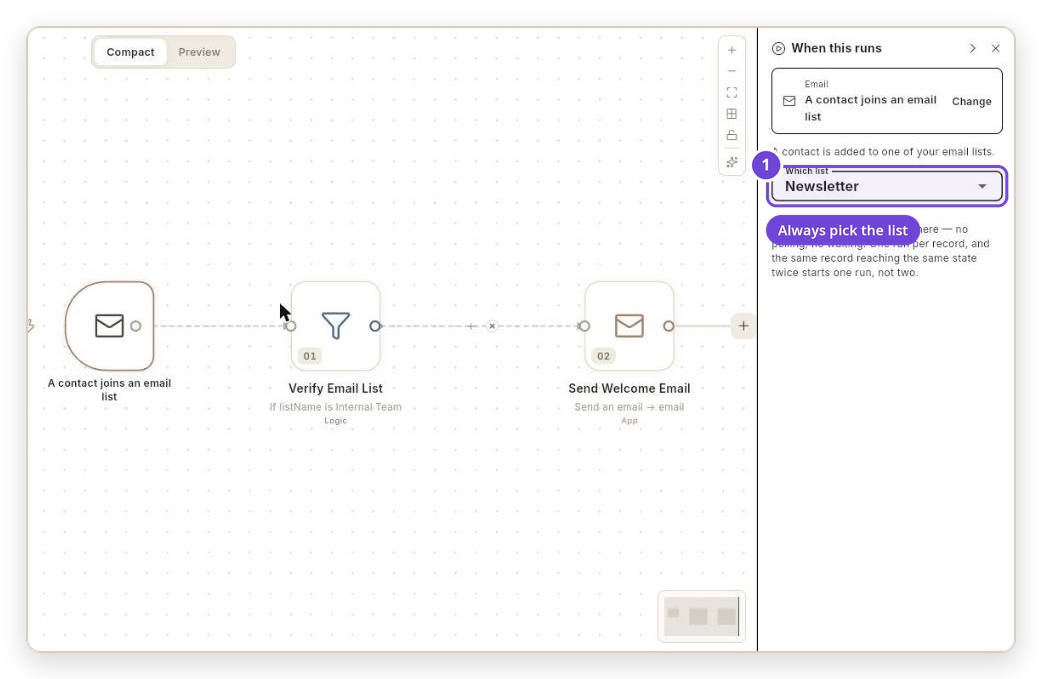
If you leave Which list empty, the flow runs for every list.
-
The email. Click the email card and read the right panel:
# Field What it should say 1 Their email {{trigger.email}}, the person who joined. Leave it.2 Kind of email Marketing — subscribed contacts only 3 Subject Your subject, for example Welcome to Bloom & Brew4 Email The text. Names are written {{trigger.firstName}}in flows.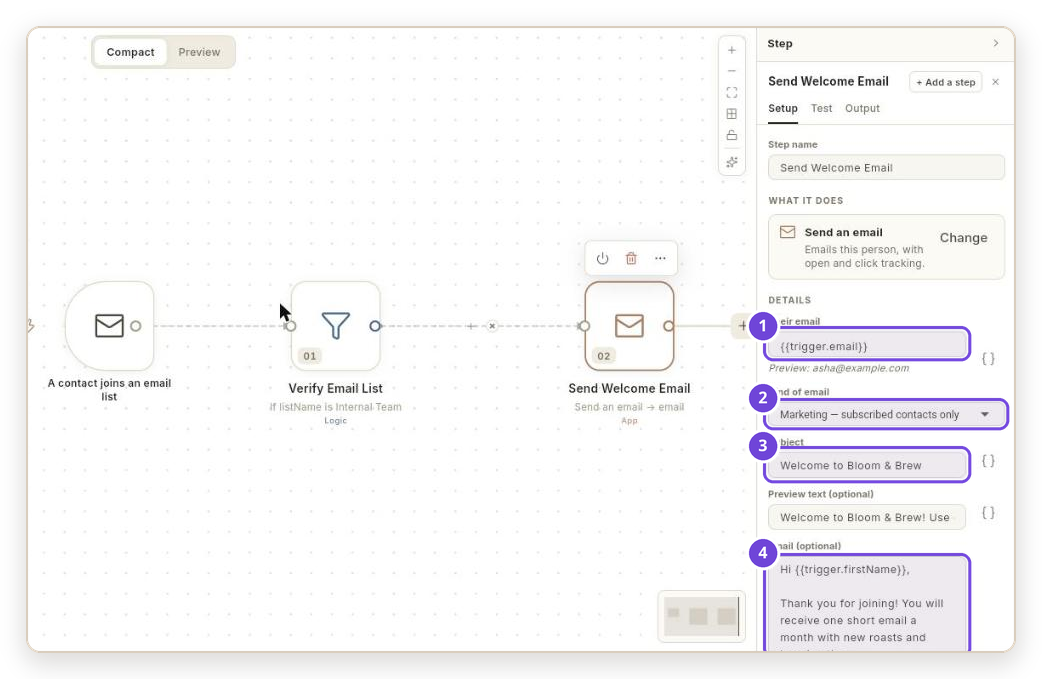
Publish and test
- Rename the flow at the top, for example
Newsletter welcome, and click Save. -
Click Publish, then Publish again in the window. The flow shows v1 · LIVE (1) and switches to Active (2) by itself.

-
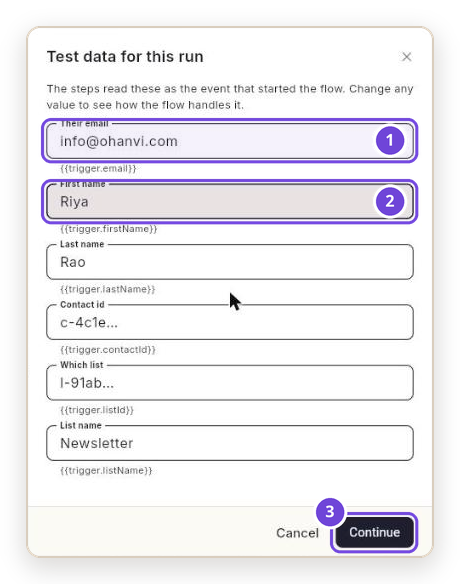
Click Test, then Run test. In Test data for this run, type your own address in Their email (1) and your name in First name (2). Click Continue (3).
-
The test result shows at the right (1) and in Logs at the bottom (2). Under OUTGOING,
"sent": truemeans the email went out.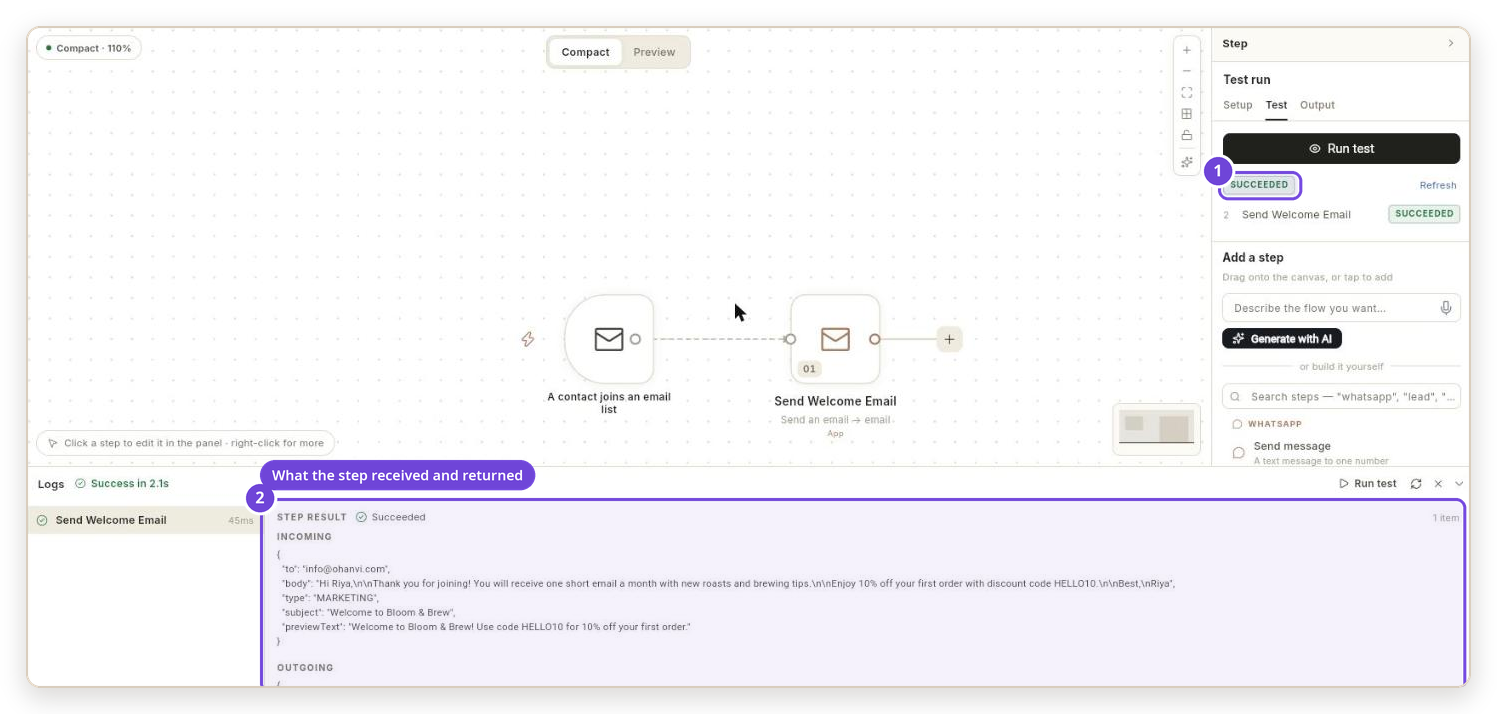
A test is a real send
The test sends a real email, but only to an address that is already a subscribed, checked contact. Each person gets the welcome email once. Joining the list again does not send it again.
How it all fits together
| Piece | What it is | Good to know |
|---|---|---|
| Sending address | The From address. | Must be confirmed with a code. The Default sender is used by flows. |
| Contact | One person you can email. | New addresses are checked for about a minute before they can be emailed. |
| List | A named group, like Newsletter. |
Joining a list can start a flow. |
| Template | A saved email design. | Ready to use as soon as it's saved. |
| Campaign | One email to many people, sent once. | Can be sent now or scheduled. |
| Flow | An automatic job that runs when something happens. | Runs only after Publish, and only while Active. |
| Send Logs | The record of every email. | Shows sent, opened, clicked, bounced and unsubscribed. |
| Wallet | Pays for emails. | Only delivered emails are charged. Tests are free. |
Every email gets a one-click unsubscribe link in its header, so Gmail and Yahoo show Unsubscribe next to your name. People who unsubscribe are never emailed again.
Troubleshooting
Signing in and confirming your address
| What you see | Why | What to do |
|---|---|---|
| No Email in the left rail | Your role has no Email Marketing access. | Ask your admin to give your role access. |
| The code email never arrives | It's in Spam or Promotions, or a company filter held it. | Search the inbox for ohanvi. Ask IT to allow info@ohanvi.com. Then click Did not get it? Send again. |
| That code has expired. Ask for a new one. | Codes work for 10 minutes. | Click Did not get it? Send again and use the new code straight away. |
| That code is not right. | A typo, or an older code. | Use the code from the newest email. After 5 wrong tries, ask for a new one. |
| You pressed Confirm this address, but the page still says Waiting for you to confirm | The click hasn't reached Ohanvi yet, or it came from an older email. | Click Check now. If it still waits, type the 6-digit code instead. It always works. |
| Add Sender Address stays grey | One of the 4 DNS checks isn't In place. | See the next section. |
A DNS check isn't "In place"
The 4 checks only apply to your own domain. Each one is a record in your domain's DNS. The panel tells you where your DNS lives, for example "Your DNS is at Cloudflare".
To add a record:
-
Open your DNS provider and sign in:
Your DNS is at Where to add records Cloudflare dash.cloudflare.com → your domain → DNS → Records → Add record GoDaddy dcc.godaddy.com/control/portfolio → your domain → DNS Hostinger hpanel.hostinger.com/domains → Manage → DNS / Nameservers Namecheap ap.www.namecheap.com/domains/list → Manage → Advanced DNS Amazon Route 53 console.aws.amazon.com/route53/v2/hostedzones -
Copy the Type, Name and Value from Ohanvi with the copy icons, and add the record.
- Come back and click Check again. Most changes show within 15 minutes.
| Check | Status | Fix |
|---|---|---|
| Mail server | Missing | The domain can't receive email. Use an address that already gets mail. |
| SPF | Missing | Add a TXT record, Name @. Google Workspace: v=spf1 include:_spf.google.com ~all. Microsoft 365: v=spf1 include:spf.protection.outlook.com -all. Zoho: v=spf1 include:zoho.com ~all. |
| SPF | Needs a look | You have 2 SPF records. Merge them into 1: keep one v=spf1, put every include: in it, and end with one ~all. |
| DKIM | Missing | Turn DKIM on in your mail provider. Google: admin.google.com → Gmail → Authenticate email. Microsoft: security.microsoft.com → DKIM, then add both CNAME records it shows. |
| DKIM | Cannot tell | Your provider hides its DKIM record. That's fine. It doesn't block you. |
| DMARC | Missing | Add a TXT record, Name _dmarc, Value v=DMARC1; p=none; rua=mailto:you@yourdomain.com. |
Using Gmail, Yahoo or Outlook?
Free addresses skip the 4 checks. Your emails go out with your name from an Ohanvi address, and replies still come to you. To show your own address, use one on your own domain.
Contacts
| What you see | Why | What to do |
|---|---|---|
| No contact matches that. when adding recipients | The Email addresses box only finds saved contacts. | Add the person under Contacts first, wait a minute, then search again. Or use Upload a file. |
| 1 email is hidden until confirmed to exist | New addresses are checked before they can be emailed. | Wait about 1 minute and refresh. |
| A contact stays hidden with waiting on their trial email | Ohanvi couldn't confirm the address, so it sent 1 trial email and is waiting to see if it's delivered. | Wait for the trial email to be delivered. If it bounces, the address is suppressed. Check the spelling. |
| A list says it has members, but Add or remove contacts shows none | Those members haven't passed the address check yet. | Wait, then reopen the list. |
| Create List failed after Create New List… | The list is usually created anyway. | Open the list picker again. If your list is there, pick it. |
Templates
| What you see | Why | What to do |
|---|---|---|
| Save template is grey | Something required is empty. | Read the line next to it, for example Give this template a name so you can find it later. |
| Hi , with no name | The contact has no first name saved. | Add first names to your contacts, or write the greeting without a name. |
| Full name comes out empty | Not filled in yet for emails. | Use First name and Last name instead. |
{{firstname}} comes out empty |
Merge fields need the exact capital letters. | Write {{firstName}}. |
Campaigns
| What you see | Why | What to do |
|---|---|---|
| Continue or Review & send is grey | A required field is empty. | Read the line in the footer, for example Write a subject line. |
| Your wallet balance is empty. | The wallet is at ₹0. | Add money under Billing. See Credits and billing. |
| A permission error on Send email | Your role can build campaigns but not send them. | Ask an admin to send it, or to give your role send rights. |
| A person was skipped | They unsubscribed, bounced, or their address is still being checked. | Check their row in Send Logs. |
Flows
| What you see | Why | What to do |
|---|---|---|
| Test step FAILED with Validation failed | No default sender is set. | Go to Manage → Sender Identities, click the crown icon, then Set as Default. Run the test again. |
OUTGOING shows "skipped": "UNVERIFIED" |
The test address hasn't passed the address check yet. | Wait for the check to finish, or test with a contact that's already verified. |
| "'subject' refers to 'firstName'…" when publishing | In flows, names need trigger. in front. |
Change {{firstName}} to {{trigger.firstName}}. |
| The welcome email goes to people on other lists | Which list is empty. | Click the first card and pick the list. |
| The flow never sends | It isn't published, or the switch is off. | Click Publish, and check the header shows LIVE and Active. |
Results
| What you see | Why | What to do |
|---|---|---|
| More opens than you expected | Apple Mail and some Gmail setups open emails by themselves. | Trust Clicked more than Opened. |
| Not Opened includes people who weren't sent to yet | That filter shows everyone without an open. | Use Queued and Failed to see who wasn't sent to. |
| New opens don't show | Send Logs doesn't refresh by itself. | Click Refresh. |