Send a WhatsApp broadcast campaign
Send an approved template to one or more contact groups, or to a list you upload. At the end, your campaign is sending or scheduled, you have tested it on your own phone, and its delivery figures fill in on the Campaigns page as WhatsApp confirms each message.
Before you start
- You have at least 1 template with the status Approved. See Create a WhatsApp message template.
- You have a contact group with opted-in contacts, or a CSV of phone numbers. See Manage WhatsApp contacts.
- You have credits. Every WhatsApp message is charged to your credits. See Credits and billing.
- You can see Campaign in the WhatsApp panel. If not, ask your admin. See Roles and permissions.
How several numbers affect a campaign
- The campaign sends from the number you pick under Send from. It starts on your Default number.
- Templates belong to the WhatsApp Business Account, so every number in it can use the same approved templates.
- When a customer replies, the chat stays on the campaign's number. Your team replies from that number automatically.
- Each number has its own messaging limit. A number with a low limit shows a note. Larger audiences are spread over several days, or should use another number.
How credits are charged
- Each message is charged when WhatsApp confirms it was sent or delivered. The rate depends on the template's category and the recipient's country.
- A message that fails is not charged.
- Before a campaign or a test goes out, Ohanvi checks your balance:
- When the balance is empty, Your credits are empty opens and the send is blocked. Click Recharge credits, add credits, then send again.
- When the balance may not last, Your credits are running low opens. Click Send anyway if you know the balance covers this send, or Recharge credits.
- If the balance runs out partway through, the messages after that point fail.
See Low or empty credits for what else stops when credits run out.
Steps
Step 1: Pick the audience
- Open WhatsApp in the left rail, then select Campaign. The Campaigns page opens.
-
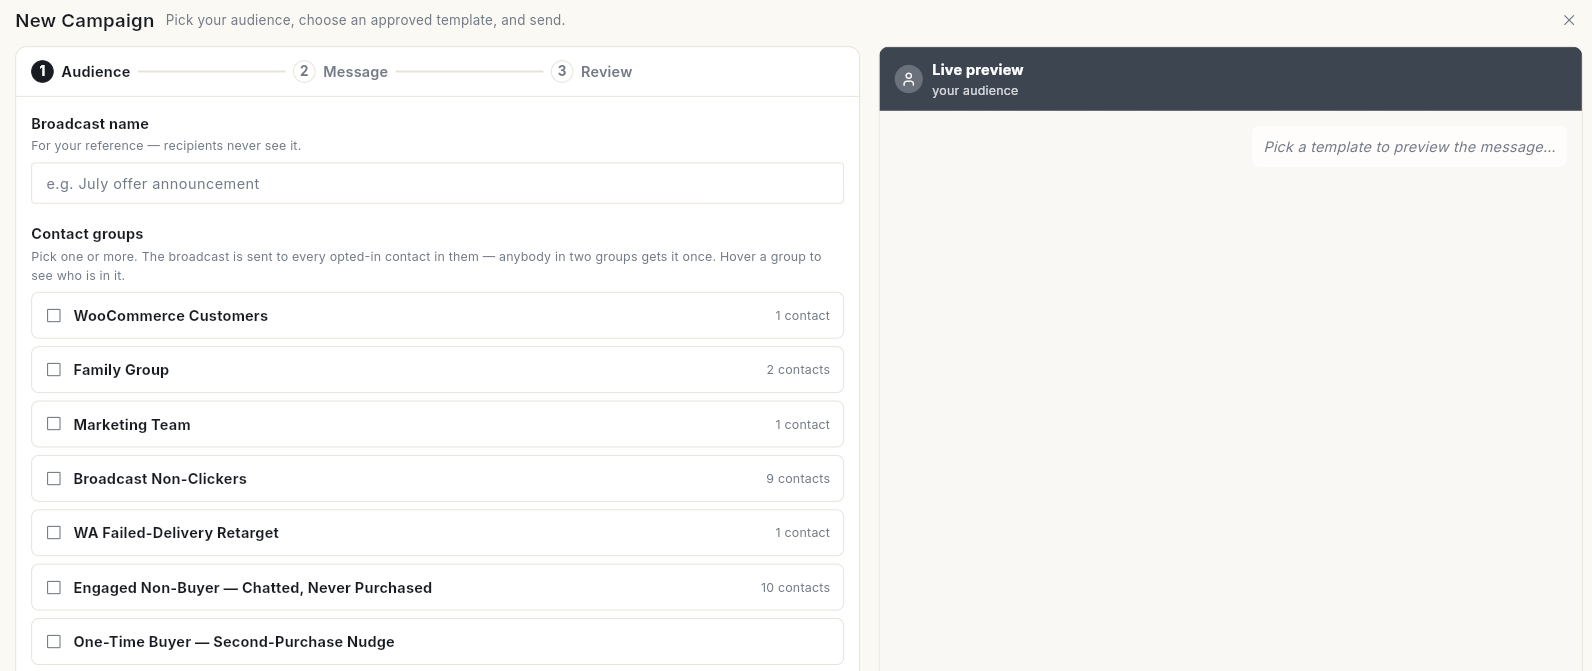
Click New Campaign. The New Campaign page opens on the Audience step, with a Live preview beside it.
-
Type a Broadcast name, for example
Diwali offer 2026. Only your team sees it. - Under Send from, pick the number the campaign goes out from. It starts on your Default number. Each choice shows the badge, the label, the phone number and its messaging limit. See Run several WhatsApp numbers.
- Under Contact groups, tick 1 or more groups. Everyone opted in to those groups gets the message once, even if they are in 2 groups. Hover a group to see who is in it.
- Click Continue. The Message step opens.
Send to contacts you picked by hand
On the Contact page, select contacts and click Send broadcast. The composer opens with those contacts as the audience, and no contact group is needed.
Step 2: Choose the template and fill the variables
-
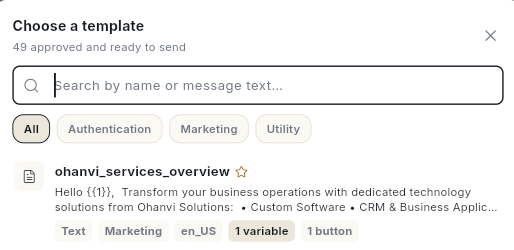
Choose a Template. Choose a template opens with only Meta-approved templates. Filter by All, Authentication, Marketing or Utility, or search by name or message text.
-
If the template has an image, video or document header, check the header file. Leave it as it is to reuse the sample the template was approved with, or pick a new file.
-
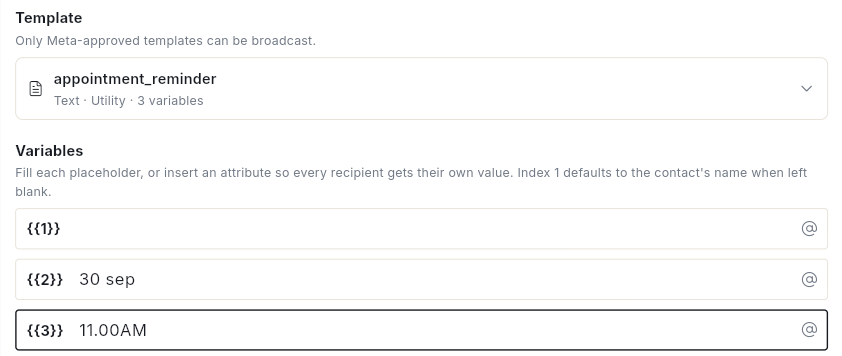
Under Variables, fill the {{1}}, {{2}} boxes and so on. If you leave {{1}} blank, it uses the contact's name. The Live preview updates as you type.
-
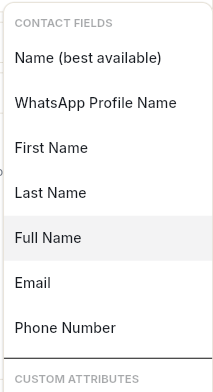
To give each person their own value, click the @ icon at the end of the variable and pick a field under CONTACT FIELDS or CUSTOM ATTRIBUTES, for example First Name.
-
Fill Fallback — sent when a contact has no value for this attribute, for example
there. This stops anyone getting a message with a blank in it.
Optional: Send to a CSV list or per-person values
Use Recipients CSV (optional) to send only to the numbers in a file, or to give each person their own variable values.
- Click Download recipients CSV. The file already holds the selected audience and the right column headings.
- Open it, add or remove rows, and fill each person's values. Keep phone numbers with the country code, for example
919876543210. - Click Upload CSV and choose the file.
- Check How we read your file. It shows which column feeds each variable. If the headings did not match, columns are read in order, so check them carefully.
- If the file has numbers that are not yet contacts, the New numbers in your file window opens. Choose Yes — save them to a contact group or No — just send it. Everyone in the file gets the message either way.
Click Continue. The Review step opens.
Step 3: Test the campaign
-
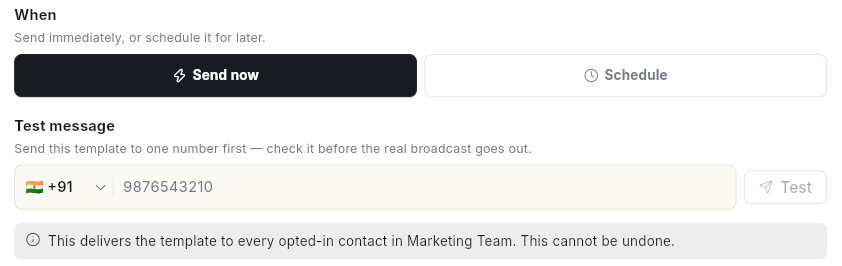
Under Test message, pick the country and type your own WhatsApp number. It is on the Review step, under When.
-
Click Test. The message Test message sent. appears when WhatsApp accepts it.
- Check the message on your phone: the header, the values, and every button.
A test message is charged like any other message.
Step 4: Send now or schedule
-
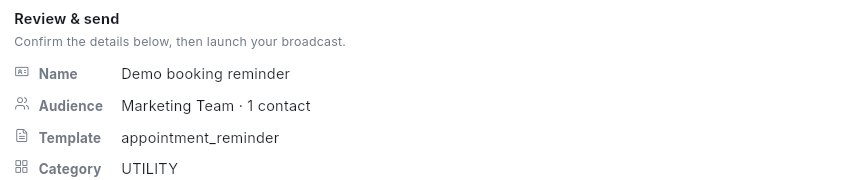
Check the summary under Review & send: the name, template, category and audience.
-
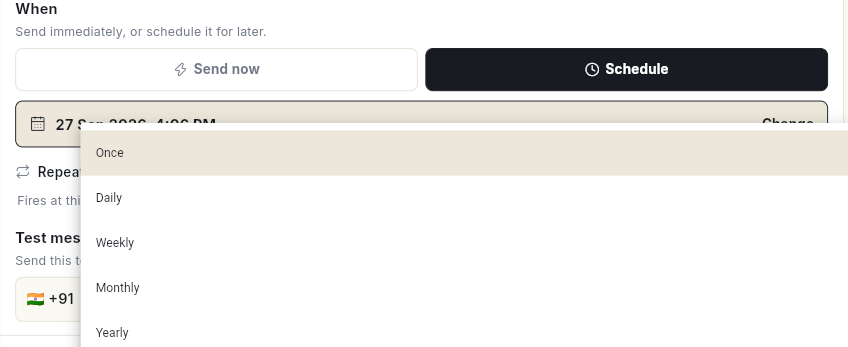
Under When, choose Send now, or click Schedule. A date and time appear. Click Change to pick yours, in your local time zone.
-
Optional: to send again and again, set Repeat to Daily, Weekly, Monthly or Yearly. Once sends 1 time.
-
Click Send now or Schedule.
A sent broadcast cannot be recalled
Send now delivers the template to every opted-in contact in your audience. This cannot be undone. Contacts who opted out are left out automatically.
One of these messages appears:
- Broadcast launched — sending to … — the campaign is sending now.
- Broadcast scheduled — it will send at the set time. — the campaign waits in the Scheduled tab.
- Recurring broadcast scheduled — first send at the set time. Manage the series from Manage > Scheduler. — the series is set up.
Manage scheduled and recurring campaigns
- On Campaigns, open the Scheduled tab and click the campaign.
- In Scheduled send or Repeating schedule, see Next send and Repeats.
- Click Change time to move the next send, Pause or Resume a series, or Stop to end it.
- For a repeating campaign, click End date to set Stop repeating after.
To see every repeating send in one place, click Open in Scheduler, or see Manage recurring schedules.
Launch, edit, cancel or resend a campaign
Each campaign row has a More actions menu.
- Launch now: sends a draft. The Launch "…"? window shows the Audience, Template and Recipients. Click Launch.
- Edit: opens Edit Campaign. Only a campaign that has not been sent yet can be edited.
- Cancel: stops a scheduled or running campaign.
- Resend: sends again to the recipients whose messages failed, or were never delivered. Click Resend in the Resend? window.
- Delete: removes the campaign from the list. This cannot be undone.
Campaign statuses
The list opens on the Completed tab. Use the tabs to switch.
| Tab | Shows |
|---|---|
| Completed | Campaigns that finished sending. |
| Scheduled | Campaigns waiting for their send time, and campaigns sending right now. |
| Draft | Campaigns you started but did not launch. |
| Cancelled | Campaigns you called off. |
| All | Every campaign. |
A campaign marked Automatic sends itself to 1 customer at a time when an event happens, such as an order placed. Your developer connects it with the Developer API. See WhatsApp webhooks and integrations.
Video walkthrough
[VIDEO]
Troubleshooting
| Issue | Cause | Fix |
|---|---|---|
| No approved templates yet | No template has been approved by Meta. | Create a template and wait for Approved. See Create a WhatsApp message template. |
| Fill every placeholder in the template, so nobody receives a message with a blank in it. | A variable has no value or fallback. | Fill every Value for {{n}}, and a fallback for each attribute. |
| Your credits are empty | Your balance is ₹0. | Click Recharge credits, add credits, then send again. |
| The campaign could not be launched. This usually means nobody in the contact group has opted in, or the template is not approved yet. Nothing was sent. | No opted-in contacts, or the template is not approved. | Check the group's opt-in status and the template status, then click Launch now. |
| Template '…' is not synced to Meta yet. Submit it from the Templates screen first. | The template was saved as a draft. | Open Template, submit it, and wait for Approved. |
| Only a campaign that has not been sent yet can be edited | The campaign already went out. | Create a new campaign. You can still send a test from the old one. |