Set up the WhatsApp AI agent
Set up an AI agent that answers customers on WhatsApp from your own business information. At the end, the agent knows your business, hands chats to your team when it cannot help, and is live for test numbers or for every customer.
Before you start
- Your WhatsApp number is connected. See Connect your WhatsApp number.
- You can see AI Agent in the WhatsApp panel. It uses the same access as Flows. If you cannot see it, ask your admin. See Manage team members, roles and permissions.
- You have credits. Each AI reply delivered to a customer is charged to your credits. See Credits and billing.
AI is managed here, not in Configuration
The AI reply agent and auto-reply are no longer set in a number's configuration. Manage AI replies from the AI Assistant hub and this page.
Steps
Know who answers first
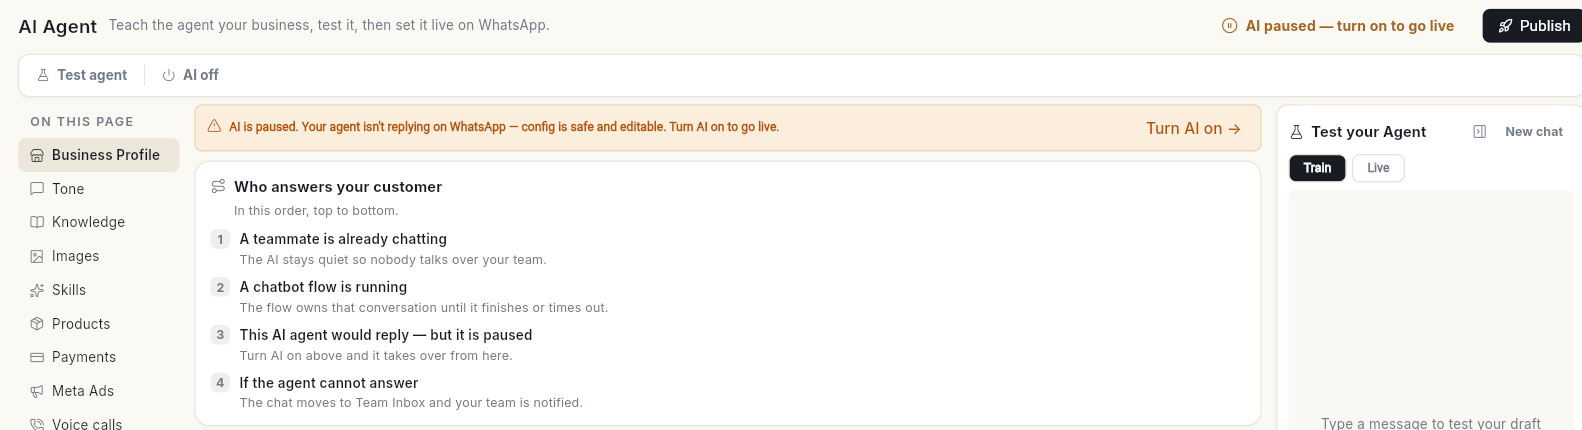
Open WhatsApp in the left rail, then select AI Agent. The Who answers your customer card shows the order, top to bottom:
- A teammate is already chatting — the AI stays quiet so nobody talks over your team.
- A chatbot flow is running — the flow owns the conversation until it finishes or times out.
- Otherwise this AI agent replies — from everything you set up on this page.
- If the agent cannot answer — the chat moves to the inbox and your team is notified.
While the AI is off, line 3 reads This AI agent would reply — but it is paused, and a bar at the top offers Turn AI on.
Describe your business
- Select Business Profile in the list on the left.
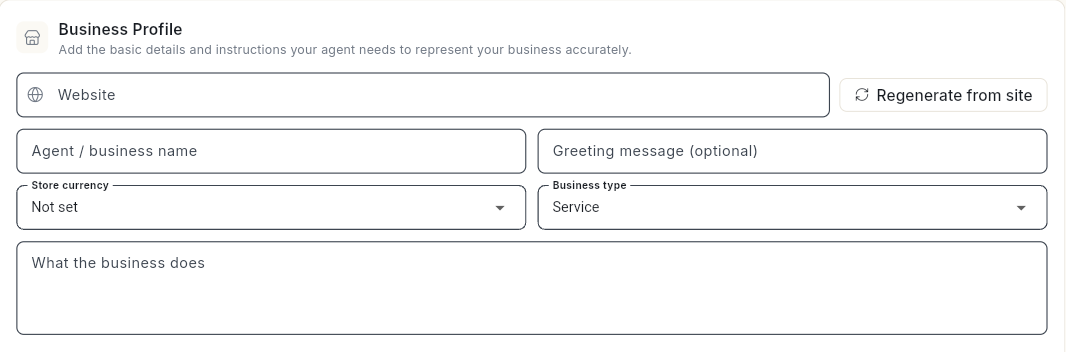
- In Website, type your site address, then click Regenerate from site. Ohanvi drafts your details from the website.
-
Check Agent / business name, Greeting message (optional), Store currency, Business type and What the business does. If you pick Other as the business type, describe it.
-
Under Persona & guardrails, fill in Allowed topics, Forbidden topics, Off-topic response and Escalation triggers as needed.
- Select Tone. Pick a tone and a Response length: Short, Medium or Long.
- Click Save changes. The message AI agent saved. appears.
Add a persona, extra notes and a custom tone
- Select Business Profile in the list on the left.
- Under Persona & guardrails, type a Persona statement, for example
You are Meera, our support assistant. - Type Additional notes for anything the agent must always or never do that does not fit the other boxes.
- Select Tone. Pick a tone and a Response length.
- Click Advanced tone settings to open it.
- Type Custom tone instructions, for example
Always answer in Hinglish. Address customers as "ji". - Click Save changes.
Add knowledge
- Select Knowledge.
-
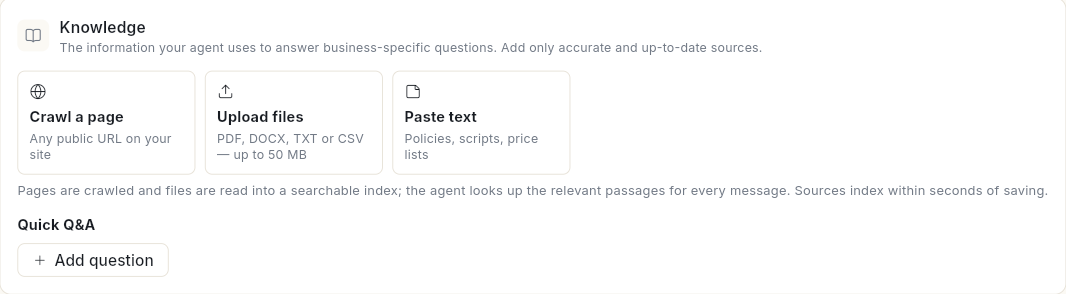
Add a source:
- Crawl a page — any public URL on your site.
- Upload files — PDF, DOCX, TXT or CSV, up to 50 MB each.
- Paste text — policies, scripts or price lists.
-
Under Quick Q&A, click Add question and type a question and its Answer.
- Click Save changes. Sources index within seconds of saving.
If a source shows Not indexed yet — use Re-index all, click Re-index all.
Add a page, a file or text by name
- Select Knowledge.
- To add a page, click Crawl a page. In the Crawl a page window, type a Name and the Page URL, then click Add.
- To add text, click Paste text. In the Paste text window, type a Name and the Text, then click Add.
- To add a file, click Upload files and pick a PDF, DOCX, TXT, CSV or MD file. The message [file name] added — save to index it. appears.
- Click Save changes to index the new sources.
- To remove a source, click the trash icon (Remove), then click Save changes.
The link to an uploaded file lasts 7 days. After that, upload the file again to re-index it. See Review and correct AI agent answers.
Add images the agent may send
- Select Images in the list on the left.
- Type the picture's web address in Image URL, for example a product shot, a menu or a brochure. To upload a file first, use the Media Library.
- Click Add. The image appears in the list.
- To stop the agent sending an image, click the trash icon (Remove) beside it.
- Click Save changes.
Product images appear here once you add products.
Choose skills
- Select Skills. Each skill is a job the agent can do.
-
Expand a skill and click Configure to set it up:
Skill What it does FAQ / Support Answers general questions from your knowledge. Human Handoff Hands the chat to your team when the customer asks for a person, is frustrated, or raises something out of scope. Lead Qualification Asks your questions to a prospect and can push the lead to your CRM. Order Status Looks up an order through a connected action and reports its status. -
To add your own job, click Add custom skill under Custom skills.
Products, Payments, Meta Ads and Voice calls in the same list let the agent recommend products, send payment links, answer ad-driven chats and work with a calling agent.
Say when a skill is used and what it collects
Every skill has the same 2 boxes.
- Select Skills, expand a skill and click Configure.
- In When it is used, describe the moment, for example
The customer asks about delivery times or shipping charges. - Under Information to collect, click Add question.
- Type the Question the agent asks, for example
Which city are you in? - Type Save as attribute, for example
City. Each answer is saved on the contact under that attribute. - Tick the box on the skill to turn it on.
- Click Save changes.
Set up Lead Qualification
- Expand Lead Qualification and click Configure.
- Type the First qualifying question.
- Type Question 2 and Question 3.
- Under Questions to collect, type each detail the agent gathers before it hands the lead to your team, then click Add. [VERIFY: example text for this box]
- Optional: type Template the agent can send (optional). Use an approved template name.
- Optional: type Use when contacts arrive from this ad. Leave it as Any / no ad for all ads.
- Optional: tick Push qualified leads to your CRM (optional).
- Click Save changes.
Add a custom skill
- Under Custom skills, click Add custom skill. A new skill card opens.
- Type an Icon, for example one emoji.
- Type a Skill name, for example
Book a demo. - Type Step-by-step instructions. Number the steps, for example
1. Ask which product… - Fill in When it is used and Information to collect, as above.
- Tick the box on the card to turn the skill on.
- To remove the skill, click Delete skill.
- Click Save changes.
Let the agent recommend products
- Select Products.
- Turn on Agent can recommend products.
- To bring products from your store, click Sync from your store. The integrations screen opens.
- To add one by hand, click Add product. The Add product window opens.
- Type a Name, a Price such as
₹4,999, and a Description. - Optional: type an Image URL (optional).
- Click Add.
- To remove a product, click the trash icon (Remove).
- Click Save changes.
With no products, the list reads No products yet. Add one by hand, or sync your connected store. To build a catalog first, see Set up your WhatsApp catalog.
Let the agent send payment links
-
Select Payments.
-
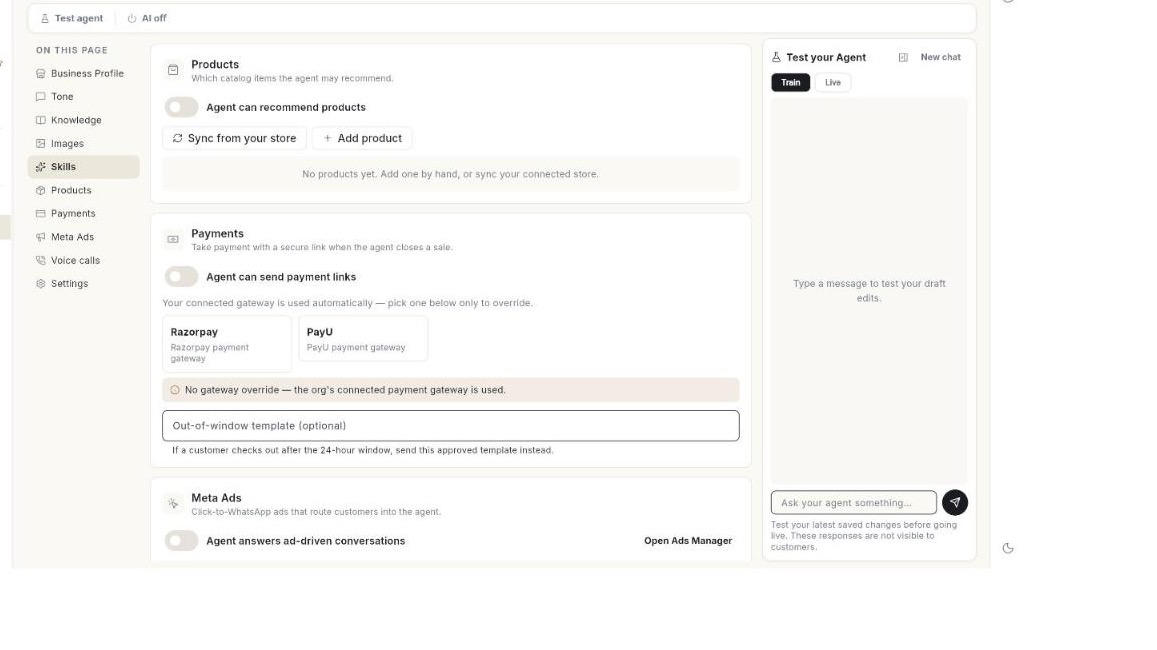
Turn on Agent can send payment links.
- Optional: click Razorpay or PayU to use that gateway. Click it again to clear the choice.
- Optional: type an Out-of-window template (optional), for example
order_payment_reminder. The agent sends this approved template if a customer checks out after the 24-hour window. - Click Save changes.
With no choice made, the page shows No gateway override — the org's connected payment gateway is used.
Send ad chats to the agent
-
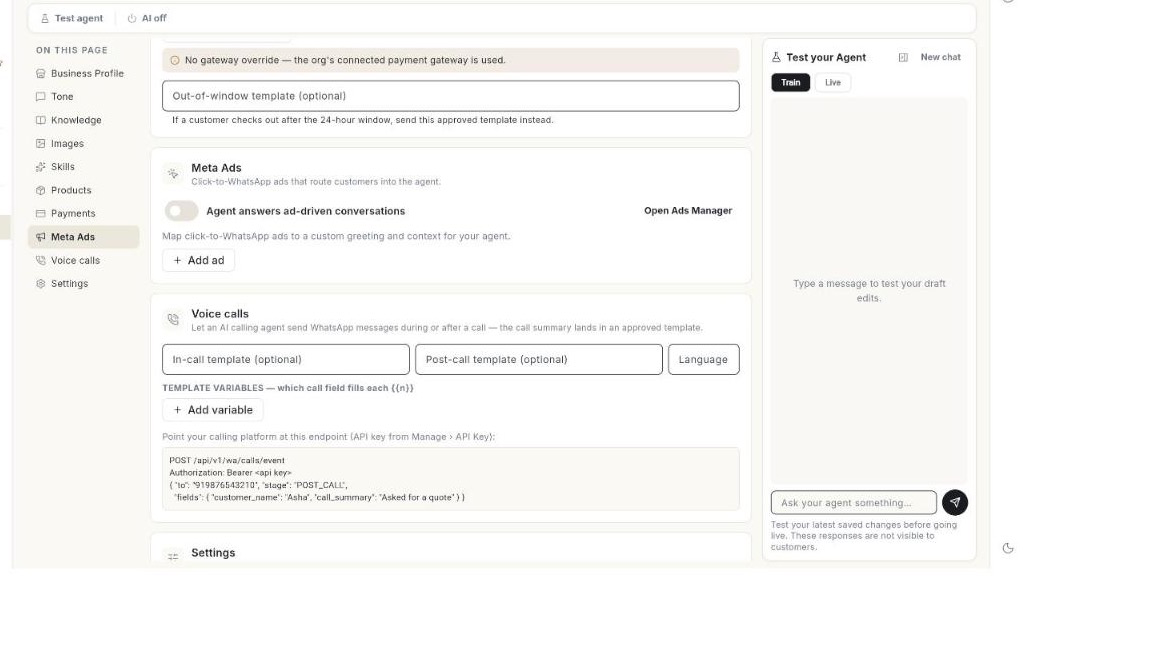
Select Meta Ads.
-
Turn on Agent answers ad-driven conversations. Click Open Ads Manager to see your ads. See Create an ad.
- Click Add ad. The Add ad window opens.
- Type the Ad name / id.
- Type a Custom greeting for people who come from that ad.
- Type Context for the agent, so it knows what the ad promised.
- Click Add.
- To remove an ad, click the trash icon (Remove).
- Click Save changes.
Connect voice calls
Use this when an AI calling agent should send WhatsApp messages during or after a call.
- Select Voice calls.
- Type an In-call template (optional) and a Post-call template (optional). Use approved template names.
- Type the Language, for example
en_US. - Under Template variables, click Add variable.
- In {{n}}, type the variable number, for example
1. - In Call field, type the call detail that fills it, for example
customer_name,call_summaryoragent_name. - Open Manage → API Key and copy your API key.
- Point your calling platform at the endpoint shown on the page, with the key as a bearer token.
- Click Save changes.
The page shows this example:
POST /api/v1/wa/calls/event
Authorization: Bearer <api key>
{ "to": "919876543210", "stage": "POST_CALL",
  "fields": { "customer_name": "Asha", "call_summary": "Asked for a quote" } }
For calling on your WhatsApp number, see WhatsApp Calling.
Add an API action
An action lets the agent look up live information or finish a task, such as an order status or a new lead.
- Select Settings. Scroll to Actions.
- Click Add custom API action. The window opens.
- Optional: paste a cURL command into Paste cURL (optional), then click Fill from cURL. It fills the method, URL, headers, body and a bearer token.
- Type an Action name, for example
Check order status. - In When should the agent call it?, describe the moment, for example
The customer asks where their order is and gives an order number. - Type an Intent group, for example
orders,appointmentsorcrm. - Choose a Sensitivity: Low — runs without asking or High — confirm first.
- Choose a Method: GET, POST, PUT, PATCH or DELETE.
- Type the URL, for example
https://api.example.com/orders/{{order_id}}. - Type Headers and Query params, one per line as
Key: value. - For POST, PUT or PATCH, type the Body, for example
{"order_id": "{{order_id}}"}. - Choose Authentication: None, Bearer token, Basic auth or API key (header). Fill in the boxes that appear.
- Under Variables, click Add variable. Type a Name, for example
order_id, and What it is. - Type Examples (one per line, 1–5), for example
Customer: "where is order 1001?" → order_id=1001. - Optional: type sample values in Test call — sample values (name=value per line), then click Test call. The result shows the HTTP status and body, or the error.
- Click Add. When you edit an action, the button reads Save.
An action needs a name and a URL. A shield icon marks a High sensitivity action. Use the pencil (Edit) and trash (Remove) icons beside an action to change or delete it. Click Save changes on the page to keep your actions.
Test before you save
Test call sends a real request to your URL. Use sample values that are safe to send.
Set the handoff to a human
- Select Settings.
- Under Hand off to a human, type the Trigger phrases that start a handoff, for example talk to a human.
- Type the Handoff message the customer gets.
- Optional: under Handoff webhook (optional), add a Webhook URL to tell your helpdesk or CRM about each handoff.
- Type a Fallback message for when the agent has no answer.
A handed-off chat moves to the inbox and your team is notified. See Use the WhatsApp inbox.
Secure the handoff webhook
- Select Settings. Under Hand off to a human, find Webhook URL.
- Type an Authorization header (optional), for example
Bearer …. - Type Extra headers (JSON, optional), for example
{"X-Source":"whatsapp"}. - Click Save changes.
Ohanvi sends each handoff as JSON with these fields: event, orgId, phone, contactName, reason, lastMessage and at.
Test the agent
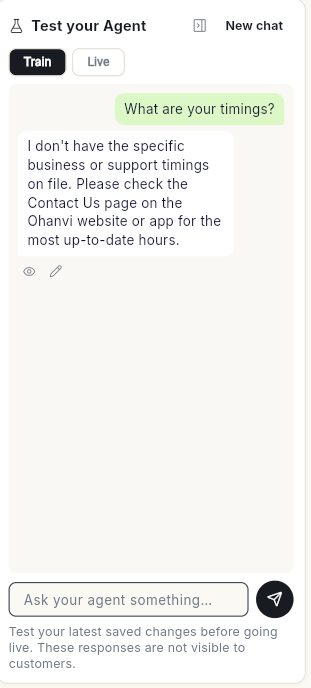
- Click Test agent. The Test your Agent panel opens.
-
Keep Train selected to test your latest saved changes. Type in Ask your agent something… and read the reply. Test replies are not visible to customers. Click New chat to start over.
-
If an answer is wrong, click the pencil icon under the reply (Correct this answer), type What the agent should say, then click Save & teach.
Go live
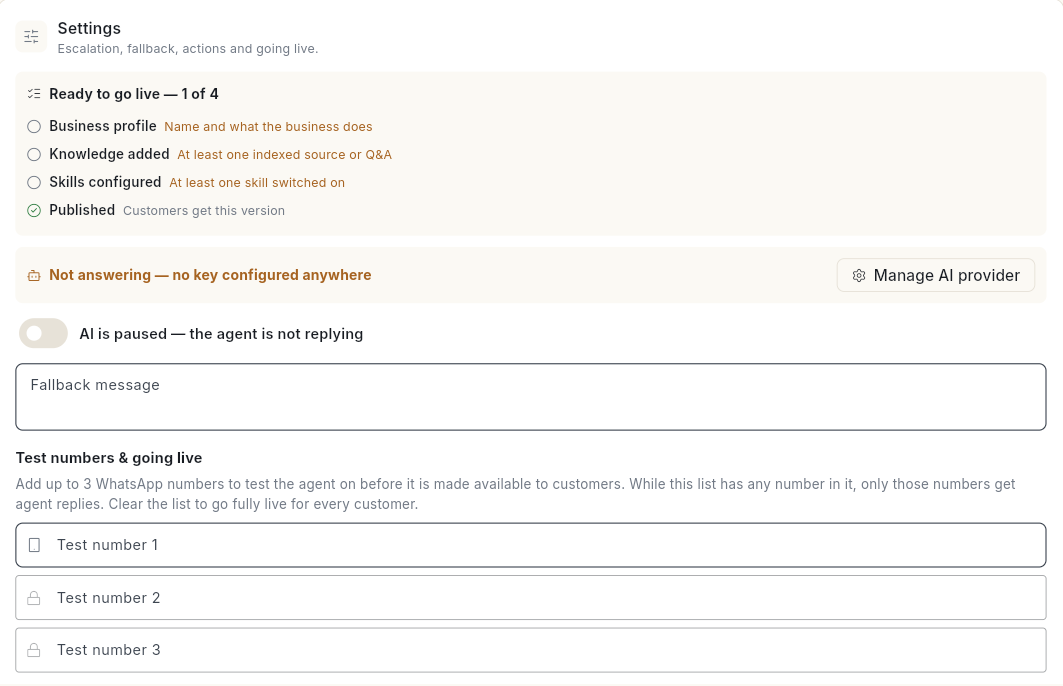
- Under Settings → Test numbers & going live, add up to 3 WhatsApp numbers to try the agent first. While the list has a number, only those numbers get agent replies.
-
Check Ready to go live. It shows how many are done, for example 1 of 4, and lists Business profile, Knowledge added, Skills configured and Published. If Not answering — no key configured anywhere shows below it, click Manage AI provider and add a key first.
-
Click Publish & go live. The message Published — customers now get this version. appears.
- Turn the agent on with Turn AI on. The status shows AI is live.
- When you are ready for every customer, clear the test numbers.
To stop the agent, click Pause AI. Saved changes reach customers only after you publish.
Video walkthrough
[VIDEO]
Troubleshooting
| Issue | Cause | Fix |
|---|---|---|
| Tell us your business type — "Other" needs a description. | Business type is Other with no description. | Describe your business type, then save. |
| Enter your website first. | Website is empty. | Type your site address, then click Regenerate from site. |
| Could not draft anything from that site. | The site could not be read. | Fill in What the business does by hand. |
| Files must be 50 MB or smaller. | The file is too large. | Split or compress the file. |
| Customers get old answers | Your changes are saved but not published. | Click Publish & go live. |
| The agent stopped replying | Your credits ran out, or only test numbers get replies. | Recharge, and clear the test numbers. See When credits run low or run out. |