Manage contacts
Add people to Ohanvi, find them fast, and keep each record correct. At the end you will have contacts that WhatsApp, Email and CRM all read from the same record, tagged, grouped and free of duplicates.
Before you start
- You can see Contacts in the left rail. If not, ask your admin to give your role access to CRM contacts. See the Settings overview.
- To merge contacts, your role also needs update access to contacts. Without it, Merge into… shows (no permission).
- On a narrow window or a phone, All contacts shows a simple grid instead of the three panes described here. The same actions are available from each row.
Steps
Open your contacts
-
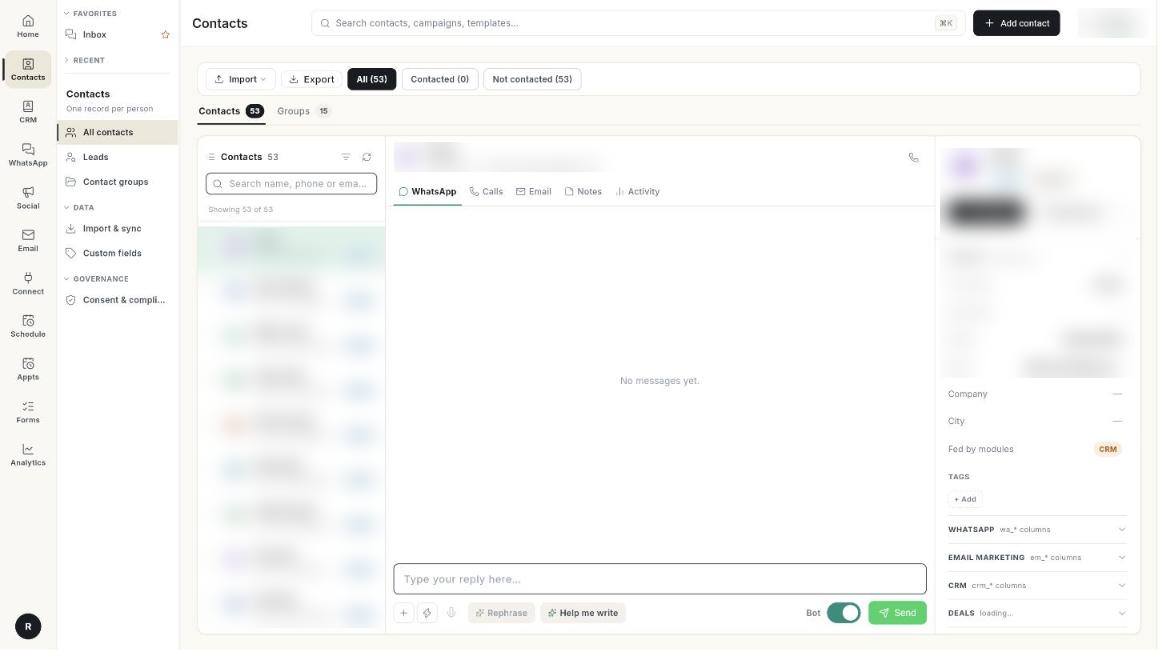
Open Contacts in the left rail, then select All contacts.
-
The screen shows 3 panes: the contact list on the left, the conversation in the middle, and the contact record on the right.
- To see saved lists instead of people, click the Groups tab above the list. See Create and manage contact groups.
If you have no contacts yet, you see No contacts yet with Import contacts and Connect WhatsApp. Anyone who messages your connected WhatsApp number becomes a contact on their own. A number new to you also appears on CRM → Leads. See Work with leads.
Add a contact
Adding a contact also starts follow-ups
When you add a person here, Ohanvi creates the contact and starts their follow-ups. See What Add contact does with follow-ups.
- Click Add contact in the top bar. The Add Contact form opens.
- Under Basic Information, type the First Name. It is the only required field.
- Fill in Last Name, Email, Phone and Mobile as needed.
- If the phone or email already belongs to someone, a warning appears at the top, for example +91 9820041122 already belongs to Priya Nair. Click Open that contact to check that record.
- Fill in Work details: Designation, Department, Account and Lead Source.
- Under Personal & Consent, set Date of Birth, and tick Do Not Call or Email Opt-out if the person asked for that.
- Add the Address and any Description under Notes.
- Click Submit. The message Contact created appears and the contact shows in the list.
Note
The duplicate warning does not block saving. Two people can share an office phone. If you did create a duplicate by mistake, merge the two records (see below).
What Add contact does with follow-ups
When you click Submit on Add Contact, the person is a contact straight away, and their follow-ups start. The message Contact created. Follow-ups started. appears.
- A linked lead appears on CRM → Leads, with the source Contacts list, the status Qualified and you as owner.
- Step 1, First call, is already done. If your admin added more steps to Phase 1, they are planned from today.
- If Phase 1 has only First call, nothing else runs. The person shows Waiting for you until you mark them converted or lost.
- If the person is already in the flow, nothing is added twice.
- If the follow-ups cannot be started, the contact is still created.
An import into Contacts adds contacts but starts no follow-ups. See Import and sync contacts.
Adding a contact from the WhatsApp or Email areas is not affected. Nothing starts there.
To read what the follow-ups do, see Work with leads.
Find a contact
- Type in Search name, phone or email… above the list. The list narrows as you type.
- Click a pill above the list to show All, Contacted or Not contacted contacts. Each pill shows its count.
- For more filters, click the filter icon (Filter contacts). The Filter Contacts dialog opens.
- Pick a Last seen window or a Created at window: In 24hr, This Week or This Month. Turn on Opted in to show only people who agreed to WhatsApp messages.
- Click Apply. To remove every filter, click Clear filters above the list.
Read and edit a contact
- Click a contact in the list. Their WhatsApp chat opens in the middle and their record on the right.
- In the middle pane, switch between the WhatsApp, Calls, Email, Notes and Activity tabs to see their history.
- In the record, the Identity block is open. Change First name, Last name, Phone, Email or City directly in place.
- As soon as you change a field, the Add contact button becomes Update contact. Click Update contact to save. The message Contact updated. appears.
- Open the WhatsApp, Email marketing and CRM blocks for channel details such as Conversation status, Subscription and Owner. The Deals and Appointments blocks show linked records.
If you click another contact before saving, the Unsaved changes dialog asks what to do: Keep editing, Discard or Save & switch.
Set a contact's level
- Click the level badge in the record header, for example New.
- Pick New, Awaiting reply, Replied, Customer or Cold. The message Level set to … confirms it.
Tag a contact
- In the Identity block, under Tags, click + Add. The Add or remove a tag dialog opens.
- Choose which list the tag belongs to: WhatsApp or Email. The two channels keep separate tag lists.
- Type the tag in Tag, for example
Festive. - Click Add. To take the tag off instead, click Remove.
Message, call or log activity
- In the record header, click Message to send a WhatsApp message, or Broadcast to open the broadcast composer.
- Click More actions (the … button) for the other actions: Call Now, Call on Mobile — send this number to your phone, Send Welcome Email, Send WhatsApp, WhatsApp Call and Notes & Activities.
- For the steps of each action, see Call contacts and review your calls, Call many contacts in a row with Auto Calling and Send a welcome email to a contact.
Merge duplicate contacts
- Open the contact you want to remove, then click More actions → Merge into…. The Merge "…" into… dialog opens.
- In Surviving record, pick the contact to keep.
- Read the note, then click Merge.
Merging cannot be undone
Blank fields on the surviving record are filled from the other contact. Its notes, activities and group memberships move over, and then the other contact is deleted.
Act on many contacts at once
- Tick the checkbox next to each contact. A bar appears above the list, for example 3 selected.
- Click Add to segment to put them in a group. In Add to which group?, pick a group. The message Added 3 to … confirms it. Only groups filled by hand are offered, not groups filled by a rule.
- For more, click More bulk actions (the … button) and choose Add or remove a tag, Opt in to marketing, Opt out of marketing, Exclude from broadcasts or Include in broadcasts.
- Click Clear to untick everyone.
Export contacts
- Click Export in the toolbar above the list.
- Ohanvi downloads an Excel file named
CrmContacts.xlsx.
Note
Export selected in the selection bar downloads the same full contact list, not only the ticked contacts. Filter the file in Excel if you need a subset.
Video walkthrough
[VIDEO]
Troubleshooting
| Issue | Cause | Fix |
|---|---|---|
| Please fill the following required fields: First Name | The form was submitted without a first name. | Type a First Name and click Submit again. |
| … already belongs to … warning in the form | Another contact has the same phone or email. | Click Open that contact. If it is the same person, cancel and edit that record instead. |
| Could not update the contact — please try again. | The in-place edit did not save. | Check your connection, then click Update contact again. |
| Merge into… (no permission) is greyed out | Your role cannot update contacts. | Ask your admin for update access to CRM contacts. |
| No hand-picked group to add them to. | All your groups are filled by a rule, or you have none. | Create a group without a rule first. See Create and manage contact groups. |
| The middle pane says No WhatsApp number | The contact has no phone or mobile number. | Add a Phone in the Identity block, then click Update contact. |