Manage WhatsApp integrations
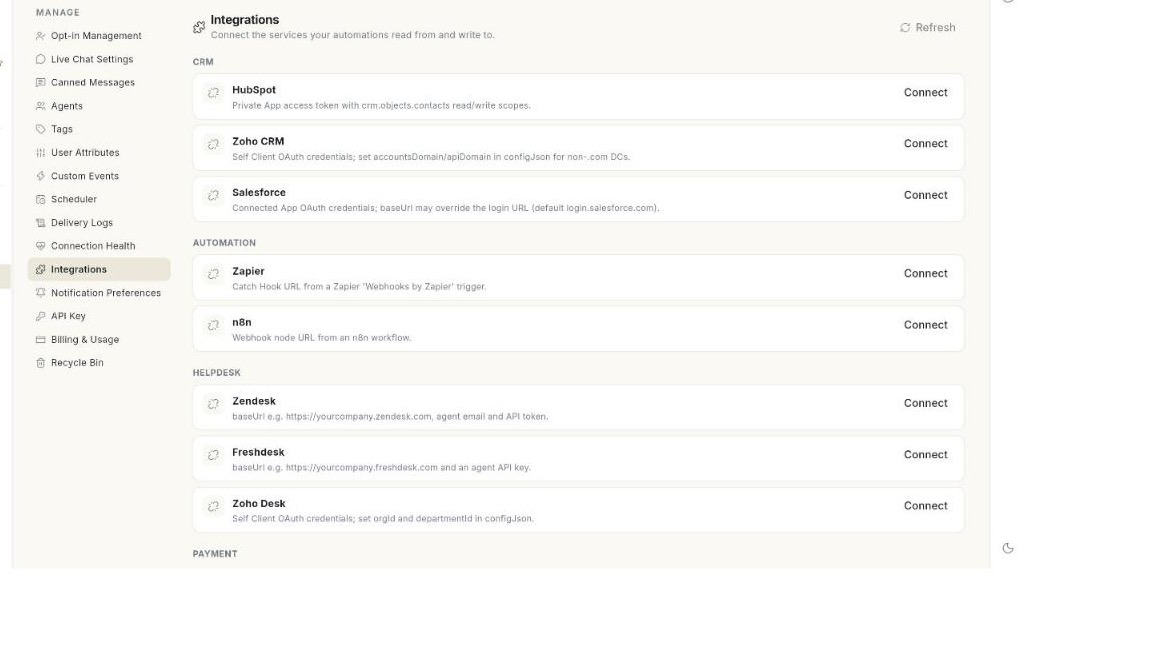
Open Integrations in Manage to connect the outside services your WhatsApp automations use. At the end, a service shows Connected, you have tested it, and you know how to change its details or remove it. Connecting takes about 2 minutes.
Before you start
- Your role can open WhatsApp Manage. If not, ask your admin. See Manage team members, roles and permissions.
- You have the details the service asks for, such as a key or a token. Each service shows a short setup hint in its card.
- You know which automation will use the service. See Connect apps for flows.
What the Integrations screen shows
The screen is titled Integrations. Under it you read Connect the services your automations read from and write to. Services are grouped under a heading in capital letters, one heading per category.
| What you see on a card | What it means |
|---|---|
| Connected | The service is connected and switched on. |
| Paused | The service is connected but switched off. |
| A red status label | The last connection check did not return OK. Run Test. |
| Set up under AI Settings. | This service is set up on the AI settings screen. The card has no buttons. |
Steps
Connect a service
- Open WhatsApp in the left rail, then select Manage.
-
Select Integrations. The list of services opens.
-
Find the service. Read the setup hint under its name.
- Click Connect. A window opens with the name of the service as its title.
- Fill in each field. Fields for a key, secret, token or password hide what you type.
- If the window reads This integration needs no credentials — connecting is enough., there is nothing to fill in.
- Click Save. The message Integration saved. appears and the card shows Connected.
Field names
The window takes its fields from the service. A field named apiKey shows as Api key.
Test a connection
- Find a card that shows Connected or Paused.
- Click Test.
- Read the message that appears. It is the service's own answer, for example why a key was refused. If the service sends no text, the message reads Connection test finished.
- If you see a red status label on the card afterwards, click Edit and check the details.
Change the details of a service
- Find the connected service.
- Click Edit. The same window opens.
- Type the new values.
- Click Save. The message Integration saved. appears.
Leave a field empty to keep the value you saved before. [VERIFY: whether an empty field keeps the saved value]
Remove a service
- Find the connected service.
- Click Remove. The Remove this integration? window opens.
- Read the warning. Automations that depend on the service will stop working until it is connected again.
- Click Remove to confirm, or Cancel to keep it. The message Integration removed. appears.
Automations stop right away
Check which flows use the service before you remove it. You can get a removed integration back from the Recycle Bin. See Restore deleted items.
Reload the list
- Click Refresh at the top right of the screen.
- If the list does not load, the screen shows Could not load integrations. Click Retry.
Troubleshooting
| Issue | Cause | Fix |
|---|---|---|
| Could not save the integration. | A required field is empty or wrong, or the service could not be reached. | Check each field, then click Save again. |
| Could not reach the service. | The test could not connect. | Check your internet connection and the service's own status, then click Test again. |
| A card has no Connect button and reads Set up under AI Settings. | The service is configured on the AI settings screen, not here. | Open the AI settings. See Set up the WhatsApp AI agent. |
| A card shows a red status label | The last check failed, for example a key was revoked. | Click Test to read the reason, then Edit to fix the details. |
| Could not remove the integration. | The removal did not go through. | Click Refresh, then try Remove again. |
| The service you need is not in the list | Ohanvi does not offer it here. | Use a webhook or the API instead. See Webhooks and integrations. |