Check scheduled messages and delivery logs
The Scheduler holds every WhatsApp message set to go out later, and the Delivery Logs record what happened to each message sent. At the end, you can find a scheduled send, read its details, and trace any message from sent to replied or failed.
Before you start
- Your role can open WhatsApp Manage. See Manage team members, roles and permissions.
Steps
Read the Scheduler
- Open WhatsApp in the left rail, select Manage, then Scheduler.
- Filter at the top with All, Scheduled, Paused, Sent, Failed or Stopped. Each shows its count.
- Search with Search title, type or number…, then click an item. Its details open on the right.
The Schedule card shows the Name, how it Repeats, the Time slot, First send, Last sent, Sends on, its Status and Messages sent. Click Remove at the top to delete it.
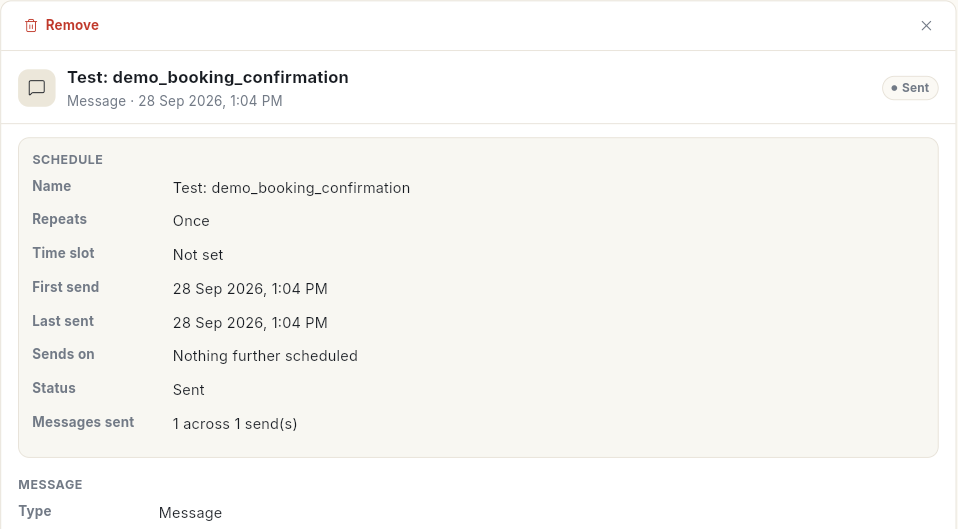
To schedule a new message, click Schedule above the list, or Schedule Message at the top right. Test messages also appear here, named Test: and the template name.
The cards above the list count Upcoming, Sent, Failed and Stopped. Upcoming counts the items the Scheduled filter shows.
For a calendar of everything scheduled across Ohanvi, see View everything scheduled. For repeating sends, see Manage recurring schedules.
Schedule a message
- In Scheduler, click Schedule Message. The Schedule Message window opens.
- Optional: type a Title (optional).
- Under Contact Group, pick one or more groups. The label reads Contact Groups (2 selected) once you pick 2. Members are picked up fresh at every send.
- Under Template, pick an approved template.
- Under Variables, fill each placeholder, or insert an attribute so every contact gets their own value. Add a fallback for contacts with no value.
- Under Repeat, choose Once, Daily, Weekly, Monthly, Yearly, Special Days or Holidays.
- Under Time slot, choose one of 6 windows of 4 hours, from 12:00 AM – 4:00 AM to 8:00 PM – 12:00 AM. The message goes out at the start of the window.
- Set Send date. For a repeating schedule it reads First send date. For Special Days and Holidays, pick the dates on the calendar instead.
- Optional: set End date (optional). Without one, the schedule runs until stopped.
- Optional: tick Also add to Google Calendar. Click Connect Google on the Scheduler page first.
- Check Message Preview, then click Schedule Message. The message Message scheduled. appears.
If something is missing, the form says what, for example Select at least one contact group. or Fill every template variable.
Change, pause or stop a schedule
Click an item in the list. Its buttons show above the details. Right-click an item to see the same actions as a menu.
- To move it, click Reschedule. Change Repeat, Time slot, the next date or the end date, then click Save. The message Schedule updated. appears.
- For a failed item, the same button reads Retry. Click Retry in the window to put the send back in the queue.
- To hold a schedule that has not gone out yet, click Pause. The message Schedule paused — nothing sends until you resume it. appears.
- To continue a paused schedule, click Resume. The message Schedule resumed. appears.
- To end a send that has not gone out, click Stop, then Stop it. The item stays in the list as Stopped.
- To start a stopped item again, click Restart. The message Schedule restarted. appears.
- To clear a finished item, click Remove, then Remove it. The message Removed from the scheduler. appears.
- If an item failed, click Copy error to copy the reason.
Removing is final
Remove takes a stopped or sent item off the list for good. A stopped item cannot be restarted after that. Messages already sent are not affected.
Only the 6 time slots can be used. A slot that has already passed today is refused: The … slot has already passed on that date — pick a later slot or date.
Read the Delivery Logs
- In Manage, select Delivery Logs.
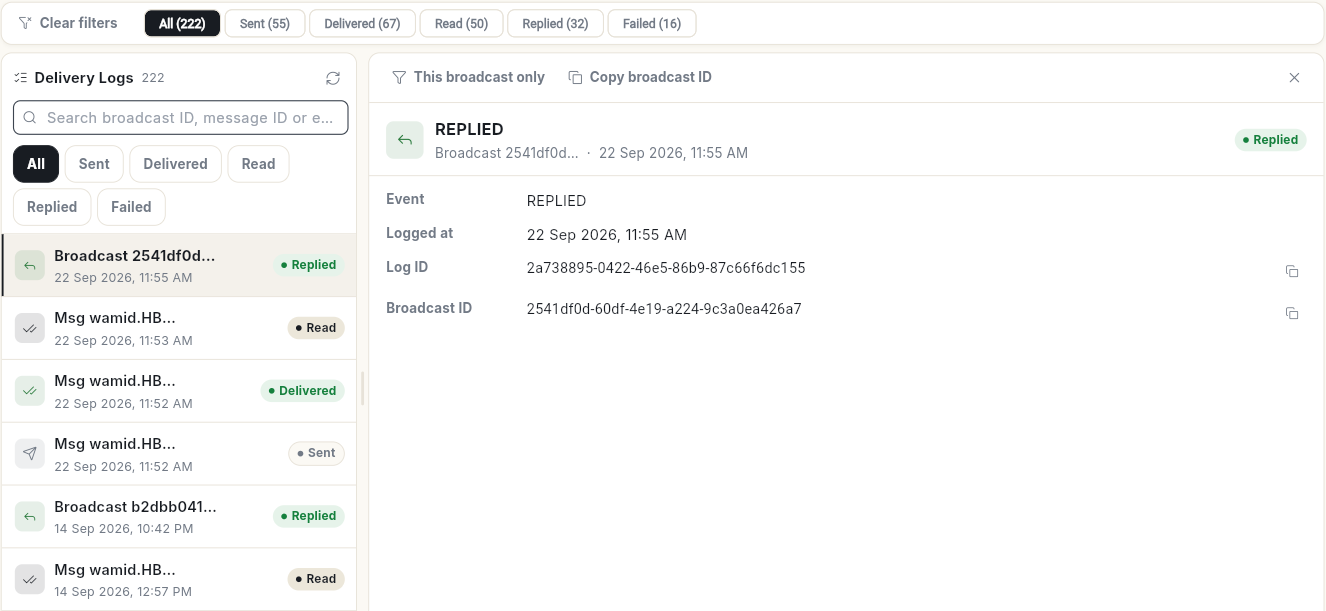
- Filter at the top with All, Sent, Delivered, Read, Replied or Failed. Each shows its count. Click Clear filters to start again.
- Search by broadcast ID, message ID or error, then click an entry. Its details open on the right.
Each entry shows the Event, when it was Logged at, the Log ID and the Broadcast ID. A failed message also shows its Error code and Error message. Click This broadcast only to see just that broadcast, or Copy broadcast ID to share it.
Failed messages
Delivery Logs only shows what happened. It has no button to send a failed message again. The Retry button on this page only reloads the list. To send again, use the campaign report. See Read a WhatsApp campaign report.
You can also reach the failed entries from the dashboard: Review failures → Open Delivery Logs. See Read the WhatsApp dashboard.
Video walkthrough
[VIDEO]