Set up server tracking
Add your website to Server tracking and install one script, so each event reaches Meta from the browser and from our server. Browsers and ad blockers drop many pixel events. The server copy lets Meta see more of your sales. Takes about 15 minutes.
Before you start
- Your Facebook account, Page and ad account are connected in Setup. See Run Click-to-WhatsApp ads.
- You have a dataset (pixel) on the ad account. See Track website events.
- You can edit your website's theme or code. On Shopify you can instead connect your store and install in 1 click.
- You know your website's domain, for example
myshop.com. If you use Shopify, also know your checkout domain, for examplemyshop.myshopify.com.
How it works
You add a website and get one tracking script. The script sends a PageView by itself. Each event goes to the browser pixel and, with the same event id, through our server to Meta's Conversions API. Meta keeps one copy. Orders from your store can also be reported from the server.
The tab shows your websites on the left and the selected website on the right. Each website has 4 tabs: Overview, Health, Install and Settings.
Steps
Add a website
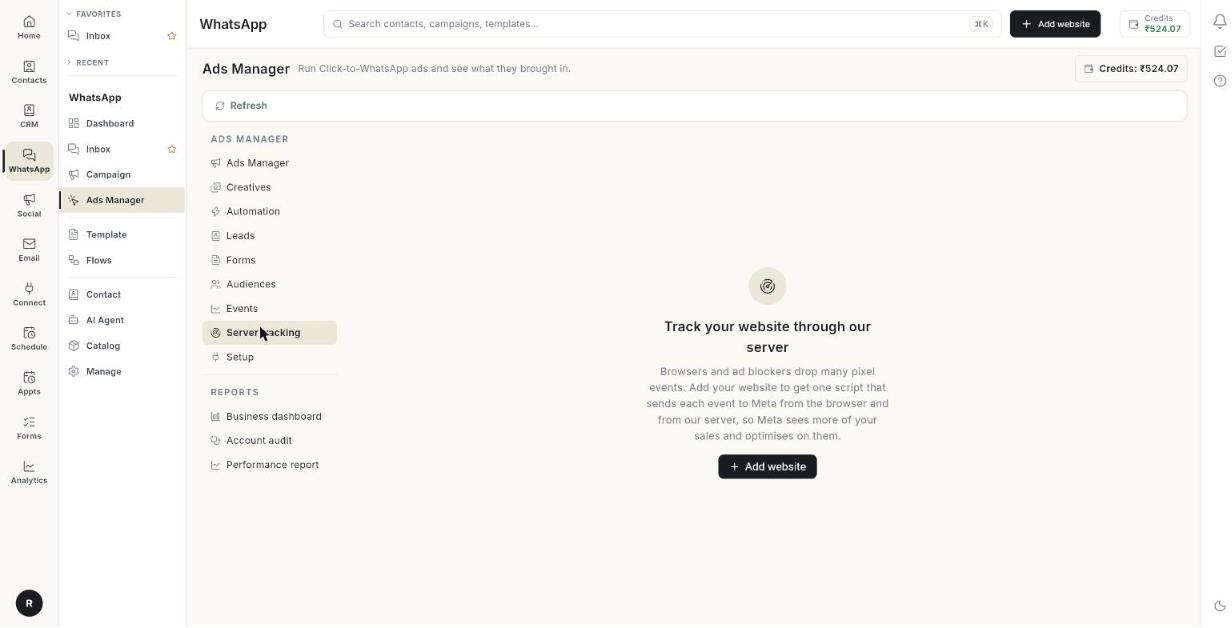
- Open WhatsApp in the left rail, then select Ads Manager.
-
Click Server tracking.
-
Click Add website. The Add website window opens.
-
Type a Website name *, for example
Main store. - Type your Domains *, for example
myshop.com, myshop.myshopify.com. Sub-domains are included. Events from any other site are refused. - Turn on This website already has the Meta pixel only if your site already loads a Meta pixel.
- Click Add.
If you leave a box empty, the message Name and domain are required. appears.
Two pixels can double-count events
If your site already has the pixel and you turn on the switch, the script sends server events only. Meta may count some events twice because your pixel's events carry different ids. Removing the old pixel and letting this script load it avoids that.
Install the script on every page
- Select the website, then click Install. The tab has 5 steps. Open each step to see it.
- Open step 1, Add the script to every page.
- Click the copy button on the Tracking script box. The message Script copied appears.
- Paste the script just before
</head>on every page. - On Shopify, paste it in Online Store → Themes → Edit code → theme.liquid.
- On WordPress, paste it with a header-scripts plugin or in your theme's header.
- Or, if your Shopify store is connected, click Install on Shopify. It installs the script on every store page with no theme edit. The message Installed on your Shopify store appears.
- To take it off Shopify, click Remove.
To send events other than PageView, call this from your site:
ohTrack('track', 'AddToCart', {value: 499, currency: 'INR'})
Track orders on the thank-you page
This links each order to the shopper's ad click. Purchases then reach Meta even when the browser pixel is blocked. Open step 2 on the Install tab and follow the platform you use.
On Shopify
- In Shopify admin, open Settings → Customer events.
- Click Add custom pixel and name it.
- Paste the Custom pixel code from step 2.
- Click Save, then click Connect.
- Add your checkout domain, for example
yourstore.myshopify.com, to this website's domains.
On WooCommerce
- Click Download WordPress plugin.
- In WordPress, open Plugins → Add New → Upload Plugin and upload the file.
- Click Activate. The plugin adds the script to every page and sends product views, add to cart, checkout and orders.
- Skip step 1 and the snippet.
If you use the PHP snippet for WooCommerce instead of the plugin, add it with a code snippets plugin or in the theme's functions.php. The script from step 1 must already be in the header.
On any other website
- Copy the code from the Thank-you page box.
- On the order confirmation page, after the tracking script, call
ohTrack('identify', …). - Then call
ohTrack('track', 'Purchase', …).
Test the connection
- In Meta Events Manager, open your dataset, then Test events. Copy the test code shown there.
- Open step 3 on the Install tab.
- Paste the code in Test event code. The hint reads e.g. TEST12345.
- Click Send test event.
- Read the result. Sent. Open Events Manager → Test events: a server PageView should appear within a minute. means it worked.
- Open your website. The dot beside it in the list turns green once our server receives its first event.
- Click Refresh to check the dot.
Watch live events
- Open step 4 on the Install tab.
- Click Watch live events. The view stays on for 30 minutes and refreshes every 5 seconds. Before the first event it reads Waiting for the first event….
- Open your website in another tab and click around.
- Read each row. It shows the time, the event name, the customer details it carried (never their values), the page, and what Meta did with it.
- Click Stop live view to end it early.
| Result | Meaning |
|---|---|
| Sent to Meta | Meta accepted the event. |
| Failed | Meta refused the event. The reason shows in the row. |
| Not sent here | The event is held back, for example by a setting. |
| Waiting | The event is queued. |
Verify your domain with Meta
Meta wants to know you own the website your ads send people to.
- Open step 5 on the Install tab.
- Read the status of each domain.
- For a domain that is Not in Business Manager, click Add to Business Manager.
- Prove ownership with a DNS TXT record on the domain. Click the copy icon to copy the TXT value.
- Or put the copied meta tag in the
<head>of the home page. - Click Open Business settings and press Verify there.
- Come back and click Check again to refresh the status.
Each domain shows one of these statuses:
- Verified
- Added, not verified yet
- Not in Business Manager
- Check in Business settings
The WordPress plugin adds the meta tag for you. Download it again after adding the domain. On Shopify, use the DNS record, or paste the meta tag into theme.liquid inside <head>.
Read the Overview
- Select the website, then open Overview.
- Read Status. It shows Receiving events, Waiting for the first event — install the script, or No events in the last 24 hours.
- Read Domains. These are the domains you added.
- Read Dataset. This is the dataset events go to. It shows None selected when empty.
- Read Browser pixel. It shows Loaded by this script, or Already on the site — the script sends server events only.
- Read Last event. This is the date of the last event.
- Read Website purchases. It shows Sent by us from your store orders, or Reported by your store's own Meta app.
- Read Received. These are events that reached our server.
- Read Sent to Meta. These are events Meta accepted.
- Read Failed. These are events Meta refused.
- Read the table below them. It lists Event, Received, Sent and Failed for each event name.
The counts cover the last 14 days, counted on our server. Pick Last 7 days, Last 14 days or Last 30 days above the counts to change it.
Check the tracking audit
- Select the website, then open Health. The Tracking audit is at the top.
- Read the score, for example 6 / 8 checks pass.
- Read each open check. It has a name, a detail and a fix.
- Click Open on a check to go to the tab or step that fixes it.
- After a fix, click Run again.
- Click Show 5 passed checks to see the checks that passed.
| Label | Meaning |
|---|---|
| Pass | The check is fine. |
| Fix this | Something is broken. Follow the line that starts with an arrow. |
| Check | Something may be wrong. Look at it. |
| Tip | An optional improvement. |
Read the health charts
- On Health, choose Last 7 days, Last 14 days or Last 30 days.
- Read Events through our server. It shows events per day, split into Sent to Meta and Failed.
- Read What Meta received. It shows the last 7 days as Meta counts them, Browser (pixel) against Server. Server events reach Meta even when an ad blocker stops the pixel.
- Read Purchases Meta credited to your ads. It shows Per day before, Per day since and Change, for the last 28 days. Meta can take up to 3 days to credit a sale.
- Read Store orders reported to Meta. It shows the share of orders sent as a Purchase. The lines are Sent, Waiting for COD confirmation, Not sent, Failed at Meta, and the reasons some were not sent.
- Read Meta match quality. This is Meta's Event Match Quality, from 0 to 10, for each event. Higher means more sales credited to your ads. Meta needs a few days of events before it shows a score.
If fewer than 6 in 10 orders come with the thank-you page details, check step 2 on the Install tab. Those orders still go, with less to match the buyer on.
Change the website settings
- Select the website, then open Settings.
- Change Website name * or Domains * to rename the website or change its domains.
- Choose a Dataset for the events. Ads account dataset uses the dataset of your ad account.
- Turn on This website already has the Meta pixel to send server events only.
- Optional: in Also send to datasets, type up to 5 dataset ids, separated by commas. Use it for an agency pixel and a brand pixel. Every event also goes to them.
- Turn on Wait for visitor consent if your site shows a cookie or privacy banner. Nothing is stored or sent until your banner calls
ohTrack('consent', 'grant'). - Call
ohTrack('consent', 'revoke')when a visitor says no. Browsers with Global Privacy Control are always sent as limited data use. - Optional: in Never send these events, type event names, for example
PageView, Search. They are dropped in the browser and on our server. - Turn on Don't send customer details to send no email, phone, name or address. Meta then matches fewer sales. When off, details are hashed before they leave our server.
- Click Save. The message Website saved appears.
Serve the script from your own sub-domain
Use Tracking sub-domain so browsers keep ad-click cookies longer and blockers see the script as your own site.
- Open Settings.
- Type the sub-domain in Tracking sub-domain, for example
track.myshop.com. This field is optional. - Click Save.
- At your domain provider, add a CNAME record. The name and value show under the box.
- Click Check DNS.
- When the line reads is verified, open Install and copy the script again. It now loads from your domain.
Choose how purchases are reported
Below the website form, Purchases — all websites and stores applies to every website. Each choice saves at once. The message Saved appears.
- Under website purchases, choose one option.
- My store's Meta app reports website purchases: keep this if Shopify's Facebook & Instagram app or another plugin already sends purchases. We still report sales from Click-to-WhatsApp ads.
- Send website purchases from our server: every online order goes to Meta from your store data and the thank-you page code.
- If you choose Send website purchases from our server, turn off purchase tracking in your store's Meta app first. Otherwise Meta counts each sale twice.
- Under Cash on delivery, choose when to report a COD order.
- Report when the order is placed: Meta learns from every COD order straight away.
- Report once the order is confirmed: sent once the store marks it shipped, paid or completed. Cancelled orders never count. Sent within 7 days of the order.
- Under Google Ads conversion, paste the resource name of a Google Ads conversion, for example
customers/1234567890/conversionActions/987654321. Store sales from a Google ad click are sent to it. Leave it empty to skip. - Click Save beside it.
Replace the script key or remove a website
- To make a new key, click New script key. The script on your website stops working until you paste the new one.
- Open Install and copy the script again.
- To stop tracking a website, click Remove website, then click Remove. Its script stops sending events. Past counts are kept.
A new script key stops the old script
Use New script key only if the key was misused. Copy the script again from Install afterwards.
Troubleshooting
| Issue | Cause | Fix |
|---|---|---|
| Connect your Meta ad account with a Set up now button | Setup is not finished. | Click Set up now and finish Setup. |
| Could not load your websites | The list did not load. | Click Retry. |
| Name and domain are required. | A box in Add website is empty. | Fill Website name * and Domains *. |
| Waiting for the first event — install the script | No event has reached our server. | Paste the script on every page, open your site, then click Refresh. Use Watch live events to see events arrive. |
| No events in the last 24 hours | The script was removed, or the site has no traffic. | Check the script is still on the page. Open the site and watch live events. |
| Paste the test code from Events Manager → Test events first. | Test event code is empty. | Copy the code from Meta Events Manager and paste it. |
| Meta did not accept the test event. | The test code is wrong or expired. | Copy a fresh test code and click Send test event again. |
| A domain shows Not in Business Manager | The domain was not added to your Business Manager. | Click Add to Business Manager, then verify in Open Business settings. |
| Could not read domains. | Meta did not return the domain list. | Click Check again. |
| Could not change live view. | The live view did not start or stop. | Click the button again. |