Add action blocks to a chatbot flow
Add blocks that do something in the background of a chat: save a value on the contact, tag them, call an API, pass the chat to an agent, let AI reply, move to another flow, or end the conversation. Each block takes about 2 minutes.
Before you start
- You have a chatbot flow open on the canvas. See Create a WhatsApp chatbot flow.
- For Jump to flow and Connect Flow, at least 1 other flow exists in WhatsApp → Flows.
- For Chat with agent, your team members are added. See Add WhatsApp agents.
What each block does
| Block | What happens in the chat |
|---|---|
| Set Attribute | Saves a value on the contact. |
| Add Tag | Tags the contact. |
| Condition | Sends the chat to a True or False exit. See Ask for name, phone, email and address, then wait or branch. |
| Connect Flow | Runs another flow, then comes back. |
| API Request | Calls an external API and keeps the reply. |
| Chat with agent | Hands the chat over to a human. |
| AI Reply | Lets AI write the reply. |
| Jump to flow | Moves the conversation to another flow. It does not come back. |
| End | Ends the conversation. |
Steps
Open the Actions blocks
- Open WhatsApp → Flows, then open your flow.
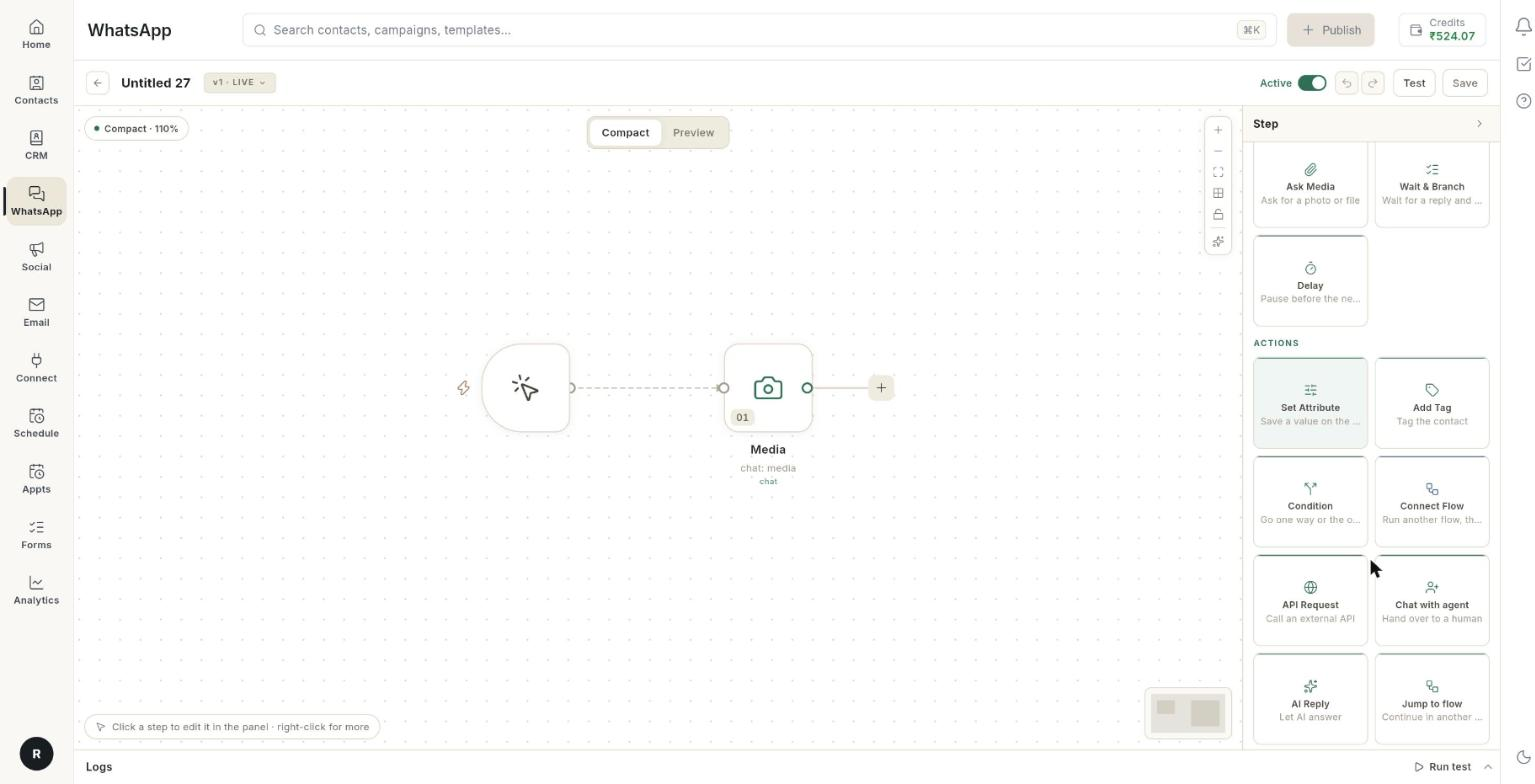
- Click the + after the block where the action should run. The Add a step after menu opens.
- Click All steps.
-
Find the Actions group. It holds all the blocks on this page.
-
Click the block you want. Its settings open in the right panel.
Save a value on the contact
- Add a Set Attribute block.
- In Question, type the text the block uses. The box shows
Type your question.... - Under Save the answer as, click Choose… and pick a name: name, contact_number, email, address, city, interests or goal.
- To use your own name, choose Custom…, type a name such as
company_name, and click Use. Use it in a message as{{company_name}}. - Under The answer should be, pick the type of value: Short text, Long text, Number, Email, Phone number, Date, Time, One choice, Several choices, Yes or no, A file, A location, A rating or An NPS score.
Set Attribute and Ask Question
[VERIFY: Set Attribute uses the same Question, Save the answer as and The answer should be fields as Ask Question.] See Create a WhatsApp chatbot flow for how a saved answer appears in a message.
Tag the contact
- Add an Add Tag block.
- In Tag, type the tag name. The box shows
tag name. - Check the tag in WhatsApp → Manage → Tags. See Manage tags, user attributes and custom events.
Run another flow and come back
- Add a Connect Flow block. The description reads Run another flow, then come back.
- In Step name, type what the step is for. This is optional.
- Under Which flow, open Runs and choose the flow.
- If the list is empty, the panel reads No other flows to run yet. Create another flow first.
The other flow runs to its end before this one continues.
Call an external API
- Add an API Request block.
- Next to Method, click the value to cycle through GET, POST, PUT, PATCH and DELETE. The default is GET.
- In URL, type the address, for example
https://api.example.com/orders/{{orderId}}. - In Headers (JSON), type any headers, for example
{ "Authorization": "Bearer …" }. - In Body (JSON), type the data you send, for example
{ "phone": "{{phone}}" }. - Under Save the answer as, choose the name that stores the reply, as in "Save a value on the contact".
Use a saved answer in the URL, headers or body with double curly braces, in small letters.
The API is called for every customer
The block calls the address each time a customer reaches it. Test with your own number first.
Hand the chat to an agent
- Add a Chat with agent block. On the canvas the card reads Handoff.
- Read the note in the panel: Handoff to agent. The block has no fields.
- Place it after the message that tells the customer a person will reply, for example
Connecting you to our team.
The conversation moves to Requesting in WhatsApp → Inbox, where an agent takes it. See Use the WhatsApp inbox.
Let AI reply
- Add an AI Reply block.
- Read the note: The AI writes this reply. The wording varies per customer. Test before publishing.
- In Guidance for the AI (optional), tell the AI what to answer, for example
Answer questions about our return policy in one short paragraph. - In Model (optional), type a model name. Leave it empty to use the default.
Continue in another flow
- Add a Jump to flow block.
- Next to Continue in, click Choose a flow. The Jump to which flow list opens.
- Pick the flow. The button now shows its name.
- If the list reads No other flows to jump to yet., create another flow first.
The conversation moves there and does not return. To come back afterwards, use Connect Flow instead.
| Need | Use |
|---|---|
| Run another flow, then carry on here | Connect Flow |
| Move to another flow and stay there | Jump to flow |
End the conversation
- Add an End block as the last block of a path. On the canvas the card reads End conversation.
- Read the note: Ends the conversation. The bot stops here and the session closes.
Save and publish
- Click Save. The chip reads DRAFT.
- Open the Test tab and click Check for your keyword.
- Click Publish.
- From your test phone, send the keyword and follow the path. Check the contact for the new tag or value.
Video walkthrough
[VIDEO]
Troubleshooting
| Issue | Cause | Fix |
|---|---|---|
| No other flows to jump to yet. | Your workspace has only this flow. | Create and save a second flow, then reopen Jump to flow. |
| No other flows to run yet. | Your workspace has only this flow. | Create a second flow, then reopen Connect Flow. |
| Could not publish — the step that needs fixing is marked on the canvas | A block is incomplete, for example no tag name. | Open the marked card, fill in the missing field, save and publish. |
| The AI answers differently each time | AI Reply writes new wording for each customer. | Add clear Guidance for the AI (optional), and test several times before you publish. |
| The bot does not continue after Chat with agent | The chat is now with an agent. The flow stops there. | Reply from WhatsApp → Inbox. |
| The API reply is not used in a later message | The reply is not saved under the name the message uses. | Check Save the answer as and use the same name in small letters, for example {{orderId}}. |