Set up Ads Manager
Connect your Facebook account, Page, ad account and WhatsApp number in Setup, and choose how Meta is paid for ad spend. At the end, the page shows Setup complete and Create Ad is ready to use. Setup is done once and takes about 10 minutes.
Before you start
- Your WhatsApp number is connected to Ohanvi. See Connect your WhatsApp number.
- You manage a Facebook Page and a Meta ad account. No ad account yet? Create one in Meta Business Settings → Ad Accounts.
- You can see Ads Manager in the WhatsApp panel. If not, ask your admin. See Roles and permissions.
What the Setup page shows
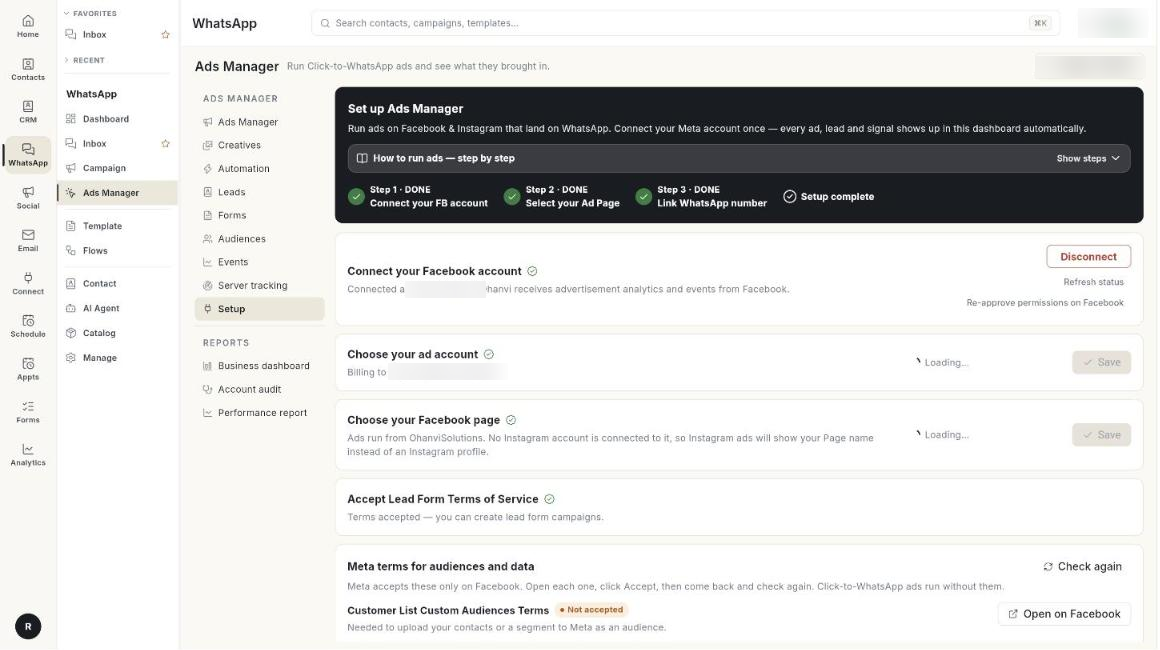
Open WhatsApp in the left rail, then select Ads Manager → Setup. The page title is Set up Ads Manager. The tab reads Setup · pending until all steps are done.
| Item | What it shows |
|---|---|
| Connect your FB account | Step 1. Shows DONE or PENDING. |
| Select your Ad Page | Step 2. Shows DONE or PENDING. |
| Link WhatsApp number | Step 3. Shows DONE or PENDING. |
| Setup complete | Appears when all 3 steps are DONE. |
| How to run ads — step by step | A short guide you open with Show steps and close with Hide. |
Steps
Connect your Facebook account
- Open WhatsApp in the left rail, then select Ads Manager.
-
Click Setup. The Set up Ads Manager page opens.
-
Under Connect your Facebook account, click Continue with Facebook.
- Log in with the Facebook account that manages your business.
- On Meta's screen, choose Opt in to all current and future for both Businesses and Pages.
- Return to Ohanvi. The message Facebook connected! appears and the card shows Connected as your Facebook name.
The card now reads Ohanvi receives advertisement analytics and events from Facebook.
Refresh or re-approve the Facebook connection
- On the Connect your Facebook account card, click Refresh status to reload the connection after you change something on Meta.
- If Meta shows an opt-in error, click Re-approve permissions on Facebook.
- On Meta's screen, choose Opt in to all current and future again for Businesses and Pages.
Use the Business login when Facebook refuses the login
- On the card, open Facebook refused the login?
- Read Permissions requested:. If Meta names one as an invalid scope, that permission must be added in the Meta App Dashboard. [VERIFY: who adds the permission in the Meta App Dashboard — Ohanvi or the customer]
- Or click Use the Business login. It takes its permissions from Meta Business settings.
Pick your Page and ad account
- Under Choose your Facebook page, open Choose your page and pick the Page your ads will run from.
- Check the line under the Page. If an Instagram account is linked, it reads Instagram ads run as @your_username.
- If none is linked, the line reads No Instagram account is connected to it, so Instagram ads will show your Page name instead of an Instagram profile. If you linked an Instagram account to the Page recently, reload Setup. Ohanvi asks Meta again and shows the account when it finds one.
- Under Choose your business portfolio, open Business portfolio and pick the Meta business that owns your ad account.
- Under Choose your ad account, open Ad account and pick the account your campaigns are billed to.
- Click Save. Each card now shows what you chose, for example Billing to and the ad account.
Tip
If two Pages have the same name, the list shows Name - id. Pages from another business are grouped under Other Pages.
Accept the Meta terms
- Find Accept Lead Form Terms of Service.
- Tick I accept the Terms of Service for Lead Form Ads.
- Click Accept Terms. The status changes from Not accepted to Accepted.
You need this only for lead form ads. Click to WhatsApp ads run without it.
Next, accept the audience and data terms:
- Find Meta terms for audiences and data. It lists more terms.
- Click Open on Facebook next to each term and accept it on Facebook. Meta accepts these only there.
- Return to Ohanvi and click Check again. Ohanvi asks Meta again each time, so a term you just accepted should change to Accepted.
- When all are accepted, the card reads All set. Contact audiences and chat conversion events can reach Meta.
Click to WhatsApp ads run without these terms.
Link your WhatsApp number
- Under Link WhatsApp Number, open WhatsApp number and pick the number where leads should land. Only numbers already connected in WhatsApp setup appear.
- Click Send code. The message Code sent to … on WhatsApp. appears.
- Type the code in Code from WhatsApp. Click Resend if it does not arrive.
- Click Verify. The message WhatsApp number linked to your page. appears.
Linking the number to your Page makes an ad open a chat with you. To change the number later, click Link another number.
Pay for the ads
The Credits & billing card shows how ad spend is paid. It lists Credits balance (shared), Old ads credits, Meta payment method, Total ad spend and Unbilled spend. The card sits on the Performance report page.
Choose one way to pay:
- Add Meta payment method: add a card or UPI on the ad account at Meta. Meta bills it directly. If a method is on file, the page shows Billing ready.
- Pay with Ohanvi: Meta bills Ohanvi, and the spend comes off your Ohanvi credits. Ohanvi adds a 2% fee on the ad spend, taken from your credits too.
Add credits
- Click Buy Credits. The Add money to Ads Credits window opens.
- Type an Amount (₹). The minimum recharge is ₹10.
- Click Pay with Razorpay. A payment page opens with UPI (scan the QR), card and netbanking. [VERIFY: netbanking shown on the payment page]
- If a recharge is pending, click Pay now to finish it, or I have paid — check after you pay.
Turn on Pay with Ohanvi and set a spend cap
- On the Pay with Ohanvi card, click Turn on.
- Click Change cap. The Spend cap window opens.
- Type the Cap (₹).
- Click Save. The message Spend cap updated. appears.
The cap is the most this ad account may spend on Ohanvi's credit line. Meta stops delivery when it is reached. The cap is limited by your credits balance, so add money first.
Pause, resume or turn off Pay with Ohanvi
- To stop spending for a while, click Pause on the Pay with Ohanvi card. The card shows Paused.
- To start spending again, click Resume.
- To return to the payment method at Meta, click Turn off.
Turn off Pay with Ohanvi
Turning it off sends billing back to the payment method at Meta. Turning it on later creates a new allocation, which is checked again.
Disconnect Facebook
- On Connect your Facebook account, click Disconnect.
- Read Disconnect Facebook? and click Disconnect.
Ad analytics and ad launching stop until you connect again. Your Page, terms acceptance and WhatsApp number are kept. To reconnect, click Continue with Facebook once.
Check that setup is complete
- Look for Setup complete at the top of the page.
- Check that the Create Advertisement card reads You are all set — click Create Ad to start receiving leads.
- Click Create Ad to continue. See Create an ad.
Video walkthrough
[VIDEO]
Troubleshooting
| Issue | Cause | Fix |
|---|---|---|
| Please select OPT-IN to all for Business and Page to proceed. | On Meta's screen, not every Business and Page was opted in. | Click Continue with Facebook again. Choose Opt in to all current and future for both. |
| Facebook closed without connecting. | The Facebook window was closed, or Meta showed Invalid Scopes. | Click Continue with Facebook again. If Invalid Scopes shows, click Use the Business login. |
| Facebook is connected, but ads access is still pending | The login did not include permission to manage ads. | Your Page and WhatsApp steps still work. Ad creation turns on when Meta approves the permission. |
| Facebook login could not start. Reload the page and try again. | The login did not open in the browser. | Reload the page and click Continue with Facebook. |
| Enter the code Meta sent to your WhatsApp. | Verify was clicked with an empty code field. | Type the code from WhatsApp, or click Resend. |
| The Page list is empty, or a Page is greyed out with no WhatsApp number. | Meta has not given Page access, or the Page has no linked number. | Click Re-approve permissions on Facebook. Then link the number for that Page. |